
| “This site contains affiliate links for which OEMDTC may be compensated” |
NHTSA Campaign Number: 17V759
Manufacturer Daimler Trucks North America LLC
Components SERVICE BRAKES, AIR
Potential Number of Units Affected 3,007
Improperly Torqued Brake Caliper Mounting Bolts
If the calipers detach, there would be reduced braking performance, increasing the risk of a crash.
Summary
Daimler Trucks North America LLC (DTNA) is recalling certain 2018 Freightliner 108SD, 114SD, Cascadia, M2 Business Class vehicles, 2018 Western Star 4700, 4900 and 5700 vehicles, and 2018 Freightliner Custom Chassis (FCC) S2C 106 chassis and S2G Cab/Chassis vehicles. The brake caliper mounting bolts on these vehicles may not been properly tightened, potentially resulting in the caliper detaching.
Remedy
DTNA will notify owners, and dealers will inspect the bolts, replacing them as needed, free of charge. The recall began on December 29, 2017. Owners may contact DTNA customer service at 1-800-547-0712. DTNA’s number for this recall is FL-758.
Notes
Owners may also contact the National Highway Traffic Safety Administration Vehicle Safety Hotline at 1-888-327-4236 (TTY 1-800-424-9153), or go to www.safercar.gov.
| Daimler Trucks North America LLC |
Recall Campaign |
December 2017
FL758A-C
NHTSA
#17V-759 (Non-School Bus)
#17V-760 (School Bus)
Transport Canada #2017-580
Subject: Brake Mounting Caliper Bolts
Models Affected: Specific Freightliner Business Class M2, Cascadia,
Columbia, 108SD, and 114SD vehicles; Western Star 4700, 4900, and
5700 vehicles; and Freightliner Custom Chassis S2C, S2G, and B2
(Thomas Built Buses Saf-T-Liner C2) bus chassis manufactured
May 1, 2017, through October 31, 2017, and equipped with air disc brakes.
General Information
Daimler Trucks North America LLC (DTNA), on behalf of its Freightliner Trucks Division, and its wholly owned subsidiaries, Western Star Truck Sales, Inc., and Freightliner Custom Chassis Corporation, has decided that a defect that relates to motor vehicle safety exists on the vehicles mentioned above.
There are approximately 4,247 vehicles involved in this campaign.
On certain vehicles, insufficiently torqued fasteners may not provide adequate clamping force between the brake caliper and brake anchor plate, potentially resulting in reduced brake effectiveness, increasing the risk of a vehicle crash.
Fasteners will be inspected, and replaced as needed.
Additional Repairs
Dealers must complete all outstanding Recall and Field Service campaigns prior to the sale or delivery of a vehicle. A Dealer will be liable for any progressive damage that results from its failure to complete campaigns before sale or delivery of a vehicle.
Owners may be liable for any progressive damage that results from failure to complete campaigns within a reasonable time after receiving notification.
Work Instructions
Please refer to the attached work instructions. Prior to performing the campaign, check the vehicle for a completion sticker (Form WAR260).
Replacement Parts
Replacement parts are now available and can be obtained by ordering the part number(s) listed below from your facing Parts Distribution Center.
If our records show your dealership has ordered any vehicles involved in campaign number FL758, a list of the customers and vehicle identification numbers will be available in OWL. Please refer to this list when ordering parts for this recall.
Table 1 – Replacement Parts for FL758
| Campaign Number | Part Description | Part Number | Qty. per Part |
|---|---|---|---|
| FL758A& & C | SCREW-HEX,SOCKET HEAD,M16-2X110,12.9 | 23-13315-110 | 6 ea |
| FL758B | SCREW-CAP,SOCKET HEAD,M20X1.5X70 | 23-13843-070 | 4 ea |
Table 1
Removed Parts
U.S. and Canadian Dealers, please follow Warranty Failed Parts Tracking shipping instructions for the disposition of all removed parts. Export distributors, please destroy removed parts unless otherwise advised.
Labor Allowance
Table 2 – Labor Allowance
| Campaign Number | Procedure | Time Allowed (hours) | SRT Code | Corrective Action |
|---|---|---|---|---|
| FL758A-C | Inspect Caliper Bolts | 0.6 | 996-R005A | 06-Inspect |
| FL758A-C | Inspect a nd Replace Caliper Bolts | 1.0 | 996-R005B | 12-Repair Recall/Campaign |
Table 2
IMPORTANT: When the Recall has been completed, locate the base completion label in the appropriate location on the vehicle, and attach the red completion sticker provided in the recall kit (Form WAR260). If the vehicle does not have a base completion label, clean a spot on the appropriate location of the vehicle and first attach the base completion label (Form WAR259). If a recall kit is not required or there is no completion sticker in the kit, write the recall number on a blank sticker and attach it to the base completion label.
Claims for Credit
You will be reimbursed for your parts, labor, and handling (landed cost for Export Distributors) by submitting your claim through the Warranty system within 30 days of completing this campaign. Please reference the following information in OWL:
- Claim type is Recall Campaign.
- In the FTL Authorization field, enter the campaign number and appropriate condition code (e.g. FL758-A, FL758-B, etc.).
- In the Primary Failed Part Number field, enter 25-FL758-000. In the Parts field, enter the appropriate part number(s) as shown in the Replacement Parts Table. Group A requires the Bendix part number, Group B requires the Meritor WABCO part number, and Group C/TBB, requires the Bendix part number.
- In the Labor field, first enter the appropriate SRT from the Labor Allowance Table. Administrative time will be included automatically as SRT 939-0010A for 0.3 hours.
- The VMRS Component Code is 013-001-129 and the Cause Code is A1 – Campaign. Replacement of brake pads and/or caliper are considered progressive damage and a WSC ticket inquiry is required.
- S. and Canada — Reimbursement for Prior Repairs. When a customer asks about reimbursement, please do the following:
- Accept the documentation of the previous repair.
- Make a brief check of the customer’s paperwork to see if the repair may be eligible for reimbursement. (See the “Copy of Owner Letter” section of this bulletin for reimbursement guidelines.)
- Submit an OWL Recall Pre-Approval Request for a decision.
- Include the approved amount on your claim in the Other Charges section.
- Attach the documentation to the pre-approval request.
- If approved, submit a based on claim for the pre-approval.
- Reimburse the customer the appropriate amount.
IMPORTANT: OWL must be viewed prior to performing the recall to ensure the vehicle is involved and the campaign has not been previously completed. Also, check for a completion sticker prior to beginning work.
U.S. and Canadian dealers, contact the Warranty Campaigns Department via Web inquiry at
DTNAConnect.com / WSC, or the Customer Assistance Center at (800) 385-4357, after normal business hours, if you have any questions or need additional information. Export distributors, submit a Web inquiry or contact your International Service Manager.
U.S. and Canadian Dealers: To return excess kit inventory related to this campaign, U.S. dealers must submit a Parts Authorization Return (PAR) to the Memphis PDC. Canadian dealers must submit a PAR to their facing PDC. All kits must be in resalable condition. PAR requests must include the original purchase invoice number. Export Distributors: Excess inventory is not returnable.
The letter notifying U.S. and Canadian vehicle owners is included for your reference.
Please note that the National Traffic and Motor Vehicle Safety Act, as amended (Title 49, United States Code, Chapter 301), requires the owner’s vehicle(s) be corrected within a reasonable time after parts are available to you. The Act states that failure to repair a vehicle within 60 days after tender for repair shall be prima facie evidence of an unreasonable time. However, circumstances of a particular situation may reduce the 60 day period. Failure to repair a vehicle within a reasonable time can result in either the obligation to (a) replace the vehicle with an identical or reasonably equivalent vehicle, without charge, or (b) refund the purchase price in full, less a reasonable allowance for depreciation. The Act further prohibits dealers from selling a vehicle unless all outstanding recalls are performed. Any lessor is required to send a copy of the recall notification to the lessee within 10 days. Any subsequent stage manufacturer is required to forward this notice to its distributors and retail outlets within five working days.
Copy of Notice to Owners
Subject: Brake Mounting Caliper Bolts
For the Notice to U.S. Customers: This notice is sent to you in accordance with the National Traffic and Motor Vehicle Safety Act. For the Notice to Canadian Customers: This notice is sent to you in accordance with the Canadian Motor Vehicle Safety Act.
Daimler Trucks North America LLC (DTNA), on behalf of its Freightliner Trucks Division and its wholly owned subsidiaries, Western Star Truck Sales, Inc., and Freightliner Custom Chassis Corporation, has decided that a defect that relates to motor vehicle safety exists on specific Freightliner Business Class M2, Cascadia, Columbia, 108SD, and 114SD vehicles; Western Star 4700, 4900, and 5700 vehicles; and Freightliner Custom Chassis S2C, S2G, and B2 (Thomas Built Buses Saf-T-Liner C2) bus chassis manufactured May 1, 2017, through October 31, 2017, and equipped with air disc brakes.
On certain vehicles, insufficiently torqued fasteners may not provide adequate clamping force between the brake caliper and brake anchor plate, potentially resulting in reduced brake effectiveness, increasing the risk of a vehicle crash.
Fasteners will be inspected, and replaced if needed.
Please contact an authorized Daimler Trucks North America dealer to arrange to have the Recall performed and to ensure that parts are available at the dealership. To locate an authorized dealer, go to www.Daimler-TrucksNorthAmerica.com. On the menu tab, select “Contact,” scroll down to “Find a Dealer,” and select the appropriate brand. The Recall will take approximately one hour and will be performed at no charge to you.
You may be liable for any progressive damage that results from your failure to complete the Recall within a reasonable time after receiving notification.
If you do not own the vehicle that corresponds to the identification number(s) which appears on the Recall Notification, please return the notification to the Warranty Campaigns Department with any information you can furnish that will assist us in locating the present owner. If you have leased this vehicle, Federal law requires that you forward this notice to the lessee within 10 days. If you are a subsequent stage manufacturer, Federal law requires that you forward this notice to your distributors and retail outlets within five working days. If you have paid to have this recall condition corrected prior to this notice, you may be eligible to receive reimbursement. Please see the reverse side of this notice for details.
For the Notice to U.S. Customers: If you have questions about this Recall, please contact the Warranty Campaigns Department at (800) 547-0712, 7:00 a.m. to 4:00 p.m. Pacific Time, Monday through Friday, e-mail address DTNA.Warranty.Campaigns@Daimler.com, or the Customer Assistance Center at (800) 385-4357 after normal business hours. If you are not able to have the defect remedied without charge and within a reasonable time, you may wish to submit a complaint to the Administrator, National Highway Traffic Safety Administration, 1200 New Jersey Avenue, SE., Washington, DC 20590; or call the Vehicle Safety Hotline at (888) 327-4236 (TTY: 800-424-9153); or to https://www.safercar.gov. For the Notice to Canadian Customers: If you have questions about this Recall, please contact the Warranty Campaigns Department at (800) 547-0712, 7:00 a.m. to 4:00 p.m. Pacific Time, Monday through Friday, e-mail address DTNA.Warranty.Campaigns@Daimler.com, or the Customer Assistance Center at (800) 385-4357 after normal business hours.
We regret any inconvenience this action may cause but feel certain you understand our interest in motor vehicle safety.
WARRANTY CAMPAIGNS DEPARTMENT
Enclosure
Reimbursement to Customers for Repairs Performed Prior to Recall
If you have already paid to have this recall condition corrected you may be eligible to receive reimbursement.
Requests for reimbursement may include parts and labor. Reimbursement may be limited to the amount the repair would have cost if completed by an authorized Daimler Trucks North America LLC dealer. The following documentation must be presented to your dealer for consideration for reimbursement.
Please provide original or clear copies of all receipts, invoices, and repair orders that show:
- The name and address of the person who paid for the repair
- The Vehicle Identification Number (VIN) of the vehicle that was repaired
- What problem occurred, what repair was done, when the repair was done
- Who repaired the vehicle
- The total cost of the repair expense that is being claimed
- Proof of payment for the repair (such as the front and back of a cancelled check or a credit card receipt) Reimbursement will be made by check from your Daimler Trucks North America LLC dealer.
Please speak with your Daimler Trucks North America LLC authorized dealer concerning this matter.
Work Instructions
Subject: Front Caliper Mounting Bolts
Models Affected: Specific Freightliner Business Class M2, Cascadia,
Columbia, 108SD, and 114SD vehicles; Western Star 4700, 4900, and
5700 vehicles; and Freightliner Custom Chassis S2C, S2G, and B2
(Thomas Built Buses Saf-T-Liner C2) bus chassis manufactured
May 1, 2017, through October 31, 2017, and equipped with air disc brakes.
NOTE: Bendix instructions below, for Meritor WABCO go to page 8.
Front Caliper/Carrier Assembly Inspection and Installation-Bendix
- Check the base label (Form WAR259) for a completion sticker for FL758 (Form WAR260) indicating this work has been done. The base label is usually located on the passenger-side door, about 12 inches (30 cm)below the door latch. If a sticker is present for FL758, no work is needed. If there is no sticker, proceed with the next step.
- Park the vehicle on a level surface, shut down the engine, and set the parking brake. Chock the rear tires.
- Raise the vehicle and support it on jack stands.
- Remove the right-front wheel.
- Check the caliper mounting bolts by hand to see if they are loose.
- Remove the retainer pin, cotter pin, and brake pad retainer. Inspect the brake pad hardware to ensure it is in good condition. If it is not, file a WSC ticket for instructions.
- Remove the brake pads.
- Remove caliper bolts.
IMPORTANT: The caliper/carrier assemblies are left and right handed. Ensure that the correct assembly (left or right) is installed on each side of the vehicle.
- Align each caliper/carrier assembly with the rotor by pushing the fixed pin side of the caliper against the shelf on the torque plate, then install the caliper/carrier assembly using new caliper mounting bolts. See Fig. 1.
NOTE: The tightening pattern will always start on the short (floating) pin side, with the bolt that passes through the sheer sleeve.
- Tighten the carrier mounting bolts in two steps, using the pattern shown in Fig. 1.
- Initially tighten all six bolts 40 to 50 lbf·ft (54 to 68 N·m). Slide the caliper inboard and outboard, through the center of the chamber or brake. The caliper must have a minimum of 20 mm of travel. If the brake assembly does not move, or requires more than 40 pounds of force to move, the caliper has a binding issue. File a WSC ticket for instructions.
- Perform a final tightening spec of 180 to 200 lbf·ft (244 to 271 N·m). Slide the caliper inboard and outboard, through the center of the chamber or brake. The caliper must have a minimum of 20 mm of travel. If the brake assembly does not move, or requires more than 40 pounds of force to move, the caliper has a binding issue. File a WSC ticket for instructions.
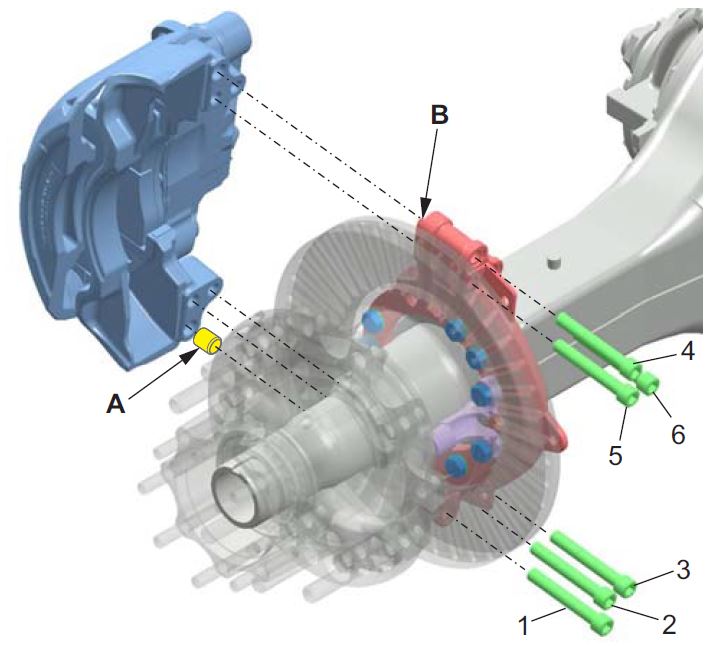 |
| Tighten the fasteners in the order indicated. A. Guide Sleeve B. Alignment Shoulder |
NOTICE
Do not use a motor driven tool to tighten the manual brake adjuster nut, or use excessive force to tighten the nut. Doing so could damage the manual brake adjuster nut.
- Install the brake pads. Provided it is good condition, use the brake pad hardware removed earlier.
- Back off the adjuster nut three clicks.
- Install the wheel.
- Raise the vehicle, remove the jack stands, then lower the vehicle.
- Charge the air system and check for leaks.
WARNING
Do not operate the vehicle until the brakes have been adjusted and checked for proper operation. To do so could result in inadequate or no braking ability, which could cause personal injury or death, and property damage.
- In a safe area, check for proper brake operation, as follows, before putting the vehicle in service.
- Apply and release the brakes several times to check for air leaks and proper operation.
- Perform six low-speed stops to ensure proper parts replacement and full vehicle control.
- Immediately after doing the above stops, check the rotor temperatures. Any rotors that are significantly cooler than others indicate a lack of braking effort on those wheels.
- Clean a spot on the base label (Form WAR259). Write the recall number, FL758, on a completion sticker(Form WAR260), and attach it to the base label to indicate this recall has been completed.
Front Caliper/Carrier Assembly Inspection and Installation – Meritor WABCO
- Check the base label (Form WAR259) for a completion sticker for FL758 (Form WAR260) indicating this work has been done. The base label is usually located on the passenger-side door, about 12 inches (30 cm) below the door latch. If a sticker is present for FL758, no work is needed. If there is no sticker, proceed with the next step.
- Park the vehicle on a level surface, shut down the engine, and set the parking brake. Chock the rear tires.
- Raise the vehicle and support it on jack stands.
- Remove the right-front wheel.
- Check the caliper mounting bolts by hand to see if they are loose.
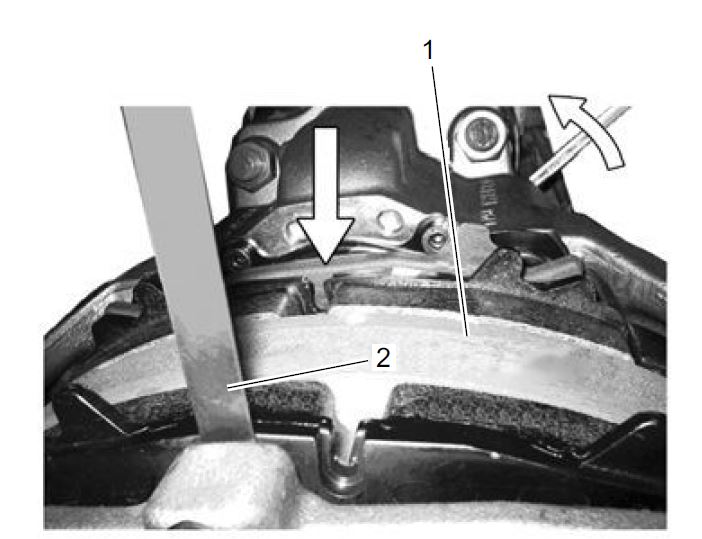
- Using a wrench, remove the socket head screw from the brake pad hold-down bracket, putting slight pressure on the brake pad hold-down bracket with your hand at the same time. See Fig. 2.
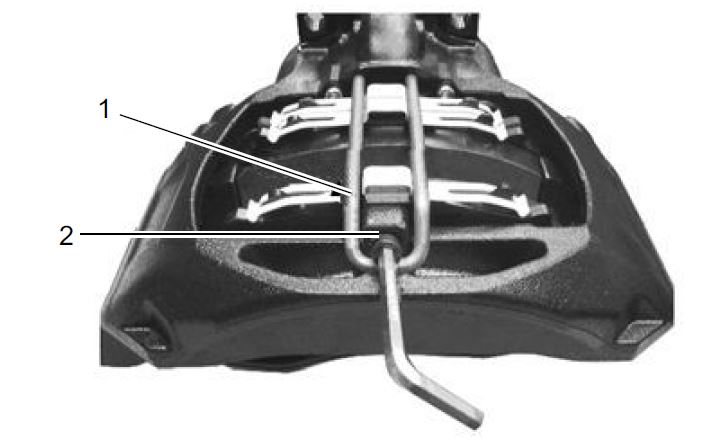 |
| 1. Brake Pad Hold-Down Bracket 2. Socket Head Screw |
Fig. 2, Removing the Brake Pad Hold-Down Bracket Screw
- Inspect the brake pad hardware to ensure it is in good condition. If it is not, file a WSC ticket for instructions.
- Remove the brake pads.
- Remove caliper bolts.
IMPORTANT: The caliper/carrier assemblies are left and right handed. Ensure that the correct assembly (left or right) is installed on each side of the vehicle.
- Align each caliper/carrier assembly with the rotor by pushing the fixed pin side of the caliper against the shelf on the torque plate, then install the caliper/carrier assembly using new caliper mounting bolts. See Fig. 1, Page 7.
NOTE: The tightening pattern will always start on the short (floating) pin side, with the bolt that passes through the sheer sleeve.
- Tighten the carrier mounting bolts in two steps, using the pattern shown in Fig. 1, page 7.
- Initially tighten all six bolts 40 lbf·ft (54 N·m). Slide the caliper inboard and outboard, through the center of the chamber or brake. The caliper must have a minimum of 20 mm of travel. If the brake assembly does not move, or requires more than 40 pounds of force to move, the caliper has a binding issue. File a WSC ticket for instructions.
- Perform a final tightening spec of 295±22 lbf·ft (400±30 N·m). Slide the caliper inboard and outboard, through the center of the chamber or brake. The caliper must have a minimum of 20 mm of travel. If the brake assembly does not move, or requires more than 40 pounds of force to move, the caliper has a binding issue. File a WSC ticket for instructions.
NOTICE
Do not use a motor driven tool to tighten the manual brake adjuster nut, or use excessive force to tighten the nut. Doing so could damage the manual brake adjuster nut.
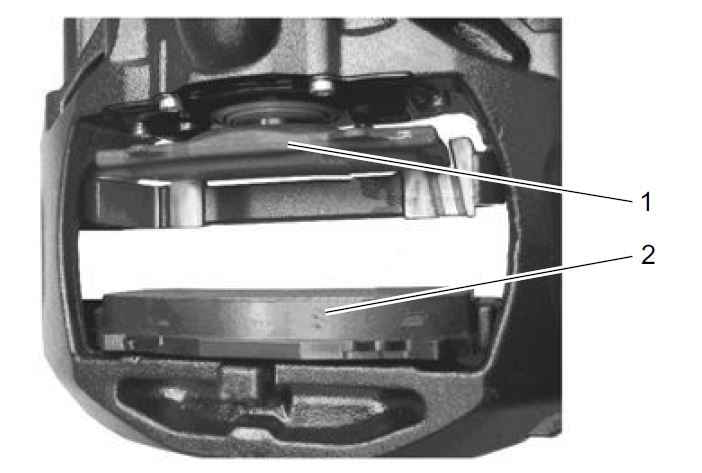
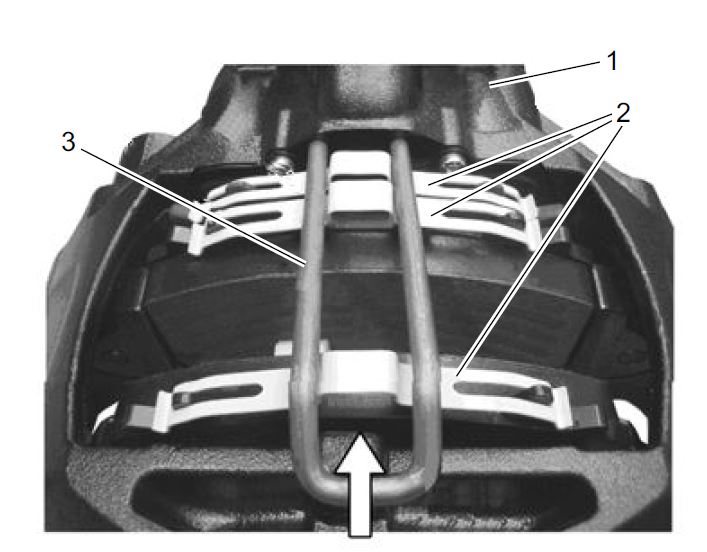
- Reinstall outboard-side brake pad. See Fig. 3. Push the brake caliper toward the brake chamber side until the brake pad of the rim side bears against the brake disc.
 |
| 1. Spreader Plate 2. Outboard Brake Pad |
Fig. 3, Installing the Outboard Brake Pad
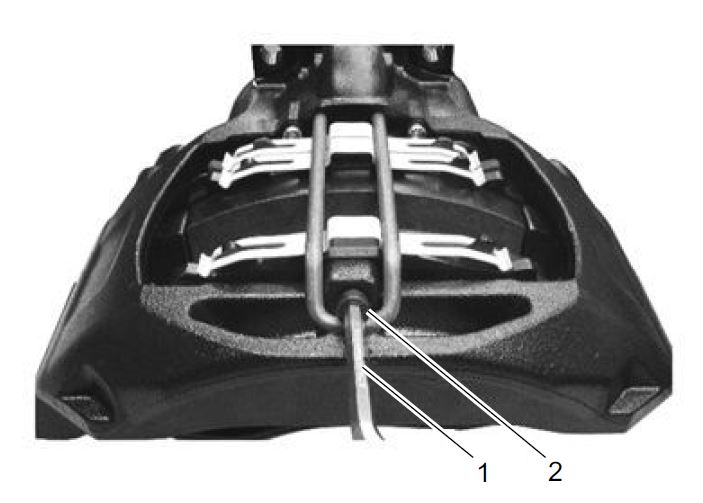
- Reinstall inboard-side brake pad. See Fig. 4. Push the brake caliper toward the outboard side until the brake pad of the inboard side bears against the brake disc.
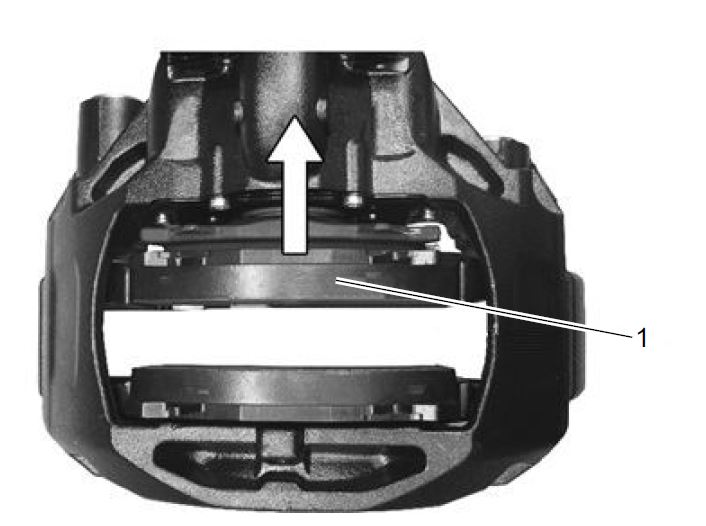
- Using a 0.047 inch (1.2 mm) feeler gauge, adjust the clearance. See the arrow in Fig. 5. Insert the feeler gauge between the brake pad of the rim side and the brake caliper.
- Tighten the manual brake adjuster nut until both brake pads bear on the brake disc and there is some resistance on the feeler gauge.
- Provided it is good condition, use the brake pad hardware removed earlier. Install the brake pad hold-downbracket into the openings of the brake caliper, and press the brake pad hold-down bracket so that the holddown springs fit into the bracket. fasten the socket head screw on the brake caliper. See Fig. 6.
 |
| 1. Inboard Brake Pad |
Fig. 4, Installing the Inboard Brake Pad
 |
| Fig. 5, Adjusting the Clearance |
Fig. 5, Adjusting the Clearance
 |
| 1. Brake Caliper 2. Hold-Down Spring 3. Brake Pad Hold-Down Bracket |
Fig. 6, Installing Hold-Down Springs and Bracket
 |
| 1. Wrench 2. Socket Head Screw |
Fig. 7, Tightening the Hold-Down Bracket
- Press the brake pad hold-down bracket against the brake caliper and fasten the socket head screw on the brake caliper. See Fig. 7. Tighten 22±12 lbf·ft (30±16 N·m).
- Install the wheel.
- Raise the vehicle, remove the jack stands, then lower the vehicle.
- Charge the air system and check for leaks.
WARNING
Do not operate the vehicle until the brakes have been adjusted and checked for proper operation. To do so could result in inadequate or no braking ability, which could cause personal injury or death, and property damage.
- In a safe area, check for proper brake operation, as follows, before putting the vehicle in service.
- Apply and release the brakes several times to check for air leaks and proper operation.
- Perform six low-speed stops to ensure proper parts replacement and full vehicle control.
- Immediately after doing the above stops, check the rotor temperatures. Any rotors that are significantly cooler than others indicate a lack of braking effort on those wheels.
- Clean a spot on the base label (Form WAR259). Write the recall number, FL758, on a completion sticker(Form WAR260), and attach it to the base label to indicate this recall has been completed.
December 2017
https://static.nhtsa.gov/odi/rcl/2017/RCRIT-17V759-0101.pdf
 Loading...
December 2017
https://static.nhtsa.gov/odi/rcl/2017/RCONL-17V759-5481.pdf
Loading...
December 2017
https://static.nhtsa.gov/odi/rcl/2017/RCMN-17V759-1662.pdf
Loading...
December 18, 2017
https://static.nhtsa.gov/odi/rcl/2017/RCAK-17V759-9314.pdf
Loading...

- Bosch Severe Duty Semi-Metallic brake pads use the latest technology in friction for best in class performance, quiet operation, and long life
- Severe Duty pads are made for vehicles subject to constant stop-and-go operation or that carry heavy payloads
- OE-style multilayer shims, slots, and chamfers (where specified)
- Engineered, tested, and manufactured in North America
- Set includes pads for 1 axle (2 wheels), synthetic lube, and hardware (as applicable); pads come boxed with a paper inner wrap for added protection

- BUILT TOUGH -- Engineered for fleets and vehicles driven in demanding conditions
- LONG LIFE -- Semi-metallic carbon-based friction material engineered in-house to deliver long lasting braking performance for the toughest applications
- TESTED AND VALIDATED -- Rigorous OE-style on-vehicle testing to ensure optimal braking performance for vehicles under extreme heat, frequent stopping and heavy loads
- OE DESIGN -- Features OE style shims, slots and chamfers
- HARDWARE INCLUDED -- Premium stainless-steel hardware kits included for key applications

- Bosch Severe Duty Semi-Metallic brake pads use the latest technology in friction for best in class performance, quiet operation, and long life
- Severe Duty pads are made for vehicles subject to constant stop-and-go operation or that carry heavy payloads
- OE-style multilayer shims, slots, and chamfers (where specified)
- Engineered, tested, and manufactured in North America
- Set includes pads for 1 axle (2 wheels), synthetic lube, and hardware (as applicable); pads come boxed with a paper inner wrap for added protection

- Bosch Severe Duty Ceramic brake pads use the latest technology in friction for best in class performance, quiet operation, and long life
- Severe Duty pads are made for vehicles subject to constant stop-and-go operation or that carry heavy payloads
- OE-style multilayer shims, slots, and chamfers (where specified)
- Engineered, tested, and manufactured in North America
- Set includes pads for 1 axle (2 wheels), synthetic lube, and hardware (as applicable); pads come boxed with a paper inner wrap for added protection

- Excellent fade and heat tolerance characteristics
- Friction formulas designed specifically to withstand extreme braking conditions
- Burnishing strips for easier brake-in
- Anti-noise shims
- Hardware included (where applicable)

- Excellent fade and heat tolerance characteristics
- Friction formulas designed specifically to withstand extreme braking conditions
- Burnishing strips for easier brake-in
- Anti-noise shims
- Hardware included (where applicable)
- Bosch Severe Duty Semi-Metallic brake pads use the latest technology in friction for best in class performance, quiet operation, and long life
- Severe Duty pads are made for vehicles subject to constant stop-and-go operation or that carry heavy payloads
- OE-style multilayer shims, slots, and chamfers (where specified)
- Engineered, tested, and manufactured in North America
- Set includes pads for 1 axle (2 wheels), synthetic lube, and hardware (as applicable); pads come boxed with a paper inner wrap for added protection
- BUILT TOUGH -- Engineered for fleets and vehicles driven in demanding conditions
- LONG LIFE -- Semi-metallic carbon-based friction material engineered in-house to deliver long lasting braking performance for the toughest applications
- TESTED AND VALIDATED -- Rigorous OE-style on-vehicle testing to ensure optimal braking performance for vehicles under extreme heat, frequent stopping and heavy loads
- OE DESIGN -- Features OE style shims, slots and chamfers
- HARDWARE INCLUDED -- Premium stainless-steel hardware kits included for key applications
Last update on 2024-04-29 / Affiliate links / Images from Amazon Product Advertising API
This product presentation was made with AAWP plugin.