| “This site contains affiliate links for which OEMDTC may be compensated” |
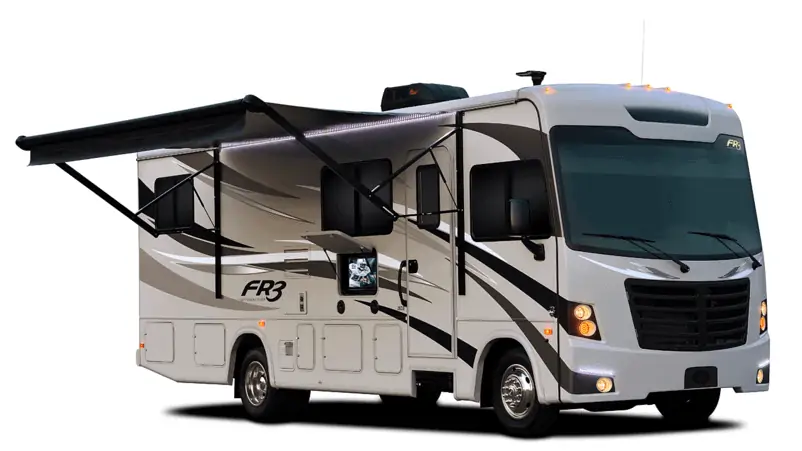
April 12, 2018 NHTSA CAMPAIGN NUMBER: 18V234000
Entry Door May Open While Moving
If the entry door opens unexpectedly, it can increase the risk of injury.
NHTSA Campaign Number: 18V234
Manufacturer Forest River, Inc.
Components STRUCTURE, LATCHES/LOCKS/LINKAGES
Potential Number of Units Affected 597
Summary
Forest River, Inc. (Forest River) is recalling certain 2018-2019 Forest River FR3 and Georgetown recreational vehicles. The entry door latch may not engage fully, allowing the door to open unexpectedly while moving.
Remedy
Forest River will notify owners and dealers will install shims between the entry door frame and the wall frame, two additional screws will be added through the entry door frame to secure the door frame to the sidewall frame and will verify that the entry door latch pawl is properly contacting the striker bolt, if required the dealer will adjust the striker bolt, at no charge to the owner. The recall began on May 9, 2018. Owners may contact Forest River customer service at 1-574-206-7600. Forest River’s number for this recall is 68-0700.
Notes
Owners may also contact the National Highway Traffic Safety Administration Vehicle Safety Hotline at 1-888-327-4236 (TTY 1-800-424-9153), or go to www.safercar.gov.
Forest River, Inc.
Dexter Door Recall Remedy Procedure
Recall 18V234
Kit Includes:
|
Step 1: Identify the problem
Make sure this applies to your motorhome. This recall only applies to the Dexter Door.
- These are the components of the Dexter Door.
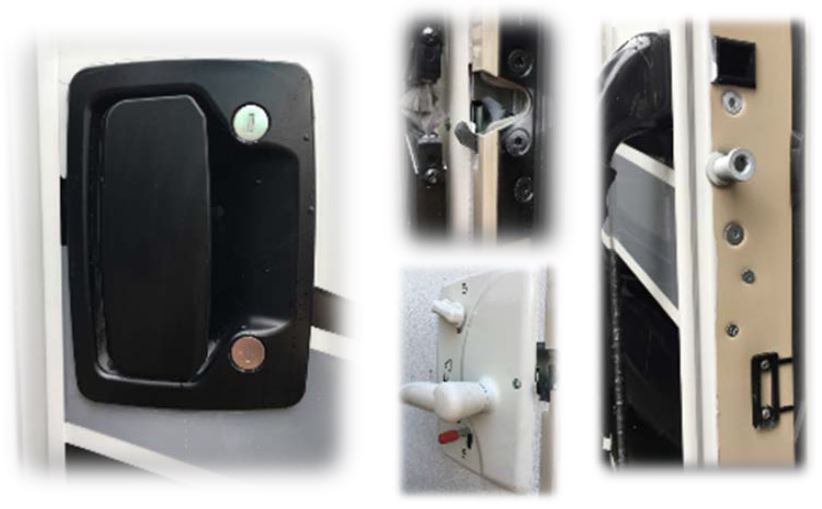
If your door does not have these components, then your unit is not part of this recall.
Step 2: Remove the interior trim at the latch
If your unit has plastic trim, pop the screw covers and remove the screws.
If your unit has wood trim, you will also have screw covers to remove but they are wood. Pop those off and remove the screws. Be careful not to scratch your trim.
You may need to remove the screws from the door rail at the top.
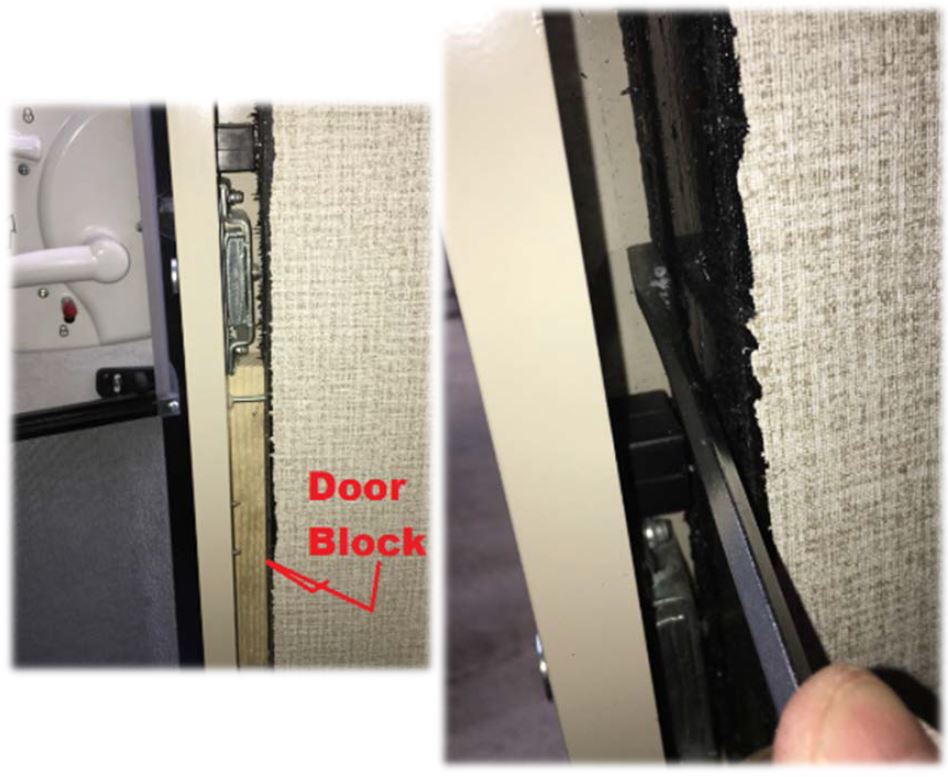
Step 3:
Clear the space between the door frame and the sidewall frame. There needs to be a flat surface on the sidewall frame for the shims to rest against. Leave the original door block in place, particularly if it is against the sidewall frame.
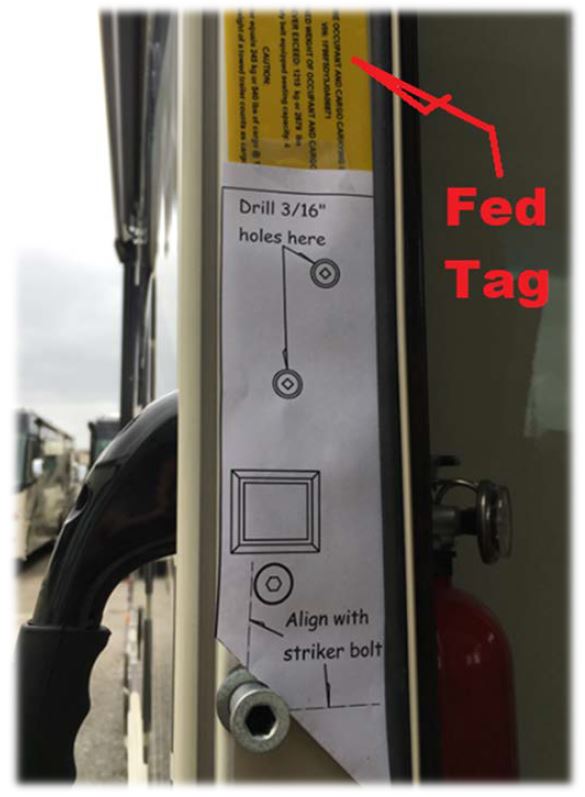
Step 4: Apply the template to the door frame and drill the holes.
Drill the holes indicated on the template. Drill only through the aluminum door frame. (The template is on the last page of this document if printed on 8 ½ x 11 sized paper) Use a 3/16” bit. (Not the size of the circles!!)
If the Fed Tag (Yellow Sticker) is low enough that the holes would go through the Fed Tag, the holes can be moved down slightly to accommodate it.
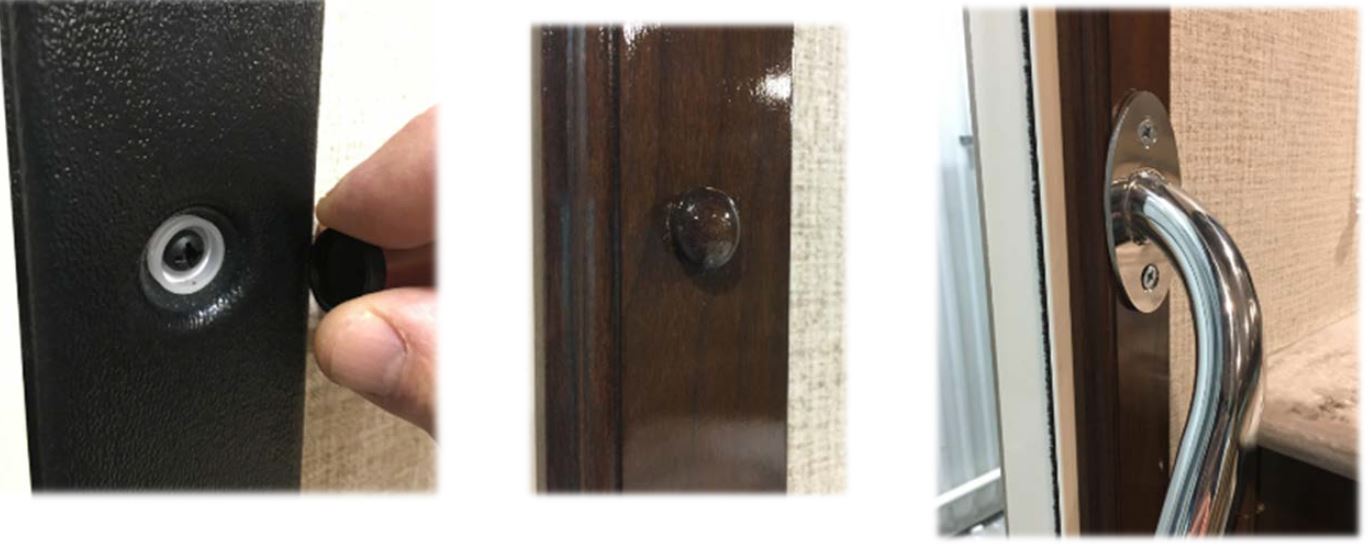
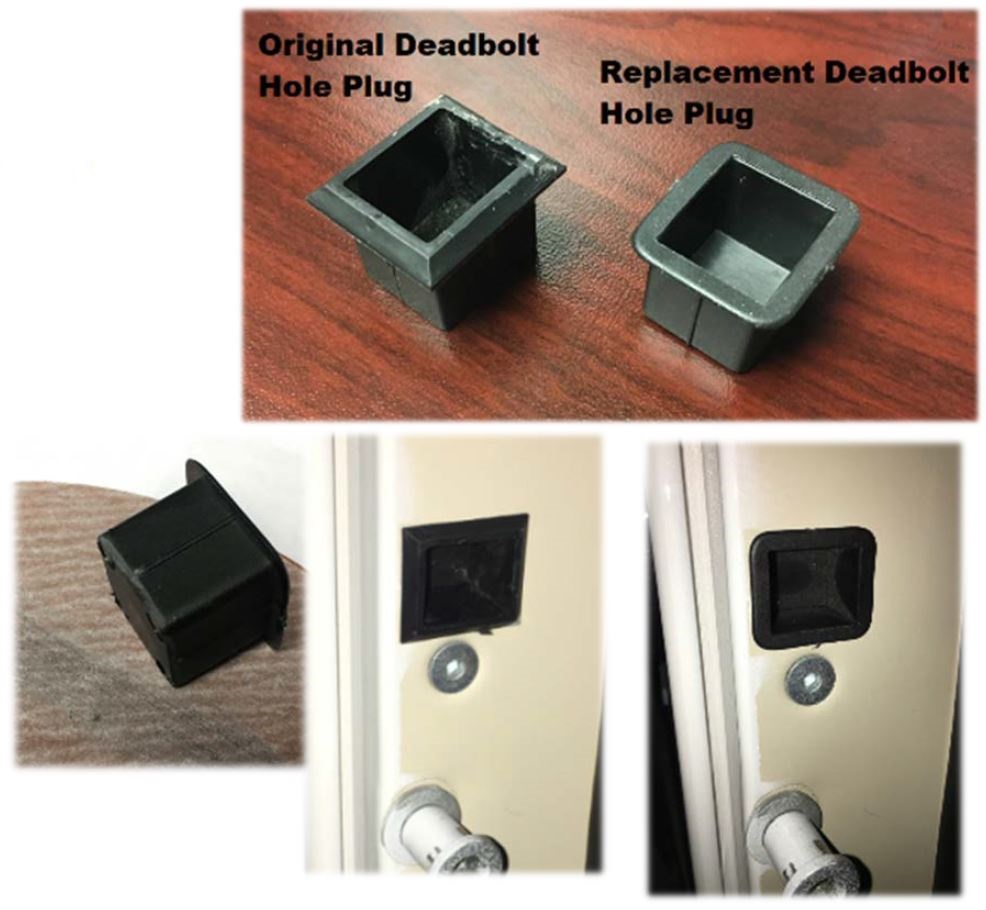
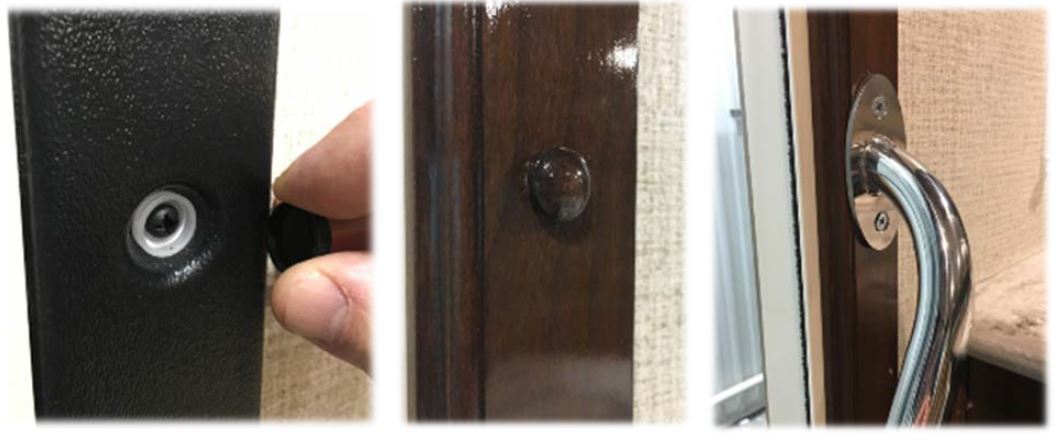
Step 5 Replace the deadbolt hole plug
- Some plugs have a screw inside them. Remove the screw if it’s there.
- Remove the plug and discard
- Replace with the supplied plug. (Be careful on installation, they are more delicate than the one being replaced. It has a narrower lip. It may be necessary to taper the back side of the plug to get it started in the opening. A piece of sandpaper helps this process
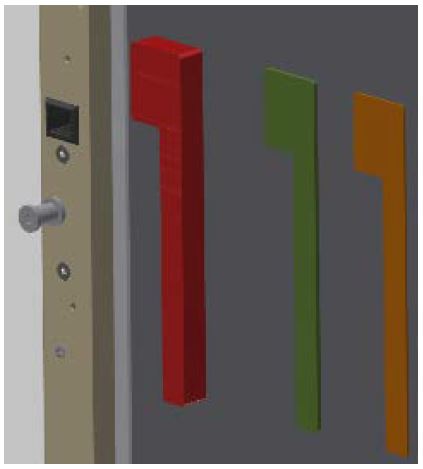
Step 6: Fit the shims
The purpose of the shims(fig 1)is to fill the gap between the door frame and the sidewall frame. They provide a solid support for the door frame.
Make sure you stack enough shims to fill the gap but not so many that it deforms the frame.
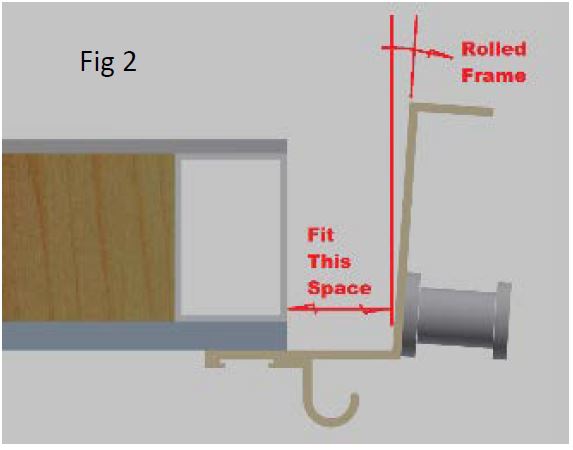
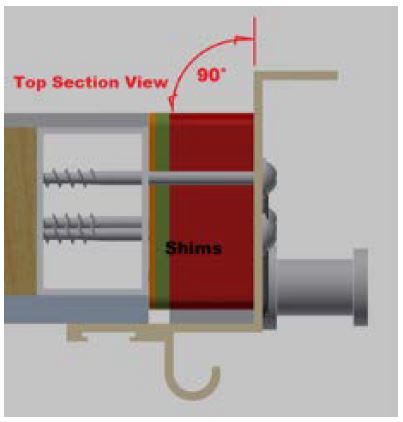
If your door has a rolled frame (fig 2), fit the space at the back of the opening between the door frame and sidewall frame. The screws should draw the frame back to the perpendicular position (Fig 3).
Step 7: Install the shims and install the screws
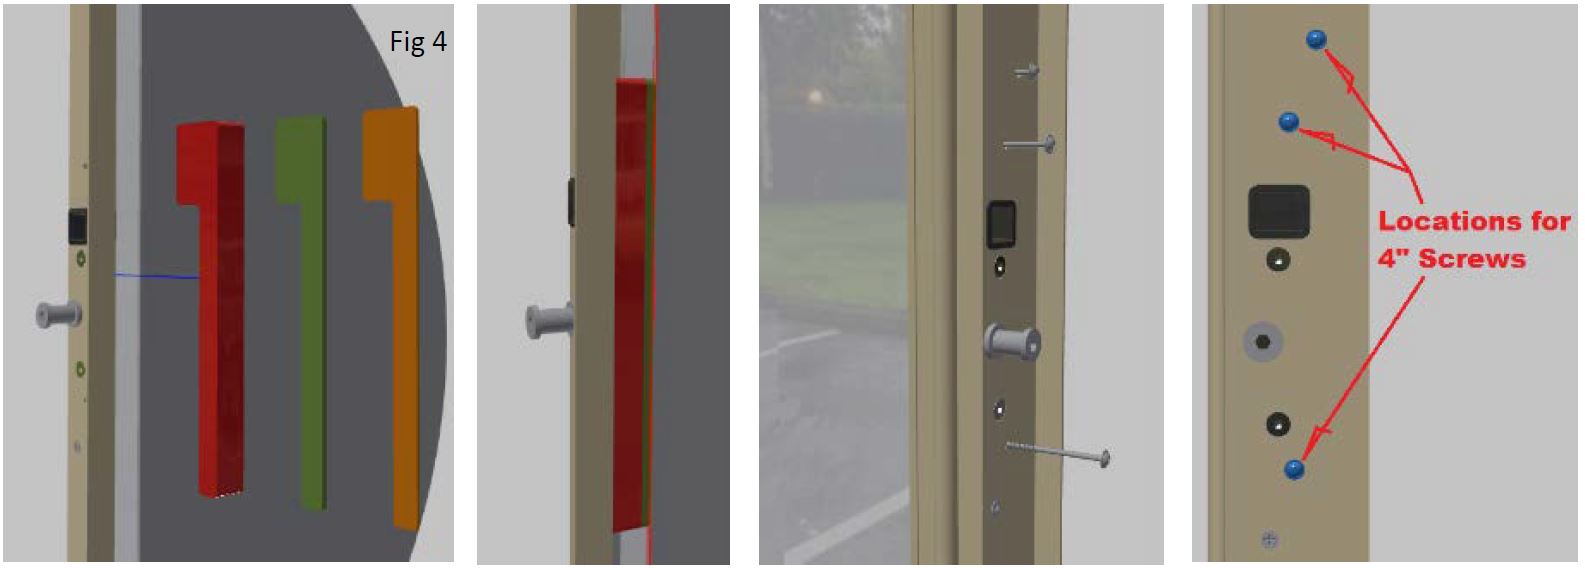
The shims should be placed so that the lip of the shim rests just above the deadbolt hole plug. (Fig 4)
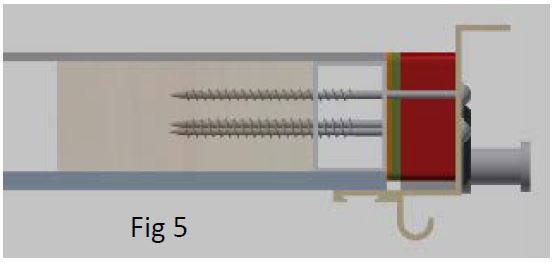
Install the screws straight into the sidewall frame. The screws should penetrate into the wood backer behind the aluminum sidewall skeleton. (Fig 5)
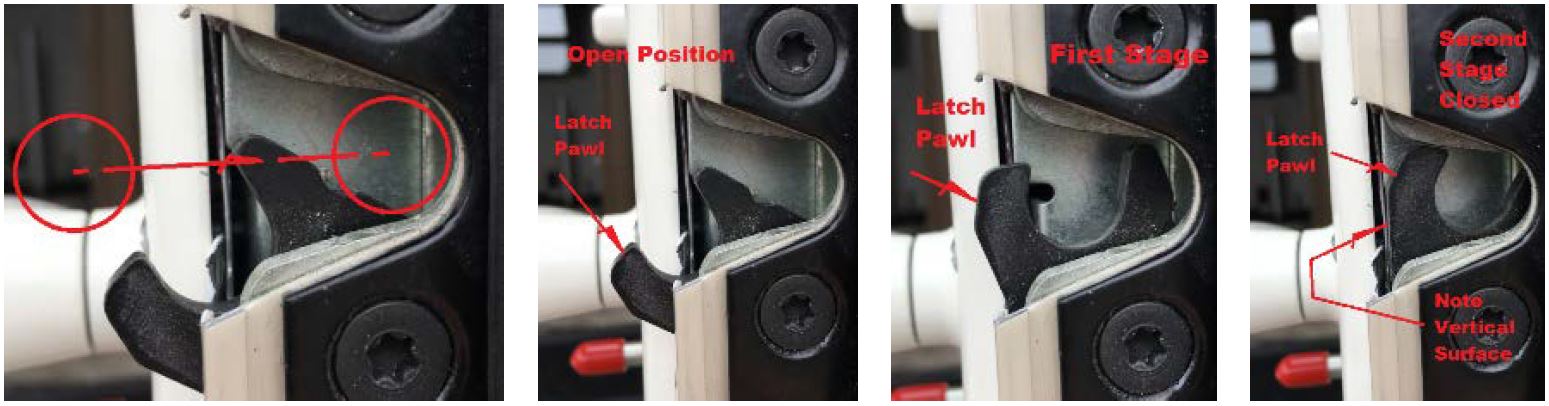
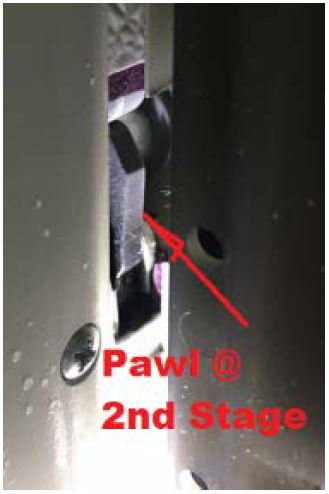
Step 8: Verify that the latch pawl is properly contacting the striker bolt.
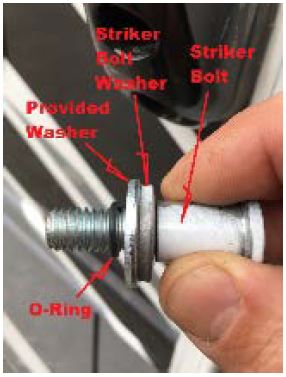
You should be able to see the latch pawl on the inside of the door when the door is closed. There should be a slight gap between the pawl and the head of the striker bolt. Another way to tell if there is clearance is to measure the gap between the door and the frame. There should be 1/8” to 5/32” of gap. Much more than that, the pawl will contact the head of the bolt. If this is the case, it may be necessary to use the washer provided in the kit under the washer of the striker. Use this washer ONLY if necessary.

| Removing screws from the door frame or replacing the door entirely is a last resort item. We are trying to adjust the door without having to remove it from the opening. If you are unable to properly pass this stage, contact Forest River Georgetown Service at 574-206-7600 for further instructions. |
Step 9: Adjust the door.
The idea is to adjust the striker to allow the latch to reach the second stage position. The second stage position is when the door is completely closed.
Initially check to see if the door will close properly. Close the door very carefully. The door striker should align with the center of the latch (Fig 6). If the striker obviously does not align to the latch, then go to Step 10 to adjust the striker. Adjust accordingly.
If the striker aligns well, close the door to the first stage. If the latch does not click into position, go to Step 10 to adjust the striker.
If it clicks in place and holds securely, push the door to the second stage.
If it does not click into place relatively easy, go to Step 10 to adjust the striker.
If it clicks into place with reasonable force, pull on the door or push from the inside to check that the door is securely closed.
Activate the dead bolt to make sure it engages properly. Activate the latch to see if the dead bolt holds securely.
If everything is working properly, Go on to Step 11 to test the door.
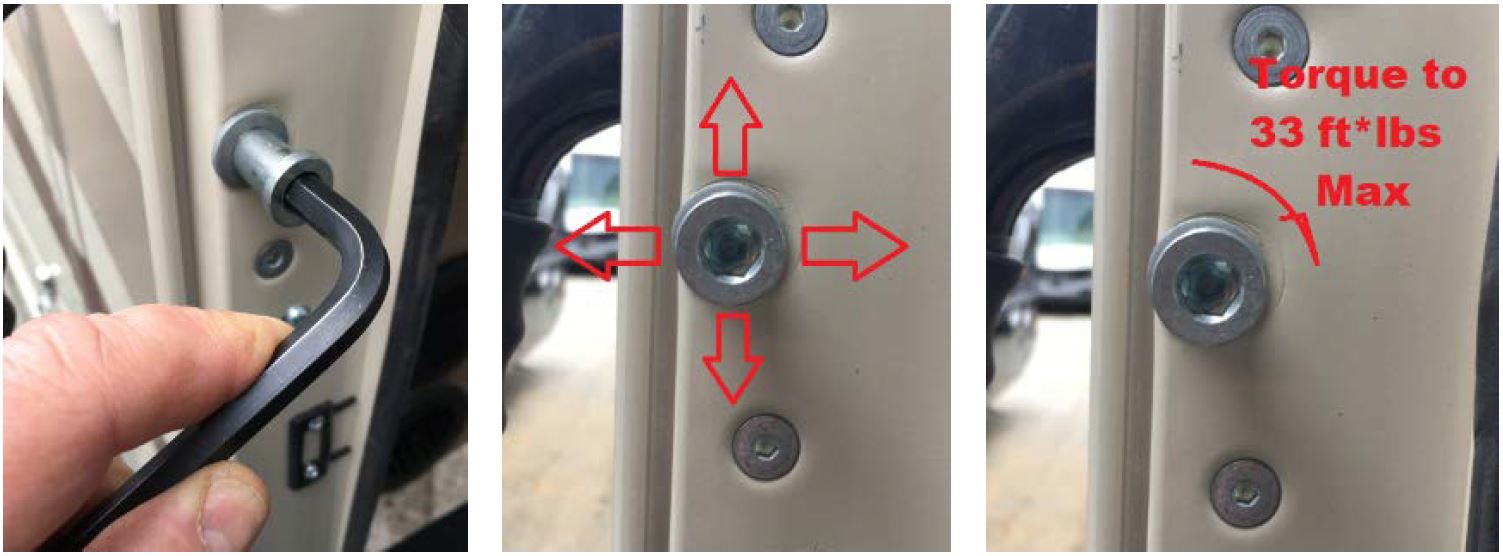
Step 10: Adjust the striker.
Use a 5/16” hex key to loosen and tighten the striker bolt. Move the striker up or down to align with the center of the latch on the door. Move the striker in or out to find the optimum position where the latch can reach the second stage and the door seals well. Typically this adjustment is to move the striker outboard. After adjustment, return to Step 9.
When the striker is finally adjusted to the optimal position, torque the bolt up to 33 ft-lbs.
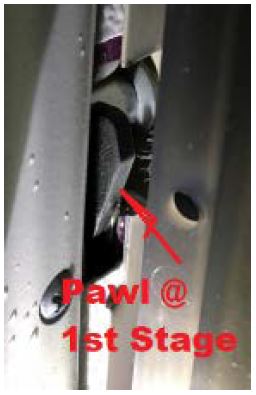
Step 11: Test the door latch.
Shut the door easy at first. It should easily make it to the first stage position. Make sure it is secure in the first stage. (Fig 7)
Next, shut the door with normal force. It should shut to the second stage position. Repeat to find the amount of force required to shut the door to the second stage. (Fig 8)
It should be approximately 10-12 lbs of force to shut the door properly. If you have to slam the door to reach the second stage, the striker needs to be adjusted outward to allow the latch to grab and still hold the seal around the door.
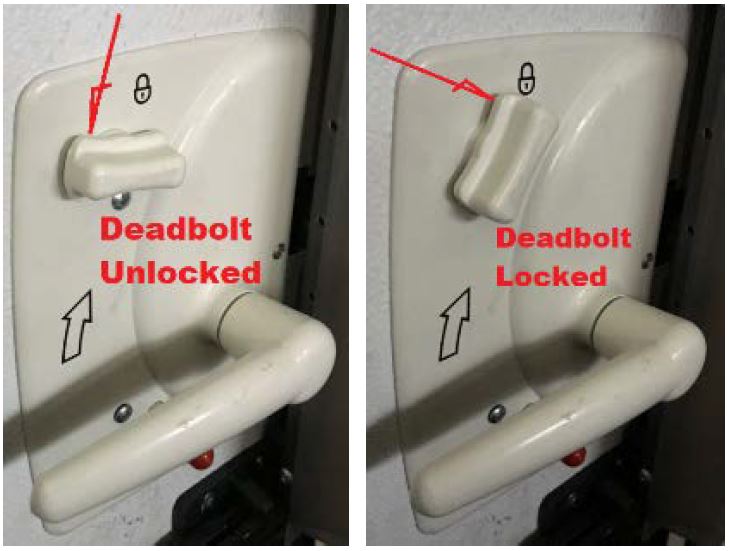
With the latch at the second stage, it should allow the dead bolt to be set to the lock position. (Fig 9) Activate the deadbolt to make sure it engages properly.
Open and shut the door in a normal manner at least 10 times to verify that the door latch is working properly.
Inspect around the latch and striker to verify that all connections are secure.
Step 12: Replace the trim around the door.
After you verify that the door latch is working as specified, place the trim back in it’s original location. Replace the screws, but do not over tighten. Replace the screw covers. Clean up the work area.
Step 13: Final check
Once the trim and all covers are back in place, repeat opening and closing the door 3 more times and verify that door is sealed all the way around. Verify that it closes in a normal manner and holds securely in the second stage position.

| If you are unable to get to this stage with good results, call 574-206-7600 for more help. |
Template for drilling top holes
 Loading...
4 Affected Products
Vehicles
| MAKE | MODEL | YEAR |
| FOREST RIVER | FR3 | 2018-2019 |
| FOREST RIVER | GEORGETOWN | 2018-2019 |
7 Associated Documents
Recall 573 Report- Amendment 1
RCLRPT-18V234-1180.PDF 216.007KB
Loading...
Defect Notice 573 Report
RCLRPT-18V234-5286.pdf 215.775KB
Loading...
Recall Acknowledgement
RCAK-18V234-2922.pdf 245.959KB
Loading...
Remedy Instructions and TSB
RCRIT-18V234-2414.pdf 731.439KB
Loading...
Recall Quarterly Report #4, 2019-1
RCLQRT-18V234-4229.PDF 211.428KB
Loading...
Recall Quarterly Report #2, 2018-3
RCLQRT-18V234-8192.PDF 214.607KB
Loading...
Recall Quarterly Report #3, 2018-4
RCLQRT-18V234-4045.PDF 211.322KB
Loading...
Latest Recalls Documents
For the Latest and Most Recent Recalls Information Visit the link below…
https://www-odi.nhtsa.dot.gov/acms/cs/documentList.xhtml?docId=18V234&docType=RCL
| “This site contains affiliate links for which OEMDTC may be compensated” |

- 3-in-1 Ceramic formula that REPAIRS fine swirls and scratches, SEALS in protection giving a wet shine finish without the wax and actively REPELS water with the durable Ceramic Technology.
- The innovative Ceramic Technology and durability of a Sealant extends duration of water-beading and protection against water pooling and water damage up to one year*.
- Now with Ceramic Technology for more water beading and protection, Nu Finish The Once A Year Polish & Sealant still contains absolutely no wax.
- Our formula brings shine back to your paint, polishes chrome, and helps to remove fine swirls and scratches in just one amazing formula.
- Polishing power helps remove minor scratches, rejuvenates paint shine and polishes chrome.

- EXCEPTIONAL RESULTS: Advanced technology formula provides a deep gloss and rich, swirl-free results
- NO MORE SWIRLS: Permanently removes swirls and light defects from all paint
- STUNNING SHINE: Produces deep reflections and high gloss
- EASY TO USE: Smooth buffing feel, easy wipe-off, and fast clean-up
- MULTIPLE WAYS TO APPLY: Formulated for use by Hand, DA Polisher, or Rotary Buffer

- REMOVE PAINT DEFECTS: The ultimate product for removing oxidation, scratches, water spots, and blemishes without scratching
- BEST CAR SCRATCH REMOVER: Cuts as fast as harsh abrasives restoring surface clarity without scratching or swirling
- SAVES TIME: The clear coat safe formula dramatically reduces the time and effort to restore abused or neglected paint finishes
- STUNNING FINISH: Exclusive micro-abrasive technology leaves a "like new" finish and adds gloss in one easy step
- SAFE FOR CLEAR COAT: Safe and effective on clear coat and single stage paints, and can be applied by hand or dual action polisher like Meguiar's MT300 Dual Action Polisher
- Nu Finish Liquid Car Polish keeps your car exterior looking new with only one application per year.Fit Type: Universal
- Delivers impressive shine and protection without rubbing or buffing
- As the only polish available with no wax, the Nu Finish formula is specifically made to protect your car’s paint and clear-coat finish
- Perfect for use on cars, fiberglass boats, RVs, and even chrome surfaces
- Apply polish with a damp cloth, let dry to a haze, and wipe off
- EASY-TO-USE ONE STEP POLISH! - P4 Precision Paint Perfection Polish is the easy-to-use one step polish that removes fine swirls, scratches, towel marks, and corrects 2000 grit and finer sanding marks while leaving virtually no dusting or residue behind! .Fit Type: Universal Fit
- SAFE FOR ALL PAINTS! - Ultra-fine abrasives used in P4 are specially developed for all paints including ceramic coated vehicles to remove microscopic amounts of clear coat quickly and leave paint incredibly glossy, shiny, and haze-free!
- WORKS GREAT ON CERAMIC COATINGS! - P4 works great on ceramic coated cars to remove minor imperfections while maintaining the integrity of your coating to produce deep, rich reflections without damaging your protection!
- SHOW CAR SHINE & GLOSS! - Chemical Guys P4 gently removes fine swirls and scratches to deliver a truly perfect finish with a deep gloss and mirror-like finish as the final step in your polish! For even more comprehensive results, first apply C4 Clear Cut Correction Compound!
- PERFECT PREP FOR CERAMIC, SEALANT, AND WAX! - Prepping your car with P4 Polish ensures that your wax, sealant, or ceramic coating makes contact with a totally bare surface, maximizing coating adhesion and durability! Get a deep gloss and shine in no time!
- Heavy duty paste that cleans dull, oxidized finishes
- Quickly and easily penetrates through the oxidized surface to remove scratches, blemishes and stubborn stains
- Restores faded finishes
- Recommended for rubbing down between coats of newly sprayed lacquer and acrylic car finishes
- Easy to use formula

- CORRECT & PROTECT … 3D Speed is a premium all in one clear coat car polish & wax all in one bottle!
- BRING YOUR PAINT BACK TO LIFE … 3D Speed is an excellent scratch and swirl remover polish and sealant that deliver minor paint correction for small or large surface areas! Please note: Our products will not remove deep scratches or correct areas where paint may be missing.
- DEPTH AND GLOSS IN ONE … Restore your paint's color, depth and gloss while also adding a long lasting wax layer protection to the surface!
- EASY APPLICATION … You can easily apply 3D Speed by hand for smaller surface areas or with a polisher or buffer for larger areas with more imperfections.
- PROUDLY MADE IN THE USA ... We've been researching and creating exterior and interior car care products for over 25 years now. A quarter of a century of giving our customers uncompromising quality. Go ahead, experience a car polish and wax that's tried and trusted. Date on bottles reflect manufactured dates, not expiry dates.

- [Car Care Kit]: One Nu Finish Exterior Car Detailing Kit includes Nu Finish Scratch Doctor, Nu Finish Once A Year Car Polish and Nu Finish Better Than Wax Ceramic Coating
- [Shines and Protects]: Car kit with three unique products that each contribute to a long-lasting car shine while offering protection against dirt, scratches and other surface imperfections
- [Smooth Surface]: Nu Finish Scratch Doctor removes surface scratches, paint scrapes, scuffs, haze and swirl marks as well as bugs and grime from vehicle surfaces
- [Car Polish]: Nu Finish Once A Year Car Polish delivers a showroom shine and safeguards your car even after 52 automatic car washes, guaranteeing a long-lasting sheen
- [Self-Cleaning]: Nu Finish The Better Than Wax Ceramic Coating creates a non-greasy protective barrier and offers a car shine for up to 100 car washes by trapping contaminants in water droplets and beading them

- UNSURPASSED SLICKNESS – You simply have to touch it to believe how slick this finish is
- MAXIMUM GLOSS AND SHINE – Hands down the highest level of gloss and shine you will ever experience; Achieve mirror-like results in a simple application, right in your own driveway
- EXTREMELY HYDROPHOBIC – Cerakote's true ceramic technology repels water, road grime, mud and dirt making your car stay cleaner, longer!
- QUICK AND EASY TO APPLY - Simply wash and dry your vehicle as you normally would; Then evenly spray a light coat directly to a panel or small area of your vehicle;, then, just lightly buff the coating to an incredible shine! It really doesn't get any easier than this!
- Advanced Formula 3-in-1. Our fortify quick coat is your all-in-one ceramic coating hydrophobic spray. Shine Armor Fortify Quick Coat ceramic car wax provides a waterless wash, coat, and shine, all-in-one convenient product.
- No Streaking, Smearing Or Scratching. Shine Armor Fortify Quick Coat premium formula ceramic car coating is a gentle and effective car polish for any vehicle! Get a clean, shiny finish without hurting your car's paint.
- Cuts Dirt, Grime & Grease. Our Quick Coat ceramic wax car sealant eliminates dirt, grime & grease instantly! Our signature 3-in-1 formula gives you a waterless car wash, coat and shine for a clean, showcase look.
- Safe For All Surfaces. Use this car wax spray-on automobiles, boats, motorbikes, RVs, four-wheelers and more! This spray wax is the perfect blend of surfactants and SiO2 ceramic-coating science.
- Superior Products. This means superior shine for your cars! Our ceramic quick coat also works as a sealer to give your vehicle a clear shield of protection while also providing a beautiful gloss. Our ceramic coat is the best hydrophobic car spray available!
Last update on 2024-04-13 / Affiliate links / Images from Amazon Product Advertising API
This product presentation was made with AAWP plugin.