| “This site contains affiliate links for which OEMDTC may be compensated” |
February 9, 2024 NHTSA CAMPAIGN NUMBER: 24V095000
Control Arm Failure May Cause Loss of Control
A loss of vehicle control increases the risk of a crash.
NHTSA Campaign Number: 24V095
Manufacturer Forest River, Inc.
Components SUSPENSION
Potential Number of Units Affected 10
Summary
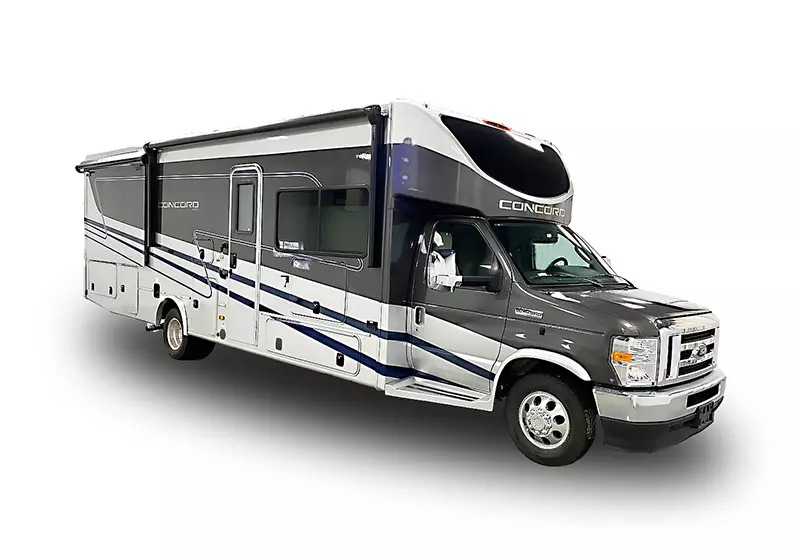
Forest River, Inc. (Forest River) is recalling certain 2023-2024 Coachmen Concord motorhomes. The lower control arm bracket may fail and cause the axle to rotate or detach, resulting in a loss of vehicle control.
Remedy
Dealers will replace the lower control arm mount, free of charge. Owner notification letters were mailed February 19, 2024. Owners may contact Forest River customer service at 1-574-825-8602. Forest River’s number for this recall is 210-1734.
Notes
Owners may also contact the National Highway Traffic Safety Administration Vehicle Safety Hotline at 1-888-327-4236 (TTY 1-800-424-9153), or go to www.safercar.gov.
RECALL 24V095 / 2024-078 REMEDY INSTRUCTIONS
Make(s): CONCORD
Model(s): CNC321DSF
Model Year(s): 2023 – 2024
Concern:
The lower control arm brackets that are part of the air ride suspension kit, may fracture the welds and fail.
Turn off LP Gas at LPG Tank(s). Place vehicle in (P) Park and engage the Parking Brake. Disconnect the vehicles’ battery Positive and Negative, disconnect any House battery(s) Positive and Negative, if equipped with a generator ensure it is off and lastly, ensure the vehicle is disconnected from shore power. Block any tires/wheels to prevent the vehicle from rolling. Failure to do so may result in electrocution, fire or other personal injury, property damage and/or death.
2023 – 2024 Coachmen Concord/Autoflex Suspension
Objective
The factory installed lower axle bracket #F007-014 may have insufficient welds and/or support creating a scenario where the rear axle can become partially disconnected from the vehicle.
These brackets are to be replaced with corrected brackets #F007-01424.
Parts Needed
- 2 Lower axle brackets, Part number #F007-01424
Tools Needed
- Heavy Duty Floor Jack (To Lift at Frame)
- Standard Floor Jack (To Lift Rear Axle)*
- Heavy duty Jack Stands (6 Ton Minimum)
- ½” Drive Torque Wrench
- ½” Drive Impact Wrench
- ½” Drive sockets in the following sizes
- 1-5/16” Socket ○ 19mm Socket*
- 22mm Socket*
- 15/16” Socket
- ⅜” Drive Impact Wrench
- ⅜” Drive 9/16” Socket
- 1-5/16 Wrench
- 15/16” Wrench
- Pry bar
- Hammer
*Recommended For accessibility but not required
Procedure
Step 1 – Preparing Vehicle
- Place vehicle in park on flat ground and remove key from ignition.
- Block front wheels to prevent vehicle from rolling.
- Jack up the rear of the RV by lifting in front of the rear axle along frame rail and support both sides with jack stands (See Figure 1). At this time the rear wheels may not be off the ground. This is normal.
- Place jack stands under frame.(See Figure 1)
- Optional – If removing wheels, use a floor jack to lift the rear axle under the center of the differential until all rear wheels are off the ground. Remove wheels. (It is not necessary to remove the wheels but it may help with accessibility.)
Note: It is not necessary to deflate air bags. Air bags will deflate automatically when lifting under frame and allowing the rear axle to hang.
Step 2 – Disassembly
- Remove both 1-5/16 nuts from lower torque arms. Both bolts will remain in place for now.(Figure 2)
- Remove the (2) 9/16 nuts holding the lower air bag plate to the axle bracket.(Figure 3) The second nut is on the back side of the axle and can not be seen in Figure 3.
- Using a pry bar, compress the air bags upward to gain access to the top axle bracket.(Figure 4)
- Use locking pliers or hose clamp pliers to close off the exhaust tube at the leveling valve.(Figure 5) This creates a vacuum in the air bag and will keep it compressed for easy access.
- Use a 15/16 wrench on top (Figure 6) and 15/16 socket on bottom (Figure 7) to remove the 4 bolts holding the lower axle bracket in place.
- Remove lower bracket and discard.
Step 3 – Assembly
- Install a new lower bracket onto the lower torque arm first and position the bracket under the axle. Start the 15/16 nuts onto the bolts by hand.
- Tighten the front two bolts first to 145 lb-ft and ensure the gap between the upper and lower bracket on the front side of the axle is closed.
- Once tight, move to the rear set and tighten to 145 lb-ft.
- Tighten the 1-5/16 lower torque arm bolts to 400 lb-ft. (Figure 2)
- Recheck torque on all 8 Nuts and bolts on driver and passenger side.
- Remove locking pliers from leveling valve exhaust tube.(Figure 5)
- Re-install the lower bag mount to the top axle tube bracket using the existing 9/16-inch hardware. Tighten to 45 lb-ft. (Figure 3)
- If wheels were removed, re-install, referring to lug tightening pattern and torque specs. (Figure 8)
- Remove jack stands, lower jacks, and allow air bags to air up. Test drive to ensure successful repair.
HiSpec wheels – 140 ft/lbs; identified as using the original black Ford lug nuts.
Ion wheels – 120 ft/lbs; identified as using conical chrome plated lugs
 Loading...
February 2024
This Notice applies to your vehicle VIN listed above.
Dear Forest River Customer:
This notice is also sent in accordance with the requirements of the United States’ National Traffic and Motor Vehicle Safety Act. Forest River has decided that a defect, which relates to the motor vehicle safety, exists in certain 2023-2024 Coachmen Concord CN321DSF Class C Motorhome. This is to inform you that your vehicle may contain a defect that could affect the safety of a person.
WHAT IS THE DEFECT?
The lower control arm brackets that are part of the air ride suspension kit, may fracture the welds and fail. This condition may allow the rear axle to rotate upon braking and accelerating. Further, the axle may detach from the vehicle.
EVALUATION OF THE RISK TO THE VEHICLE AND OPERATOR(S) RELATED TO THE RECALL.
If the lower control arm bracket(s) break, this may lead to rear axle rotation upon acceleration or braking. This condition may also allow the rear axle to detach from the vehicle. These conditions may lead to loss of vehicle control and may lead to a crash.
WHAT IS FOREST RIVER AND OUR DEALERSHIPS GOING TO DO?
Forest River is notifying dealerships of the recall. You may have the recall corrected at any Forest River dealership. However, it is preferable if you have your selling dealership perform the remedy. Forest River completely covers your cost for the remedy; you will not receive any bill of sale for anything covered under the above recall number.
WHAT SHOULD YOU DO?
Please contact your dealer immediately and request a service appointment to schedule the free remedy. The lower control arm mount will be replaced. The vehicle Owner is responsible for arranging to have the work completed. Please state you have been notified by Forest River of having a recall in process for your vehicle and provide the recall number for the dealership. It is also helpful to the dealership to have a copy of this letter when you take your vehicle in for the recall remedy. You may also visit www.forestriverinc.com for dealer locations.
HOW LONG WILL THE REMEDY PROCESS TAKE?
The estimated time of repair is 3.0 hours. However, the dealership may need to keep your vehicle or schedule an appointment with you for a later date to fit into their regular service schedule.
WHAT IF YOU HAVE PREVIOUSLY PAID FOR REPAIRS TO YOUR VEHICLE FOR THIS PARTICULAR CONDITION?
If you have already paid for a repair that is within the scope of this defect under recall, you still need to have this recall inspected and/or performed to ensure the correct parts and procedures were utilized.
Additionally, you may be eligible for a refund of previously paid repairs. Refunds will only be provided for within the scope of this defect under recall.
Please send the service invoice to the following address:
Coachmen Class C
Forest River, Inc.
Attn: WARRANTY MANAGER
PO Box 30
Middlebury, IN 46540
Chronology :
On January 23, 2024, the manufacturing plant was relocating a vehicle from one location to another in its holding yard (at the same manufacturing plant) when the driver noticed that the rear end wasn’t behaving correctly when applying the brakes. Upon inspection, the driver and manufacturing personal found that the cause from broken lower control arms (passenger and driver side).
The week of January 29, 2024, the manufacturing plant began working with the supplier to try to identify the failure. Additionally, the warranty group researched if there were any failures in the field and found none.
On February 2, 2024, Forest River’s Office of Corporate Compliance (“OCC”) was asked to attend a meeting with the manufacturing plant and the supplier. OCC opened a research item into the concern.
On February 9, 2024, Forest River’s Corporate Recall Committee voted to Recall. A Stop Sale Notice will be issued immediately following this recalls’ filing.
2 Affected Products
Vehicle
| MAKE | MODEL | YEAR |
| COACHMEN | CONCORD | 2023-2024 |
6 Associated Documents
Recall 573 Report
RCLRPT-24V095-7815.PDF 214.714KB
Miscellaneous Document – Stop Sale Notice – 210-1734
RMISC-24V095-8911.pdf 120.025KB
Loading...
Recall Acknowledgement
RCAK-24V095-9785.pdf 645.977KB
Remedy Instructions and TSB
RCRIT-24V095-7398.pdf 2554.737KB
Loading...
Manufacturer Notices(to Dealers,etc)
RCMN-24V095-7202.pdf 181.668KB
Loading...
ISSUED Owner Notification Letter(Part 577)
RCONL-24V095-4718.pdf 241.72KB
Loading...
Latest Recalls Documents
For the Latest and Most recent Recall Information Visit the link below…
https://www-odi.nhtsa.dot.gov/acms/cs/documentList.xhtml?docId=24V095&docType=RCL
- Included Components: Instruction Guide Included

- Use leverage to pull down on and free lower control arms and double wishbone suspension
- Aids in getting ball-joints free from knuckles, adjustable position pulling arm allows you to position the tool where needed
- Keeps control arms out of the way to service axles, knuckles, front and rear struts and more
- Provides the muscle needed to fight against bushing pre-load and anti-sway bar tension
- Hand Pry Tool - Transform the complex process of installing wheel bearings, front axles, and CV Joints from a two-man task to a solo job. With our lower control arm prying tool, you can simplify mechanic tasks and increase productivity
- Get the Job Done - Essential for any mechanic tool kit, our prying control arm tool enhances your workshop's efficiency. An indispensable component of your auto mechanic tool set, make automotive tasks smoother and more manageable
- Works For Most Front-Wheel Drive Vehicles - Ideal for most front-wheel drive vehicles, domestic, import, or minivans. These automotive specialty tools offers versatility, ensuring you always have the right tool on hand
- Works With Any 7/8" Diameter Pry Bar - This prying tool offers precision and versatility. Designed to work with any 7/8" diameter pry bar, the hook end fits the lower control arm while the eyelet end securely attaches to your pry bar
- Gives You the Leverage - Our automotive replacement control arms provide instant leverage, making bushing removal easier and faster. Enhance your mechanic tasks with tools that maximize efficiency without any hassle

- Comfortably press down on the cross section bar and hold the cross section bar in a downward position.
- The adjustable chain makes it easy to install and use. With flexible chains, cross arms of various shapes can be safely crushed without great effort.
- The universal shaft is made of high quality carbon steel, beautiful and hard, not easy to deform, not easy to use in humid environment, not easy to rust.
- The lever is the ideal and gentle tool for removing and assembling axle components, suitable for replacing wheel bearings, repairing shock absorbers or drive shafts.
- The total length of the lever tool (including the hook): 1030mm-1300mm, the clamping height: 65mm-265mm, the chain length (including the hook): about 660mm, if the pull rod is used. If you have any questions or feedback about our products, please contact us with email.

- The lower control arm prying tool:Installing a ball joint on a lower control arm typically requires the effort of two people,However, With this tool and 7420 or 7421 pry bar or any 7/8" diameter pry bar,one person can complete this job.Transforming the complex process of installing wheel bearings, front axle, and constant velocity joints from a two person task to a single person operation.
- Application:The lower control arm prying tool 6007 applications include front wheel drive vehicles, domestic and import cars, and mini vans.
- High quality materials:The lower control arm prying tool 6007 made of high strength carbon steel, there's no need to worry about this tool bending or breaking on the jobs, which can withstand huge pressure without deformation.
- Essential Maintenance Tools:For any mechanical tool kit, our pry control arm tool is essential as it can improve the efficiency of your maintenance and make your maintenance work easier and simpler.

- 👍 LOWER CONTROL ARM PRYING TOOL — The lower control arm prying tool is designed for prying down the lower control arm to separate the lower ball joint.
- 👍 WORKS WITH ANY 7/8" DIAMETER PRY BAR — The lower control arm prying tool is compatible with 7/8 inch pry bar and can withstand tremendous pressure without deforming.
- 👍 WORKS FOR MOST FRONT-WHEEL DRIVE VEHICLES — Applicable for most front-wheel drive vehicles, import cars, domestic vehicles, and minivans.
- 👍 WIDE APPLICATION — Tanstic control arm prying removal tools and brake caliper hangers are suitable for various automotive work, such as tasks related to wheel bearings, brake, CV joints, axle shafts, exhaust systems and suspension servicing.
- 👍 HIGH QUALITY — Made of high strength carbon steel, there's no need to worry about this tool bending or breaking on the jobs.Made of steel, which can withstand huge pressure without deformation, the eyelet end fits any 7/8in pry bar.

- USEFUL ADDITION: Designed for safe efficient removal and installation of upper control arm bushings
- VERSATILE: Includes adapters for rear wheel drive Ford, GM, and Chrysler vehicles
- UNIQUE DESIGN: Allows bushings to be replaced without the removal of control arm
- COMES IN: Heavy duty blow molded case to keep set protected and organized
- EASY TO READ: Includes detailed instruction with usage photos

- 【Premium Material】Our lower control arm prying tool is made of 0.31 thick steel, you don't need to worry about the tool bending or breaking during work, it can withstand huge pressure without deforming.
- 【Accommodates 7/8-Inch Diameter Pry Bars】Our lower control arm pry tool offers versatility and accommodates 7/8-inch diameter pry bars. Use to pry off the lower control arm to separate the lower ball joint.
- 【Safety Bayonet Design】Compared with other lower control arm pry tools on the market, our product has a specially designed bayonet at the hook end to avoid slipping during use and cause danger, making it safer. The lower control arm pry tool fits most front-wheel drive vehicles, imports, domestic vehicles, and minivans and is ideal for removing and installing lower control arm bushings.
- 【Save Time】Using our suspension-specific bushing tool, turning a two-person job into a one-person job, you can easily install your lower control arms without any hassle. The tool installation process is quick and efficient, saving you time and energy.
- 【Automotive specialty tools】Use our control arm tool to achieve superior results on bushing replacement or installation tasks. Its impressive features and reliability ensure you get the job done expertly.

- Ideas for remove the inserts on upper control arm alignment brackets
- New and improved design has a self-centering knock-out for full punch removal with less tear
- Services 1989-2001 Chevrolet and GMC 1/2 3/4 and 1-ton 2 and 4 wheel drive trucks and 1990-2002 all-wheel drive Chevrolet Astro and GMC Safari vans
- Includes a center punch and an offset punch

- 【Function】Effortlessly and without pressure, disassemble and install vehicle engine ball joint, reducing the time spent struggling with pressure on the vehicle's ball joints, installing wheel bearings, front axles, and constant velocity joints required two people. With this tool on hand, you can perform this task on your own, making it a one-person job.
- 【Application】 Suitable for most front-wheel drive vehicles, including tasks related to wheel bearings, brakes, constant velocity joints, axles, exhaust systems, and suspension maintenance.
- 【High-Quality Construction】Crafted from high-strength carbon steel, you can trust this tool to withstand tremendous pressure without bending or breaking. Made from steel, it retains its shape even under extreme pressure. The eyelet end fits any 7/8-inch pry bar.
- 【Simple and Ergonomic Design】A straightforward and ergonomic design allows you to install ball joints without assistance. Slide the straight end of the ball joint tool over the control arm, insert the pry bar (not included) into the loop at the bent end, and push downward.
- 【Durable Surface Coating】 The surface is coated with an anti-oxidation layer to extend its lifespan. The rubber cap at the end prevents scratches on the vehicle during use and protects against cuts when applying force.
Last update on 2024-06-19 / Affiliate links / Images from Amazon Product Advertising API
This product presentation was made with AAWP plugin.
SEOCONTENT-START
STOP SALE NOTICE
Page 1 of 1
February 9, 2024
Pursuant to USC49CFR §577.13 – Notification to Dealerships and Distributors – Paragraph B
“It is a violation of Federal Law for a dealer to deliver a new motor vehicle or any new or used item of motor vehicle equipment (including a tire) covered by the notification under a sale or lease until the defect or noncompliance is remedied. Substantial civil penalties apply to violations of this law.”
Pursuant to Federal Motor Vehicle Safety Act; 49 CFR Part 573.11; this notice shall serve as a formal
SAFETY RECALL – STOP SALE NOTIFICATION.
2023-2024 COACHMEN CONCORD CN321DSF CLASS C MOTORHOMES
Forest River has decided that a safety defect exists in certain 2023-2024 Coachmen Concord CN321DSF Class C Motorhome Recreational Vehicles. Forest River is recalling the defect model(s) to ensure the safety of our future retail consumers and your dealership. Forest River is issuing a Stop Sale Notice effective immediately.
Please access your Home Page on Dealer Connect to verify if your Dealership has units in stock that are subject to this recall. Enter the Service Campaign number referenced above in the “Campaign Search” field, click on the “Campaign ID Number”. Next, select “MY VINS”. Not all Dealers have units in stock that are affected by this recall.
DEFECT/NONCOMPLIANCE:
The lower control arm brackets that are part of the air ride suspension kit, may fracture the welds and fail. This condition may allow the rear axle to rotate upon braking and accelerating. Further, the axle may detach from the vehicle.
EVALUATION OF RISK:
If the lower control arm bracket(s) break, this may lead to rear axle rotation upon acceleration or braking. This condition may also allow the rear axle to detach from the vehicle. These conditions may lead to loss of vehicle control and may lead to a crash.
SERVICE PROCEDURE:
The Remedy is currently under development.
HELPFUL CONTACT INFORMATION:
CONTACT
PHONE
CUSTOMER SERVICE
(574) 825-8602
SERVICE CAMPAIGN: 001069
FR ID: 210-1734
**************************************************************************************************************
OMB Control No.: 2127-0004
Part 573 Safety Recall Report 24V-095
The information contained in this report was submitted pursuant to 49 CFR §573
Manufacturer Name : Submission Date :
Forest River, Inc. FEB 09, 2024 NHTSA Recall No. : 24V-095 Manufacturer Recall No. : 210-1734
Manufacturer Information :
Manufacturer Name : Forest River, Inc.
Address : 55470 CR 1
P.O. Box 3030 Elkhart IN 46515-3030 Company phone : 1-800-348-7440
Population :
Number of potentially involved : 10 Estimated percentage with defect : 100 %
Vehicle Information :
Vehicle 1 : 2023-2024 Forest River Inc. Coachmen Concord CN321DSF Class C Motorhomes Vehicle Type : BUSES, MEDIUM & HEAVY VEHICLES Body Style : OTHER Power Train : NR
Descriptive Information : The scope was determined by reviewing manufacturing records of deliveries of the air ride suspension components from the supplier, and when the supplier changed its supplier of the lower control arm bracket.
2023 CONCORD CNC321DSF 6
2024 CONCORD CNC321DSF 4
Grand Total 10 Production Dates : MAY 11, 2023 – JAN 05, 2024
VIN Range 1 : Begin : NR End : NR Not sequential Description of Defect :
Description of the Defect : The lower control arm brackets that are part of the air ride suspension kit, may fracture the welds and fail. This condition may allow the rear axle to rotate upon braking and accelerating. Further, the axle may detach from the vehicle.
FMVSS 1 : NR FMVSS 2 : NR
Description of the Safety Risk : If the lower control arm bracket(s) break, this may lead to rear axle rotation upon acceleration or braking. This condition may also allow the rear axle to detach from the vehicle. These conditions may lead to loss of vehicle control and may lead to a crash.
Description of the Cause : Vendor Manufacturing Defect
Identification of Any Warning
that can Occur :
None Part 573 Safety Recall Report 24V-095 Page 2 Involved Components : Component Name 1 : Affected Lower Control Arm Mount Component Description : Affected Lower Control Arm Mount Component Part Number : N/A Supplier Identification : Component Manufacturer
Name : Autoflex Suspensions Address : 1070 Gorham St.
Thunder Bay, ON Foreign States P7B 5X5
Country : Canada Chronology :
On January 23, 2024, the manufacturing plant was relocating a vehicle from one location to another in its holding yard (at the same manufacturing plant) when the driver noticed that the rear end wasn’t behaving correctly when applying the brakes. Upon inspection, the driver and manufacturing personal found that the cause from broken lower control arms (passenger and driver side). The week of January 29, 2024, the manufacturing plant began working with the supplier to try to identify the failure. Additionally, the warranty group researched if there were any failures in the field and found none. On February 2, 2024, Forest River’s Office of Corporate Compliance (“OCC”) was asked to attend a meeting with the manufacturing plant and the supplier. OCC opened a research item into the concern. On February 9, 2024, Forest River’s Corporate Recall Committee voted to Recall. A Stop Sale Notice will be issued immediately following this recalls’ filing. The information contained in this report was submitted pursuant to 49 CFR §573 Part 573 Safety Recall Report 24V-095
Page 3
The information contained in this report was submitted pursuant to 49 CFR §573
Description of Remedy :
Description of Remedy Program : Forest River will provide all parts and labor free of charge to Consumers
and Dealers. An authorized Forest River Dealer or Service Center will need to perform the remedy. The lower control arm mount will be replaced.
What is the Forest River Customer Service Phone Number? (574) 825-8602 If you have already paid for a repair that is within the scope of this defect under recall, you still need to have this recall inspected and/or performed to ensure the correct parts and procedures were utilized. Additionally, you may be eligible for a refund of previously paid repairs. Refunds will only be provided for within the scope of this defect under recall.
Please send the service invoice to the following address:
Coachmen Class C Forest River, Inc.
Attn: WARRANTY MANAGER PO Box 30
Middlebury, IN 46540
How Remedy Component Differs from Recalled Component :
NR
Affected Lower Control Arm Mount: TBD Replacement Lower Control Arm Mount: TBD Autoflex Suspensions – (807) 623-0590
1070 Gorham St.
Thunder Bay, ON P7B 5X5 – Canada”
Identify How/When Recall Condition was Corrected in Production :
The week of February 5, 2024, the supplier and manufacturing plant began installing a revised lower control arm bracket to vehicles in stock and in production. Recall Schedule :
Description of Recall Schedule : Forest River has the utmost urgency in our recalls. Forest River will send
suspected VIN numbers to our third party vendor that is licensed to pull data on the current owner of the vehicles (as needed) once a formal NHTSA I.D. is provided. Forest River intends on pushing the mailing out as soon as NHTSA provides any correction(s) and an Acknowledgement Letter.
Planned Dealer Notification Date : MAR 20, 2024 – MAR 20, 2024
Planned Owner Notification Date : MAR 20, 2024 – MAR 20, 2024
* NR – Not Reported
**************************************************************************************************************
Page 1 of 1
RECALL 24V095 / 2024-078 REMEDY INSTRUCTIONS
Make(s): CONCORD
Model(s): CNC321DSF
Model Year(s): 2023 – 2024
Concern:
The lower control arm brackets that are part
of the air ride suspension kit, may fracture
the welds and fail.
Repair Code: RC-005-01-00-004488
Allotted Time: 3.00 HRS.
Inspection Code: N/A
Allotted Time: N/A
Photo(s) Required: NO
Prior Authorization Required: YES
Part(s) Kit Number: F007-01424
Part(s) Return: NO, FIELD DESTROY
Turn off LP Gas at LPG Tank(s). Place vehicle in (P) Park and engage the Parking Brake. Disconnect the
vehicles’ battery Positive and Negative, disconnect any House battery(s) Positive and Negative, if
equipped with a generator ensure it is off and lastly, ensure the vehicle is disconnected from shore power.
Block any tires/wheels to prevent the vehicle from rolling. Failure to do so may result in electrocution, fire
or other personal injury, property damage and/or death.
PRIOR TO ANY WORK – CONTACT:
CONTACT PHONE
CUSTOMER SERVICE (574) 825-8602
PLEASE REFERENCE THE ATTACHED REMEDY INSTRUCTIONS.
2023 – 2024 Coachmen Concord/Autoflex Suspension
1
Objective
The factory installed lower axle bracket #F007-014 may have insufficient welds and/or support creating a scenario where the rear axle can become partially disconnected from the vehicle. These brackets are to be replaced with corrected brackets #F007-01424.
Parts Needed
● 2 Lower axle brackets, Part number #F007-01424
Tools Needed
● Heavy Duty Floor Jack (To Lift at Frame)
● Standard Floor Jack (To Lift Rear Axle)*
● Heavy duty Jack Stands (6 Ton Minimum)
● ½” Drive Torque Wrench
● ½” Drive Impact Wrench
● ½” Drive sockets in the following sizes
○ 1-5/16” Socket
○ 19mm Socket*
○ 22mm Socket*
○ 15/16” Socket
● ⅜” Drive Impact Wrench
● ⅜” Drive 9/16” Socket
● 1-5/16 Wrench
● 15/16” Wrench
● Pry bar
● Hammer
*Recommended For accessibility but not required
2023 – 2024 Coachmen Concord/Autoflex Suspension
2
Procedure
Figure 1
Step 1 – Preparing Vehicle
● Place vehicle in park on flat ground and remove key from ignition.
● Block front wheels to prevent vehicle from rolling.
● Jack up the rear of the RV by lifting in front of the rear axle along frame rail and support both sides with jack stands (See Figure 1). At this time the rear wheels may not be off the ground. This is normal.
● Place jack stands under frame.(See Figure 1)
● Optional – If removing wheels, use a floor jack to lift the rear axle under the center of the differential until all rear wheels are off the ground. Remove wheels. (It is not necessary to remove the wheels but it may help with accessibility.)
Note: It is not necessary to deflate air bags. Air bags will deflate automatically when lifting under frame and allowing the rear axle to hang.
Step 2 – Disassembly
● Remove both 1-5/16 nuts from lower torque arms. Both bolts will remain in place for now.(Figure 2)
● Remove the (2) 9/16 nuts holding the lower air bag plate to the axle bracket.(Figure 3) The second nut is on the back side of the axle and can not be seen in Figure 3.
2023 – 2024 Coachmen Concord/Autoflex Suspension
3
● Using a pry bar, compress the air bags upward to gain access to the top axle bracket.(Figure 4)
● Use locking pliers or hose clamp pliers to close off the exhaust tube at the leveling valve.(Figure 5) This creates a vacuum in the air bag and will keep it compressed for easy access.
● Use a 15/16 wrench on top (Figure 6) and 15/16 socket on bottom (Figure 7) to remove the 4 bolts holding the lower axle bracket in place.
● Remove lower bracket and discard.
Step 3 – Assembly
● Install a new lower bracket onto the lower torque arm first and position the bracket under the axle. Start the 15/16 nuts onto the bolts by hand.
● Tighten the front two bolts first to 145 lb-ft and ensure the gap between the upper and lower bracket on the front side of the axle is closed.
● Once tight, move to the rear set and tighten to 145 lb-ft.
● Tighten the 1-5/16 lower torque arm bolts to 400 lb-ft. (Figure 2)
● Recheck torque on all 8 Nuts and bolts on driver and passenger side.
● Remove locking pliers from leveling valve exhaust tube.(Figure 5)
● Re-install the lower bag mount to the top axle tube bracket using the existing 9/16-inch hardware. Tighten to 45 lb-ft. (Figure 3)
● If wheels were removed, re-install, referring to lug tightening pattern and torque specs. (Figure 8)
● Remove jack stands, lower jacks, and allow air bags to air up. Test drive to ensure successful repair.
2023 – 2024 Coachmen Concord/Autoflex Suspension
4
Figure 2 – Driver Side Shown
Figure 3 – Driver Side Shown
2023 – 2024 Coachmen Concord/Autoflex Suspension
5
Figure 4 – Driver Side Shown
Figure 5 – Driver Side Shown
2023 – 2024 Coachmen Concord/Autoflex Suspension
6
Figure 6 – Driver Side Shown
Figure 7 – Driver Side Shown
2023 – 2024 Coachmen Concord/Autoflex Suspension
7
HiSpec wheels – 140 ft/lbs; identified as using the original black Ford lug nuts.
Ion wheels – 120 ft/lbs; identified as using conical chrome plated lugs
.
Figure 8 – Lug Tightening sequence
**************************************************************************************************************
Page 1 of 2
Corporate Compliance PO Box 30 Middlebury, In 46540
February 2024
This Notice applies to your vehicle VIN listed above.
Dear Forest River Customer:
This notice is also sent in accordance with the requirements of the United States’ National Traffic and Motor Vehicle Safety Act. Forest River has decided that a defect, which relates to the motor vehicle safety, exists in certain 2023-2024 Coachmen Concord CN321DSF Class C Motorhome. This is to inform you that your vehicle may contain a defect that could affect the safety of a person.
WHAT IS THE DEFECT?
The lower control arm brackets that are part of the air ride suspension kit, may fracture the welds and fail. This condition may allow the rear axle to rotate upon braking and accelerating. Further, the axle may detach from the vehicle.
EVALUATION OF THE RISK TO THE VEHICLE AND OPERATOR(S) RELATED TO THE RECALL.
If the lower control arm bracket(s) break, this may lead to rear axle rotation upon acceleration or braking. This condition may also allow the rear axle to detach from the vehicle. These conditions may lead to loss of vehicle control and may lead to a crash.
WHAT IS FOREST RIVER AND OUR DEALERSHIPS GOING TO DO?
Forest River is notifying dealerships of the recall. You may have the recall corrected at any Forest River dealership. However, it is preferable if you have your selling dealership perform the remedy. Forest River completely covers your cost for the remedy; you will not receive any bill of sale for anything covered under the above recall number.
WHAT SHOULD YOU DO?
Please contact your dealer immediately and request a service appointment to schedule the free remedy. The lower control arm mount will be replaced. The vehicle Owner is responsible for arranging to have the work completed. Please state you have been notified by Forest River of having a recall in process for your vehicle and provide the recall number for the dealership. It is also helpful to the dealership to have a copy of this letter when you take your vehicle in for the recall remedy. You may also visit www.forestriverinc.com for dealer locations.
HOW LONG WILL THE REMEDY PROCESS TAKE?
The estimated time of repair is 3.0 hours. However, the dealership may need to keep your vehicle or schedule an appointment with you for a later date to fit into their regular service schedule.
WHAT IF YOU HAVE PREVIOUSLY PAID FOR REPAIRS TO YOUR VEHICLE FOR THIS PARTICULAR CONDITION?
If you have already paid for a repair that is within the scope of this defect under recall, you still need to have this recall inspected and/or performed to ensure the correct parts and procedures were utilized.
Additionally, you may be eligible for a refund of previously paid repairs. Refunds will only be provided for within the scope of this defect under recall.
Please send the service invoice to the following address:
Coachmen Class C
Forest River, Inc.
Attn: WARRANTY MANAGER
PO Box 30
Middlebury, IN 46540
NHTSA RECALL: 24V095
FR ID: 210-1734
<>
<>
<
<>, <> <>
Page 2 of 2
WHAT IF YOU NO LONGER OWN THIS VEHICLE?
If you no longer own this vehicle and have the address for the current owner, please forward this letter to the new owner within 10 working days after the day in which the notice is received. You have received this letter because government regulations require that a notification is sent to the last known owner of record. Our records indicate that you are the current owner.
PLEASE NOTE: FEDERAL LAW REQUIRES THAT ANY VEHICLE LESSOR RECEIVING THIS RECALL NOTICE MUST FORWARD A COPY OF THIS NOTICE TO THE LESSEE WITHIN TEN DAYS.
MAY FOREST RIVER ASSIST YOU FURTHER?
If you have difficulties getting your vehicle repaired, please contact your Forest River Representative listed below:
CONTACT
PHONE
CUSTOMER SERVICE
(574) 825-8602
If after contacting your dealer and/or our customer care helpline, should you have additional questions in regard to this recall, you may contact:
For US Owners Please Contact:
Administrator
National Highway Traffic Safety Administration
1200 New Jersey Ave, S.E.
Washington, D.C. 20590
Or you may call the toll free Vehicle Safety Hotline at 1-888-327-4236 or (TTY: 1-800-424-9153).
Or visit www.safercar.gov and search;
Recall ID: 24V095
Sincerely,
Forest River Inc.
Office of Corporate Compliance**************************************************************************************************************IMPORTANT SAFETY RECALL
Page 1 of 2
February 2024
Pursuant to USC49CFR §577.13 – Notification to Dealerships and Distributors – Paragraph B
“It is a violation of Federal Law for a dealer to deliver a new motor vehicle or any new or used item of motor vehicle equipment (including a tire) covered by the notification under a sale or lease until the defect or noncompliance is remedied. Substantial civil penalties apply to violations of this law.”
–Forest River motorized, and towable products are contained in this section-
Forest River has decided that a safety defect exists in certain 2023-2024 Coachmen Concord 321DSF Class C Motorhome Recreational Vehicles. Forest River is recalling the defect model(s) to ensure the safety of our future retail consumers and your dealership. Forest River apologizes for any inconvenience this action may cause your dealership; however, safety continued satisfaction and our commitment to building great products are of the utmost importance to Forest River.
The identified VIN referenced in the attached document(s).
The designated Date range of production is 05/11/2023 through 01/05/2024.
DEFECT/NONCOMPLIANCE:
The lower control arm brackets that are part of the air ride suspension kit, may fracture the welds and fail. This condition may allow the rear axle to rotate upon braking and accelerating. Further, the axle may detach from the vehicle.
EVALUATION OF RISK:
If the lower control arm bracket(s) break, this may lead to rear axle rotation upon acceleration or braking. This condition may also allow the rear axle to detach from the vehicle. These conditions may lead to loss of vehicle control and may lead to a crash.
SERVICE PROCEDURE:
PRIOR TO ANY WORK – CONTACT:
CONTACT
PHONE
CUSTOMER SERVICE
(574) 825-8602
WHAT IS THE PART NUMBER OF THE REMEDY KIT?
F007-01424
DEALER REPAIR CODE(S):
PRIOR AUTHORIZATION REQUIRED
UNITED
STATES
SERVICE CAMPAIGN
REPAIR
CODE
DESCRIPTION
ALLOWABLE HOUR(S)
24V094
001069
RC-005-01-00-004488
PERFORM REMEDY
3.0 HRS.
The Recall shall be considered the utmost priority to remedy the 2023-2024 Coachmen Concord 321DSF Class C Motorhome in question. The retail consumer shall not be charged any amount of monies for remedy to their 2023-2024 Coachmen Concord 321DSF Class C Motorhome listed under this Recall.
If your dealership has already performed the remedy to 2023-2024 Coachmen Concord 321DSF Class C Motorhome your dealership is entitled to the reimbursement as stated above by filing a claim using the indicated repair code(s). If the
DEPARTMENT OF COMPLIANCE
VEHICLE SAFETY AND RECALL MANAGEMENT
PO Box 30
MIDDLEBURY, INDIANA 46540-9218
NHTSA RECALL: 24V095
FR ID: 210-1734
<>
< >
<>, <> <>
O Integrity
O Safety
O Quality
O Customer Service
IMPORTANT SAFETY RECALL
Page 2 of 2
remedy needs to be performed on an out of warranty 2023-2024 Coachmen Concord 321DSF Class C Motorhome in which the VIN falls under as stated in the identified VIN listing, your dealership is entitled to the reimbursement as stated above by filing a claim using the indicated repair code(s).
Notice:
In no manner shall a Forest River Product Owner or Coachmen Product Owner be charged any fee(s) for scheduling, conduction or completion of the recall. Additionally, all dealership(s) that are Forest River and/or Coachmen dealership(s) are Federally Mandated to perform the recall once presented with this recall whether by the Owner or Dealership receipt of this letter, without denial of service to the Owner. Lastly, denial of a remedy for this recall is a Federal Violation punishable by law resulting substantial fines and/or civil penalties.
Federal Regulation requires that any lessor receiving this Recall must forward a copy of this notice to the lessee within ten days. If your dealership no longer owns this vehicle, please inform the Warranty Manager of the product listed above of the change of ownership.
Sincerely,
Forest River, Inc.
Office of Corporate Compliance****************************************************************************************************************************************************************************************************************************
SEOCONTENT-END