
| “This site contains affiliate links for which OEMDTC may be compensated” |
NHTSA ID Number: 10164482
Manufacturer Communication Number: 059-Z01-11
Summary
Multi Adjustable Splined Torsion Axle Installation Instructions
1 Affected Product
Equipment
| BRAND | PART NO. | PRODUCTION DATES |
| DEXTER AXLE CO | DEXTER AXLE CO | |
INSTALLATION INSTRUCTIONS
Multi Adjustable Splined Torsion Axle
Frame Size: Axle brackets can be adjusted to fit a certain frame width range for each length axle “G”.
Bracket Style: There are two types of brackets, Utility style “I” and Marine style “K”.
Torsion Arm Angle: “H” The torsion arms can be adjusted from 45 degrees down to 25 degrees up.
With these three adjustments, you can replace almost all custom torsion axles used today in the hub faces offered.
Hub Face Width: Is measured from the face of the hub when properly assembled onto the axle spindle. Hub Face is NOT measured from the center of the tire. Hub face is NOT the overall length of the bare axle.
Figure 3:
Track Width: Is a measurement from the center of the tires. This length can vary with the different types of wheels that offer varying offsets. Track is NOT the same as the hub face.
Brake Flange Width: Is measured from the outer surface of the flange to the same location on the opposite side of the axle.
Each axle length has its own range of positions for mounting the axle brackets. Do NOT exceed the range shown (Figure 3). Exceeding the overhang length will create camber and tire wear issues.
NEW AXLE PLACEMENT/INSTALLATION OF WELD-ON FRAME MOUNT
If you are using new frame brackets or welding the frame brackets to your trailer frame: VERY IMPORTANT: Brackets must be “square” to the frame. The frame brackets must be welded/attached at the same distance from the rear or front of the trailer. Failure to do so will result in a trailer that will travel at an angle when towed.
- Weld-On Frame Mounts (#86884) must be installed directly across from each other to insure proper axle alignment. Before mounting the units, measure back from the coupler and mark the frame to make sure that the two distance measurements (A and B) are within 1/8 inch of each other. Mark the trailer frame for the location of the front edge of the frame mount.
| Straight Axle | V-Bend Axle | |||||
| Powder Coat Part # | Galvanized Part # | Powder Coat Part # | Galvanized Part # | Hub Face Length | Outside Frame Width Range | Brake Flange Length |
| 86870 | 86701 | N/A | N/A | 83” | 59-67” | 76.66” |
| 86871 | 86702 | 86877 | 86708 | 85” | 61-69” | 78.66” |
| 86872 | 86703 | 86878 | 86709 | 87” | 63-71” | 80.66” |
| 86873 | 86704 | 86879 | 86710 | 89” | 65-73” | 82.66” |
| 86874 | 86705 | 86880 | 86711 | 91” | 67-75” | 84.66” |
| 86875 | 86706 | 86881 | 86712 | 93” | 69-77” | 86.66” |
| 86876 | 86707 | 86882 | 86713 | 95” | 71-79” | 88.66” |
- Clamp the weld on bracket in place. The center line of the axle will line up with the center line determined by the coupler to axle measurement. Make sure the short end of the bracket is in the forward direction (Figure 5).
- Weld a 1/4” fillet weld on all sides of the mounting bracket, repeat for other side.
Figure 5
Place the axle underneath the trailer, as close as possible to the mounting location. Preform the following assembly on the floor.
- Position bracket on axle tube so that the short end of the bracket is facing forward. The rear (back) side of the axle has the identification decals
- Using the hardware supplied (Figure 6), place a flat washer over one of the bolts. Next place one of the bushings on the bolt with the wider end facing the head of the bolt.
- Insert the bolt with the bushing into housing so that the bolt goes under the axle and the threaded part is to the rear of the axle.
- Insert one of the bushings onto the bolt with the narrow end facing the axle tube.
- Place a flat washer on the bolt along with a nylon lock nut. Snug the nut on to the bolt but DO NOT TIGHTEN AT THIS TIME.
- Repeat for the second bolt.
- Repeat for the opposite side bracket.
INSTALLATION OF ADJUSTABLE TORSION AXLE
| CAUTION |
| These axles are very heavy. It is recommended to use floor jack to lift and position the axle to the frame. The following assembly requires at least two people. |
If you are installing on a new trailer, skip to step 4.
- Remove wheels and brake lines, if present, from the old torsion axle.
- Remove torsion axle from the trailer.
- Position the axle mounting brackets to match the existing axle brackets as closely as possible.
- Using a floor jack and one other person, lift the axle into mounting position.
Utility Style Mounting Brackets:
-
- Bolt the axle to the frame using existing frame brackets.
- If frame mounting brackets are not present, but needed, welding of #86884 to frame will be required prior to mounting (see page 7). Using hardware supplied with #86884, bolt utility style mounting bracket to frame mount. Short end of the bracket should face the front of the trailer.
Marine Style Mounting Bracket:
- Center the Adjustable Torsion Axle to the trailer frame. Measure the distance between the outside of the bracket to the end of the splined arm (Figure 8 and 9). Distance must be equal on each side. DO NOT USE THE AXLE TUBE AS A MEASURING POINT.
- Tighten the mounting bolts to the frame first. 150 ft lbs.
- Re-check measurements on centering the axle on the frame.
- Tighten the axle mounting brackets to 100 ft lbs.
TORSION ARM ASSEMBLY
- It is important to match as close as possible the same arm angle as the original axle. The variation possible is 45 degrees down to 25 degrees up. The end of the splined arm has index marks in a circular pattern. Use these to line up with the gap in the torsion arm to assure that you have both sides set at the same arm angle. Arm angle can only be used in a trailing position, going towards the rear of the trailer.
- Insert the torsion arm bolt and nylon lock nut, Bolt head should be in the upper or top of the arm position. Torque to 150 ft lbs.
SUPER LUBE OPERATING INSTRUCTIONS
- Remove wheel hubs from the packaging. Hubs are already preassembled and pre-greased.
- Slide hub onto spindle, followed by washer and spindle nut.
- Tighten the spindle nut to approximately 40 ft. lbs. Turn wheel in both directions to be sure wheel turns freely.
- Turn back spindle nut 1/6 to 1/4 turn to the nearest locking hole. Hub should turn smoothly with no end play or wobble.
- Line up cotter key with nearest locking hole and spread key.
- Install the Super Lube dust cap and mount wheel.
The Adjustable Torsion Axle is equipped with Super Lube Spindles. These spindles allow for easy adding or replacement of grease in the wheel hub. The hubs are pre-greased with Lucas® Red “N” Tacky grease and assembled at the factory.
SUPER LUBE “SPINDLE” LUBRICATION MAINTENANCE OR GREASE REPLACEMENT
- Remove the rubber plug from the grease (hub) cap.
- Use a standard grease gun onto the grease fitting located at the end of the spindle, making sure the grease gun nozzle is engaged on the fitting tightly.
- Pump grease into the fitting, while slowly turning the wheel. Grease will flow out of the hub around the spindle.
- When the grease appears to be the new clean grease, remove the grease gun and wipe off any excess grease.
- Replace the rubber plug in the cap.
059-Z01-11 2019.09 | 08242
059-Z01-11
https://www.nhtsa.gov/recalls?nhtsaId=10164482
https://static.nhtsa.gov/odi/tsbs/2019/MC-10164482-0001.pdf
 Loading...


- Self-Adjusting Electric Brake: Say goodbye to manual adjustments! Dive into the world of 12" x 2" electric trailer brake assemblies that self-adjust. It's not just smart; it's efficient and gives your trailer that smooth braking touch.
- Hassle-Free Installation: DIY's best friend! Our electric trailer brake is straightforward and a breeze to install. It's ready to install right out of the box and boasts high compatibility. Wherever you are, installation is just a few steps away.
- Built for the Long Haul: Keep on rolling! With a lifespan of up to 30,000 kilometers, these trailer brakes are in it for the long haul, designed for your trailer's daily adventures. Constructed from premium materials, our brakes promise robust durability and resistance to wear and tear.
- Versatility at Its Best: The trailer brake kit has a broad range of applications, including towing trailers, transporting goods, camping trips, and more. It's compatible with Dexter, AL-KO (a brand under the former), and other trailer axles.
- Top-Notch Packaging: When it comes to packaging, we don't just box; we care. Our trailer electric brake kit is packaged above industry standards. Every brake is meticulously checked and wrapped to ensure what you get is nothing short of perfect.
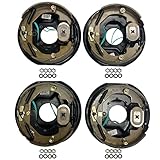
- 4 x trailer 5 on 4.5" hub drum kits + 4 x 10"x2-1/4" electric brakes for Dexter and other brands 3,500 lbs trailer axle
- Drum Bolt pattern: 5 on 4.5", bearing races and 1/2"-20 studs installed, Ref part #. 008-247-05, 84546
- Kits also includ: 4x L68149 inner cone bearings and 4x L44649 outer cone bearings, 4x Grease seals 1.719" x 2.565", 4x E Z lube grease caps with rubber plug; 20 cone wheel nuts 1/2"-20 thread
- Also include: 2 left + 2 right 10"x2-1/4" electric brakes with 3" center bore and 4" mounting bolts circle diamter

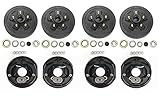
- Compatible with: Fit For Alko/ for Dexter/ for Quality, and other brands 3,500lbs trailer axle
- Kit Includes: 2x 10" x 2-1/4" left electric brake assemblies, 2x 10" x 2-1/4" right electric brake assemblies, 16x spring pad, 16x nut
- Production and Installation: Strictly follow automotive standards and comply with the G3000 standard in the US; Easy to install
- Product Introduction: The AEagle electronic brake features non-asbestos brake linings for superior friction performance, ensuring longevity and enhanced braking capabilities.
- Quality Assurance: 12-month warranty! Tested before shipping.

- Compatible with : For Alko/ for Dexter/ for Quality, and other brands 5,200 lbs 6,000 lbs, and 7,000lbs trailer axle
- Kit Includes: 1x 12" x 2" left electric brake, 1x 12" x 2" right electric brake, 10x bolt, 10x spring pad, 10x nut
- Production and Installation: Strictly follow automotive standards and comply with the G3000 standard in the US; Easy to install
- Product Introduction: The AEagle electronic brake features non-asbestos brake linings for superior friction performance, ensuring longevity and enhanced braking capabilities.
- Quality Assurance: 12-month warranty! Tested before shipping.

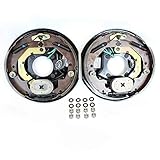
- 10" x 2.25"electric trailer brake assembly (left & right side), fit most 3500lbs - 4000lbs trailer axle; 4-hole mount w/mounting bolt
- Fits the wheel bolt pattern 4 lug,fits spline size #84 steel drum; center hole diameter: 3" ; bolt circle diameter: 4"
- Replace 023-026-00 and 023-027-00;77-10-2;23-105, 23-106,296649;replace Dexter Lippert Al-Ko,etc brake assemblies
- The electric brakes are NOT self adjusting, unlike most drum brakes on cars and trucks,need to be done when installed and periodically thereafter.If you cannot adjust yourself, please find a professional adjustment
- JADODE electric and hydraulic trailer brake parts Making it an Ideal Choice for Travelers Seeking a Hassle-Free Power Solution

- Premium LIBRA OE 12" x 2" self adjusting electric trailer brake assemblies (2 left + 2 right) for two axle
- works with most 5,200 - 7,000 lbs trailer axles in the market
- Center Hole Diameter: 3-1/4", 5 holes mounting,
- Exchange with Dexter brake # 023-180-00/023-181-00
- Self adjusting, no more manual adjusting

- 2-Pack of TruRyde 12" x 2" self-adjusting electric brake assemblies. Contains 2 left and 2 right brake assembly.
- 5 Hole mounting for 5,200 lbs., 6,000 lbs., and 7,000 lbs. trailer axles.
- Comes with mounting bolts, nuts, and lock washers
- Works with Al-Ko, Dexter, Lippert,and Quality Trailer Axles
- Geniune TruRyde Brakes. TruRyde parts are manufactured to automotive standard in ISO/TS-16949 registered factory.
- Pair of 10" x 2.25" TruRdye electric trailer brake assemblies with parts.
- 4 Hole mounting, comes with mounting bolts, nuts, and lock washers
- For Alko, Dexter, Quality, or other popular trailer axle manufacturers.
- TruRyde Brakes
- TruRyde parts are manufactured to automotive standard in ISO/TS-16949 registered factory.
Last update on 2024-06-11 / Affiliate links / Images from Amazon Product Advertising API
This product presentation was made with AAWP plugin.