| “This site contains affiliate links for which OEMDTC may be compensated” |
NHTSA Campaign Number: 17V812
Manufacturer Ducati North America
Components SERVICE BRAKES, HYDRAULIC
Potential Number of Units Affected 6,758
Front Brake Master Cylinder Failure
If the front brake master cylinder fails, the loss of front braking ability can increase the risk of a crash.
Summary
Ducati North America (Ducati) is recalling certain 2015-2018 1299 motorcycles (including STD, S, FE and SL models), Monster 1200 motorcycles (including S and R models), Multistrada motorcycles (including S and PP models), 2015-2017 Panigale R, 2016-2018 XDaviel S motorcycles and 2017-2018 Scrambler 800 Café Racer motorcycles. These motorcycles are equipped with Brembo front brake master cylinders that may fail.
Remedy
Ducati will notify owners, and dealers will replace the front brake master cylinder piston, free of charge. The recall is expected to begin February 15, 2018. Owners may contact Ducati customer service at 1-800-231-6696.
Notes
Owners may also contact the National Highway Traffic Safety Administration Vehicle Safety Hotline at 1-888-327-4236 (TTY 1-800-424-9153), or go to www.safercar.gov.
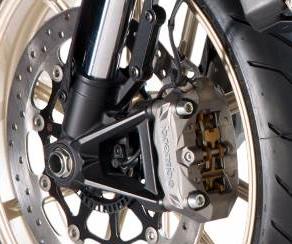
Brembo Front Brake Master Cylinder
| Models: | Scrambler Café Racer | MY 2017 – 2018 |
| Multistrada 1200 S/Pikes Peak | MY 2015 – 2017 | |
| Multistrada 1260 S/Pikes Peak | MY 2018 | |
| Monster 1200 S | MY 2015 – 2018 | |
| Monster 1200 R | MY 2016 – 2018 | |
| XDiavel S | MY 2016 – 2018 | |
| Panigale R | MY 2015 – 2017 | |
| 1299 Panigale STD/S | MY 2015 – 2017 | |
| 1299 Superleggera | MY 2017 | |
| 1299 Panigale S Anniversario | MY 2017 | |
| 1299 Panigale R Final Edition | MY 2018 |
Recall Bulletin SRV-RCL-18-001
| Date: | Monday, Jan 15th, 2018 |
| To: | Dealer Principal, General Manager, Service Manager, North American Dealer Network |
| From: | Richard Kenton, Technical Director; Jonathan LaForte, Technical Manager |
Important: All Dealer Principals, Service Managers, and Parts Managers should read and initial this notice.
Dear Service Manager, this notice is sent to you in accordance with requirements of the National Traffic and Motor Vehicle Safety Act.
NHTSA Campaign I.D. Number: 17V-812
Transport Canada Safety Recall I.D. Number: 2017-637
Situation:
Ongoing quality testing on the motorcycles as manufactured, as well as analysis of field reports, has identified a possible fault with PPS (Polyphenylene Sulphide) floating piston with diameters of 15 mm and 16 mm fitted on the Brembo front brake radial master cylinders of the models mentioned above, manufactured from 2015 to 2018. It’s necessary to replace the floating piston with one made from aluminum, which ensures a higher mechanical strength.
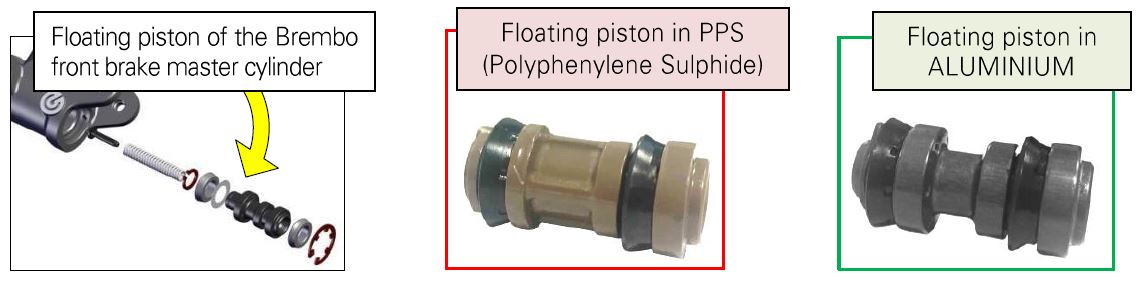
Failure of the floating piston could result in failure of the component (creation of the crack) under high- stress conditions typical of track use, frequent ABS interventions or bike tip-over. If a crack is created, it could compromise front brake operation, thus jeopardizing the vehicle’s braking capability; the rear brake is not affected by this problem.
Although the possibility of this fault is remote, we deem it necessary to preventively replace all floating pistons in PPS (Polyphenylene Sulphide).
We’ve identified the models equipped with a front brake master cylinder PPS floating piston. On the affected models it is therefore necessary to replace the floating piston with the components included in the 2 specifically created kits:
- Part no. 61041881A for the KIT containing the aluminum floating piston with a diameter of 16 mm;
- Part no. 61041891A for the KIT containing the aluminum floating piston with a diameter of 15 mm.
1) Floating piston:
Ø16 for kit part no. 61041881A
Ø15 for kit part no. 61041891A
2) New snap ring
3) New dust cap
4) Kit box
5) White grease
6) Assembly fluid
7) Elastic band for final test
| KIT containing the aluminum floating piston, diameter 16 mm Part no. 61041881A | Models with 2 calipers M50 of the front brake |
 |
| KIT containing the aluminum floating piston, diameter 15 mmpart no. 61041891A | Models with 1 caliper M4.32 of the front brakeScrambler Cafè Racer ONLY |
 |
In the early weeks following the launch of this campaign, spare parts availability will be limited; as such we ask you to initially order only the quantity required to service the first motorcycles.
The procedure for replacing the PPS floating piston of the Brembo front brake radial master cylinder described here also requires replacing the brake fluid with new DOT 4 brake fluid; this precaution not only regenerates the system with new brake fluid, but also prevents any possible mix with different DOT fluids that Customers might have used.
Although the procedure for replacing the PPS floating piston of the Brembo front brake radial master cylinder described here does not feature special difficulties, to ensure the successful outcome of this operation you must strictly comply with the instructions below. Therefore, we recommend you take your time to fully understand the procedure before attempting its implementation on the motorcycle.
The work environment where you carry out the procedure and the tools and equipment used (wrenches and gloves) must be clean.
If the motorcycle is equipped with Ducati Performance brake lever (part no. 96880011B), the procedure below may be applied. Always comply with the assembly instructions given in the specific Ducati Performance instructions.
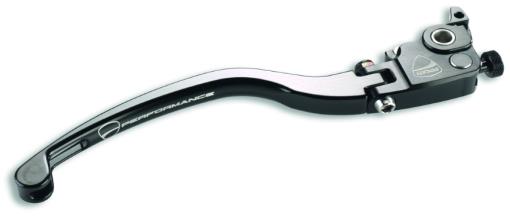
If the motorcycle to be updated is equipped with a non-genuine brake lever, on the repair order you must specify that the motorcycle is equipped with a non-genuine Ducati brake lever. Please also consider that the non-genuine Ducati brake lever could require special assembly precautions so, in case of doubt, we recommend you ask the brake lever manufacturer for associated assembly instructions.
Affected VIN Range:
You can find the precise list of VIN numbers involved in CR144 in the attached VIN list or on DCS, in sections:
| VEHICLE HISTORY |  |
You can consult the single frame number. |
| CAMPAIGNS |  |
You can consult all the VIN numbers that Ducati Motor Holding sent you. |
Criteria for application of the technical solution on circulating motorcycles
For the designated frame numbers referenced above, the motorcycles must be repaired.
Limitation on Sale or Lease of Certain Vehicles:
Section 154(d) of National traffic and Motor Vehicle Safety Act of 1996 mandates that dealers correct, prior to sale or lease, any vehicle which contains a defect relating to motor vehicle safety. It is therefore mandatory that any vehicle in your inventory affected by this recall be corrected prior to sale or lease.
Auto-ship Replacement Part:
Dealers will receive an auto-ship order of the two parts listed parts below, based on 20% of their historic sales volume and their stock of affected units. Dealers will need to order the parts required to update any further motorcycles brought in for service.
| Part no. | Description | Dealer cost USD | Dealer cost CDN | Dealer cost MEX |
|---|---|---|---|---|
| part no. 61041881A | M50 Kit (16mm) | $15.97 | $19.83 | $300.77 |
| part no. 61041891A | M4.32 Kit(15mm) | $15.97 | $19.83 | $300.77 |
Service Solution:
Below is the procedure for replacing the PPS floating piston of the Brembo front brake radial master cylinder.
The procedure includes the following steps:
B) Marking brake fluid level in the reservoir;
C) Floating piston replacement;
D) Front brake system fluid change;
E) Restoring the proper brake fluid level in the reservoir;
F) Final test with the elastic band;
G) Certification of update successfully implemented.
A video has been made showing you how to correctly perform these operations. It can be viewed at the following link: https://youtu.be/GO4-LdTC4Jk

A) Vehicle preparation
| ATTENTION |
| The brake fluid could damage the paint or parts of the bike. Wash the affected area withplenty of water in case of accidental contact. |
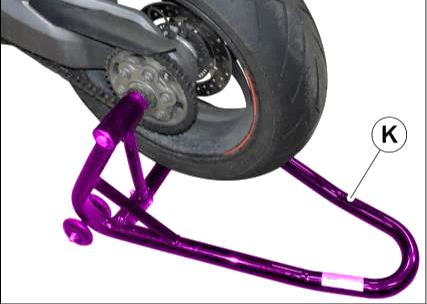
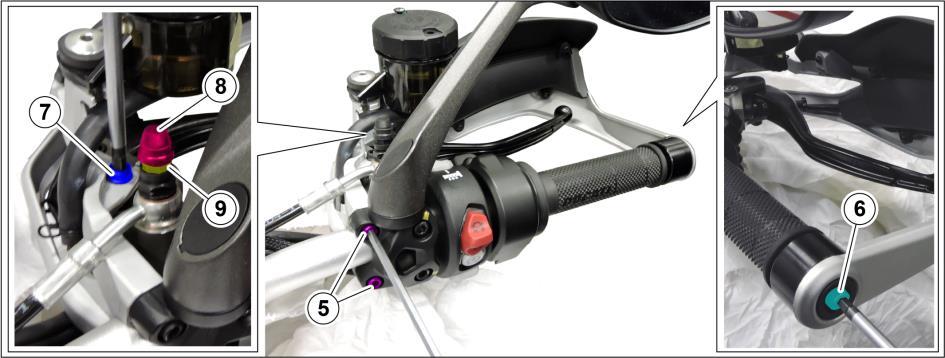
1) Position the bike on the rear paddock stand (K).
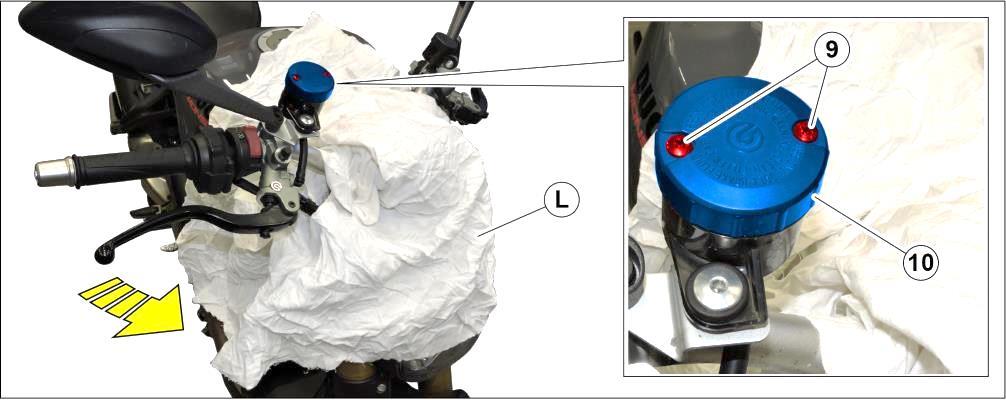
2) Turn handlebar fully to the left and use a cloth (L) to protect the parts near and under the front brake master cylinder, as shown in the figure.
| ATTENTION |
| The brake fluid is harmful in case of contact with your eyes or skin. Wash the affected areawith plenty of water in case of accidental contact. |
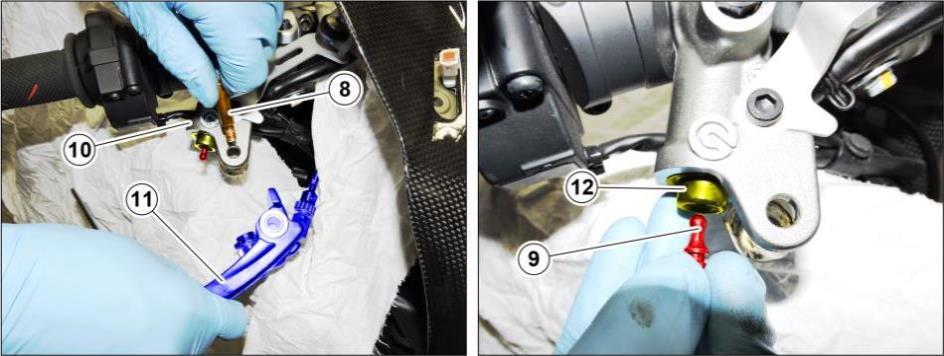
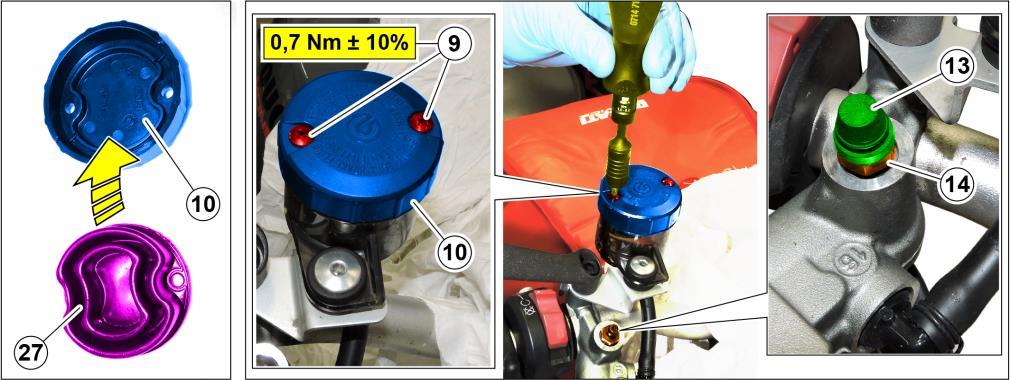
3) Unscrew the 2 screws M4x45 (9) and remove the cover (10).
| NOTE | XDIAVEL S ONLY |  |
|
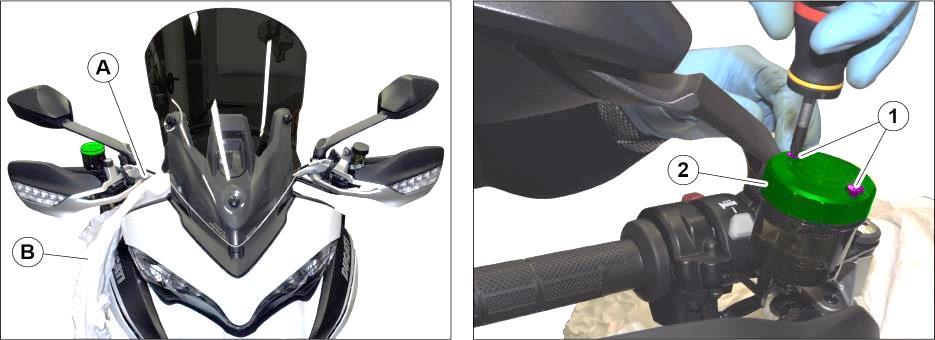
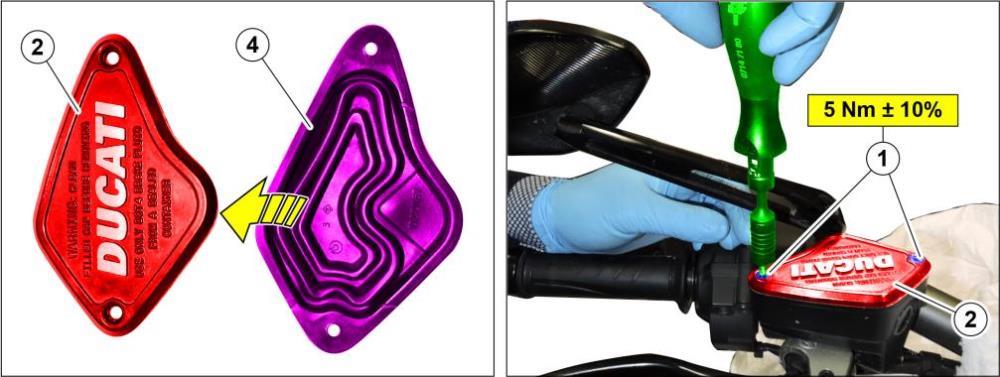
a) Turn handlebar (A) straight and use a cloth (B) to protect the parts near and under the front brake master cylinder, as shown in the figure. b) Unscrew the 2 screws M4x15 (1) and remove the cover (2).
|
||

| NOTE | MULTISTRADA ONLY |  |
|
a) Turn handlebar (A) straight and use a cloth (B) to protect the parts near and under the front brake master cylinder, as shown in the figure. b) Unscrew the 2 screws M4x45 (1) and remove the cover (2).
|
||
B) Marking brake fluid level in the reservoir
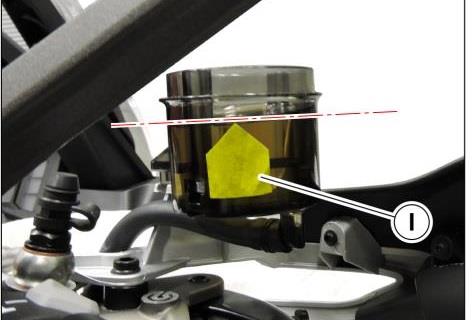
1) Prepare a reference arrow using adhesive tape (I) and stick it on the reservoir to mark the initial fluid level, as shown in the figure.
2) Completely drain the fluid (12) from the reservoir using the syringe (M).
3) Remove bleed cap (13) from bleeder union (14).

| NOTE | XDIAVEL S ONLY | |
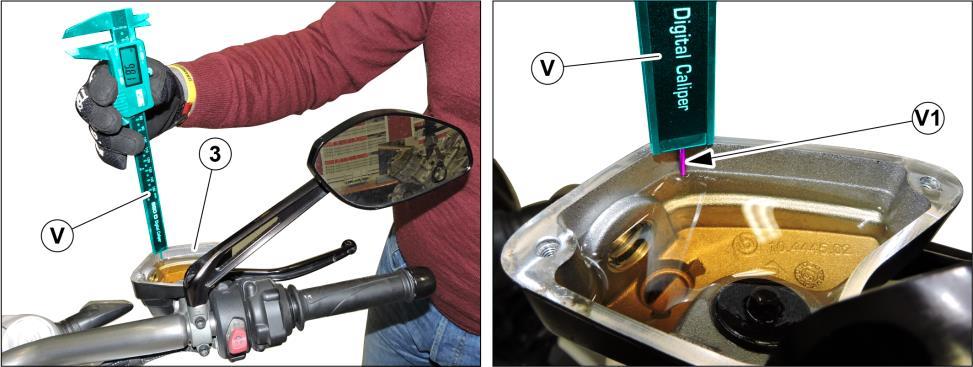
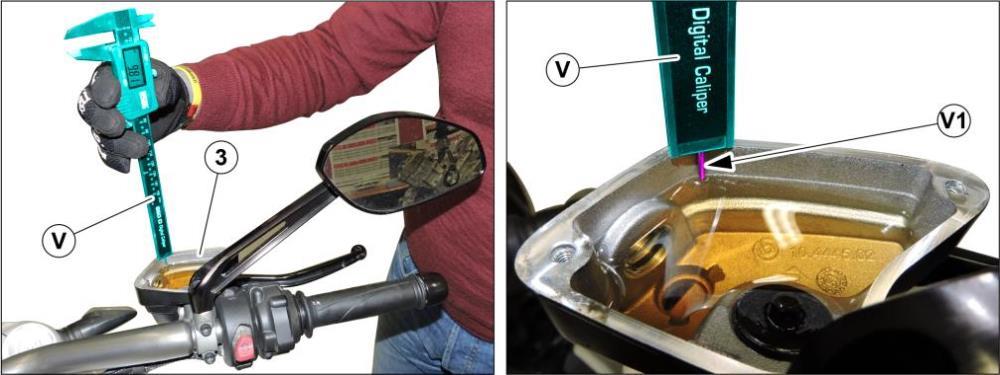
| Set the bottom of gauge (V) on the surface of brake fluid reservoir (3) and bring the tip (V1)down until reaching fluid level. Measure and take note of the measurement. | ||
C) Floating piston replacement
| NOTE | MULTISTRADA ONLY | |
|
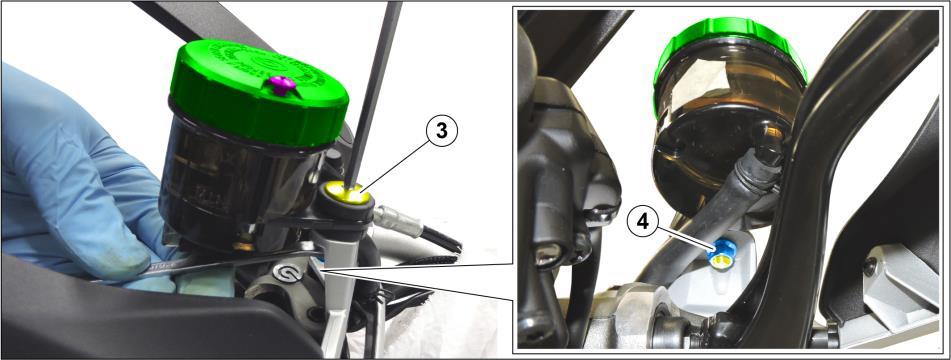
a) Loosen special screw (3), while holding nut (4) on the opposite side.
b) Loosen the 2 screws M5x18 (5), screw M6x55 (6), screw M6x18 (7) and remove the RH hand guard. c) Remove bleed cap (8) from bleeder union (9).
|
||
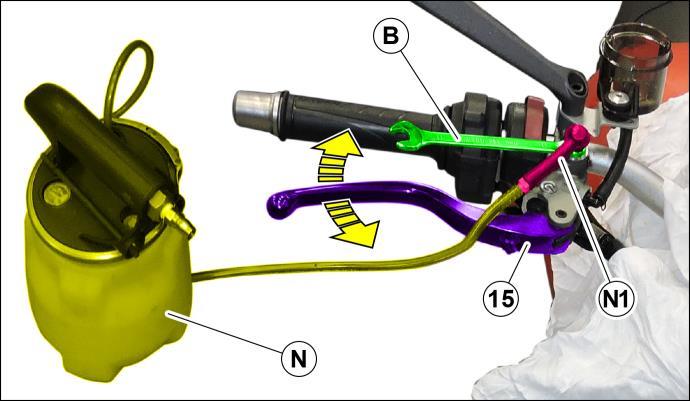
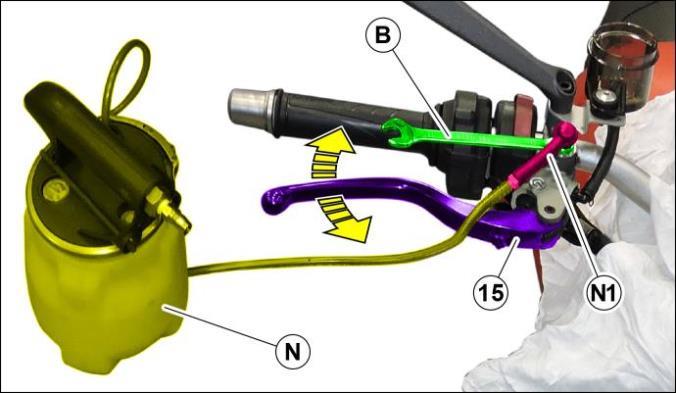
1) Fit wrench (B) in the flat on bleeder union (14).
2) Fit cap (N1) of bleeder vessel (N) on bleeder union.
3) Loosen bleeder union and pump using lever (15), to drain all the fluid from the master cylinder. Tighten the bleeder union again.
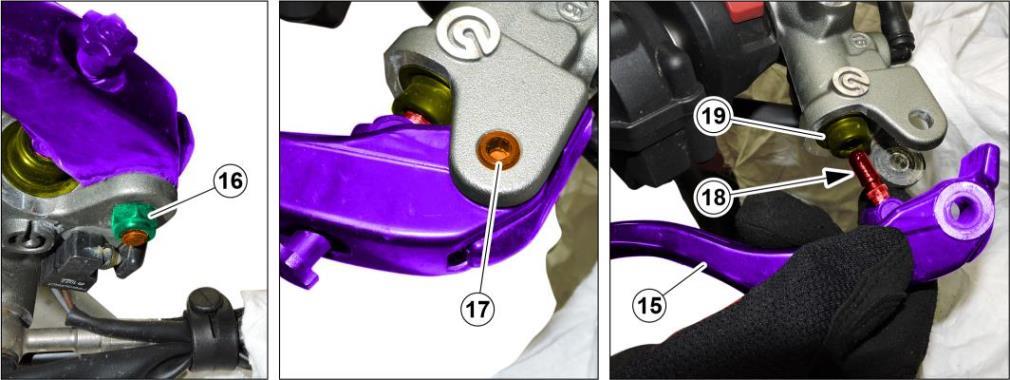
4) Loosen nut (16).
5) Loosen and remove the pin (17).
6) Remove the lever (15), by removing the pin (18) from the old dust cap (19).
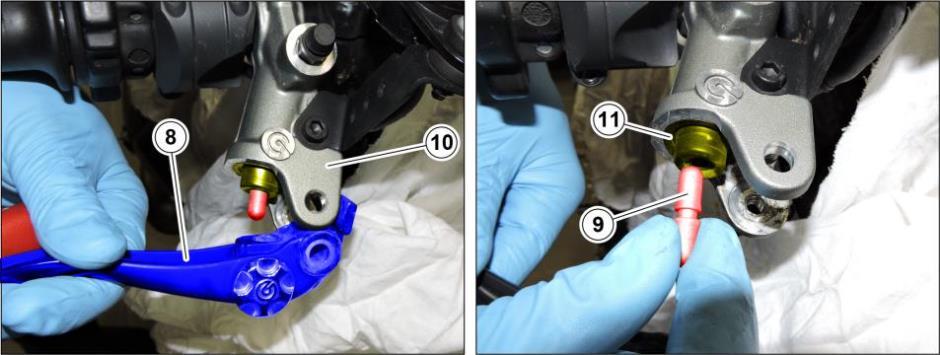
| NOTE | SCRAMBLER CAFE RACER ONLY |  |
| a) Remove the brake lever (8) from the brake master cylinder (10).
b) Remove pin (9) from the old dust cap (11).
|
||
| NOTE | 1299 SUPERLEGGERA ONLY |  |
| a) Remove the brake lever (11) from the brake master cylinder (10), and lay it onto the cloth previously arranged on the headlight fairing.
b) Remove pin (9) from the old dust cap (12).
|
||
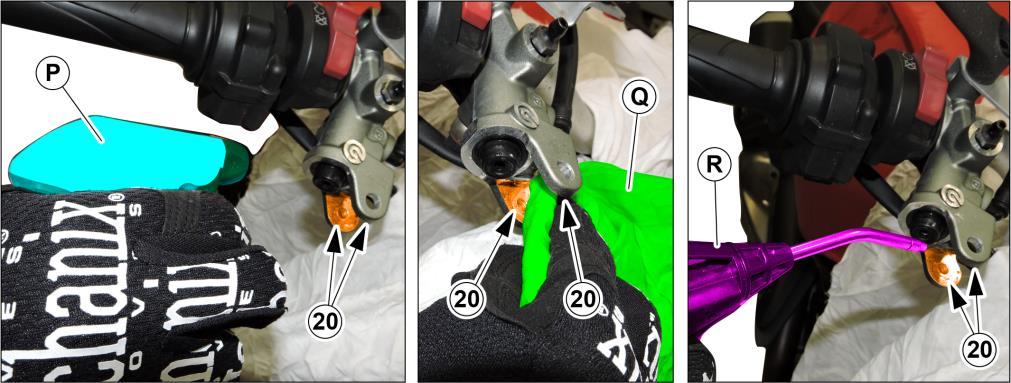
7) Use a sprayer (P) to wash the surfaces (20) with WATER.
8) Clean and dry the surfaces (20) using a cloth (Q).
9) Blow compressed air (R) to thoroughly remove all excess water from surfaces (20).
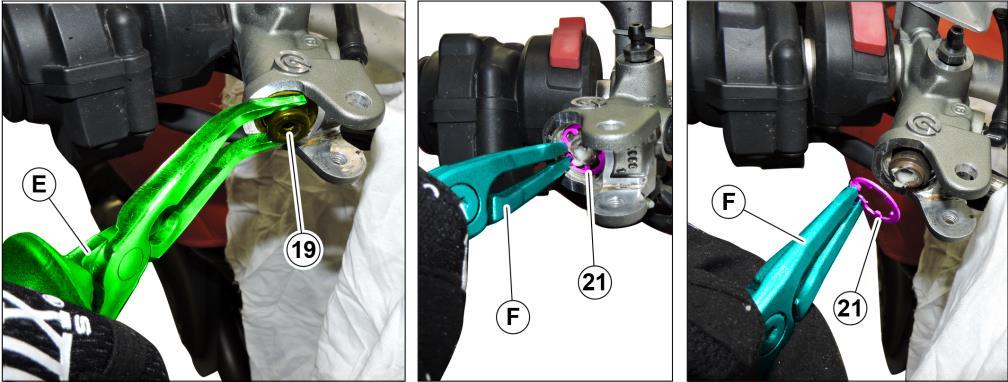
10) Remove the old dust cap (19) using pliers (E).
11) Remove the old snap ring (21) using the suitable pliers (F), as shown in the figure.
12) Take the kit specific for the model you are upgrading.
| Ø16
Floating piston KIT part no. 61041881A |
Models with two calipers
M50 of the front brake |
|
| Ø15
Floating piston KIT part no. 61041891A |
Models with one caliper
M4.32 of the front brake Scrambler Cafè Racer ONLY |
|
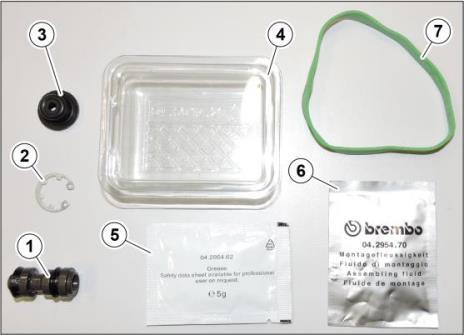
13) The 2 kits include the following parts:
1) Floating piston:
Ø16 for kit part no. 61041881A
Ø15 for kit part no. 61041891A
2) New snap ring
3) New dust cap
4) Kit box
5) White grease
6) Assembly fluid
7) Elastic band for final test
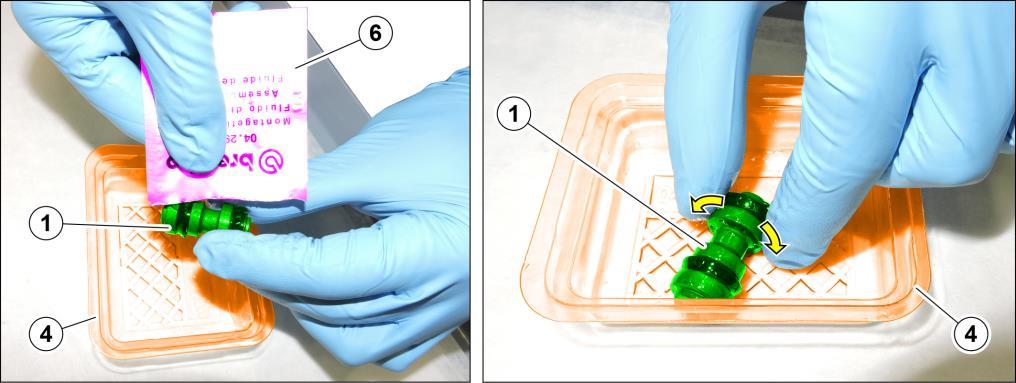
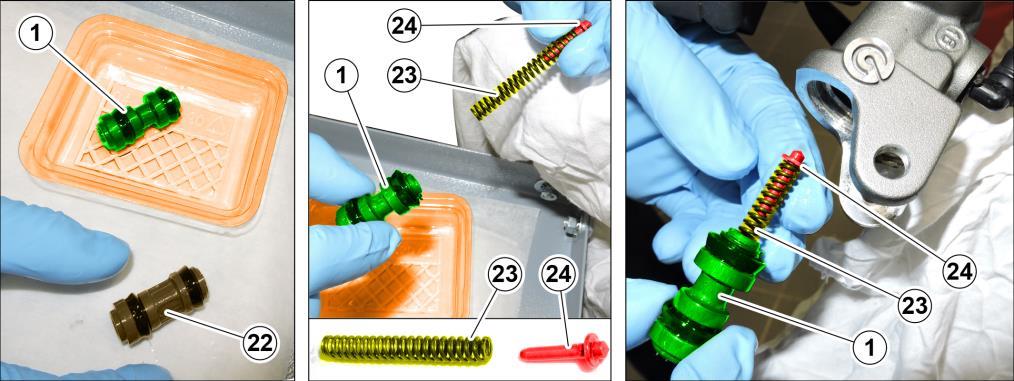
14) Open the assembly fluid sachet (6) and pour its content onto the new floating piston (1) while turning it around, and collect any excess fluid in the kit box (4).
15) Lay the floating piston (1) inside the kit box (4), making sure that the assembly fluid is present on the seals and all over the piston surface.
16) Remove the old floating piston (22) from the brake master cylinder.
17) Remove and keep pin (24) with spring (23) from the old floating piston (22).
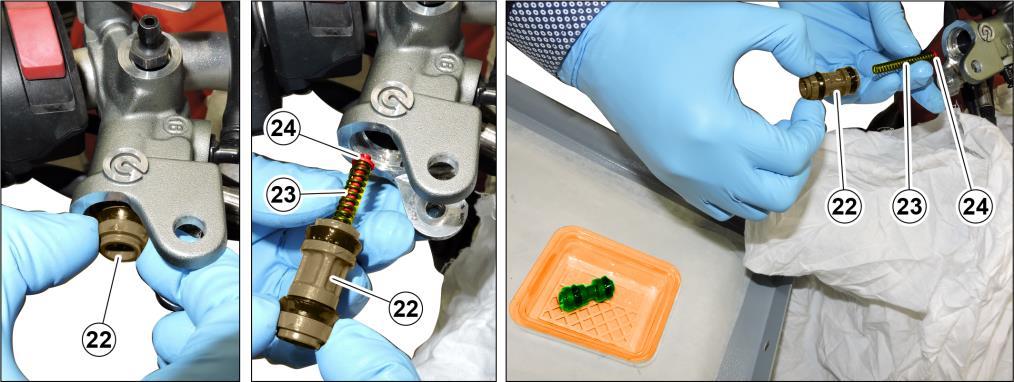
18) Lay the old floating piston (22) on the bench.
19) Take the new floating piston (1) and install spring (23) and pin (24) to it, as shown in the figure.
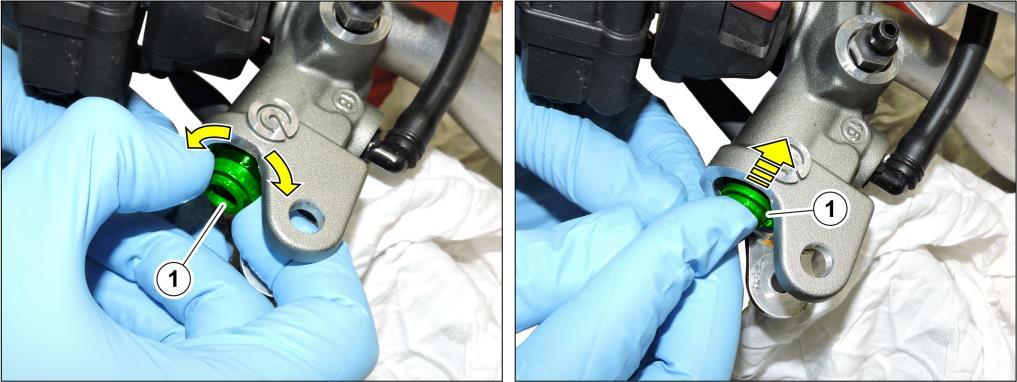
20) Install the new floating piston (1) to the brake master cylinder by SLOWLY inserting it.
| ATTENTION |
| Carry out this operation as quickly as possible so as to prevent ingress of any impurities inthe brake master cylinder. |
21) Slightly turn the new floating pin (1) so as to help settling the pin (24) in the brake master cylinder.
22) Press on floating pin (1), to make sure that pin (24) is perfectly seated in the brake master cylinder.
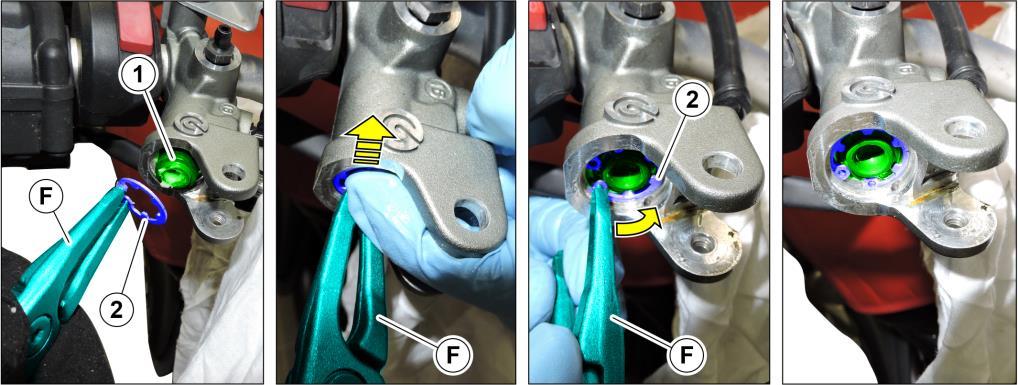
23) Use the pliers for circlips (F) to install the new snap ring (2) on the brake master cylinder, while holding the new floating piston (1) pressed inward.
| ATTENTION |
| To make sure that the new snap ring (2) is properly installed and seated, use the calipers for circlips (F) and turn the snap ring by one fourth of a turn. |
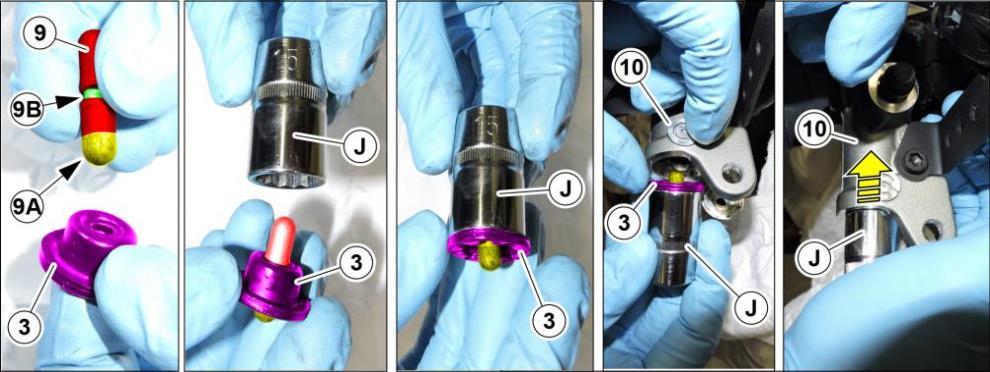
24) Open the sachet of white grease (5) and smear the new floating piston (1) with a small quantity of white grease (5A), as shown in the figure.
25) Fit the new dust cap (3) to pin (18), bring it fully home and make sure it is properly seated on the pin.
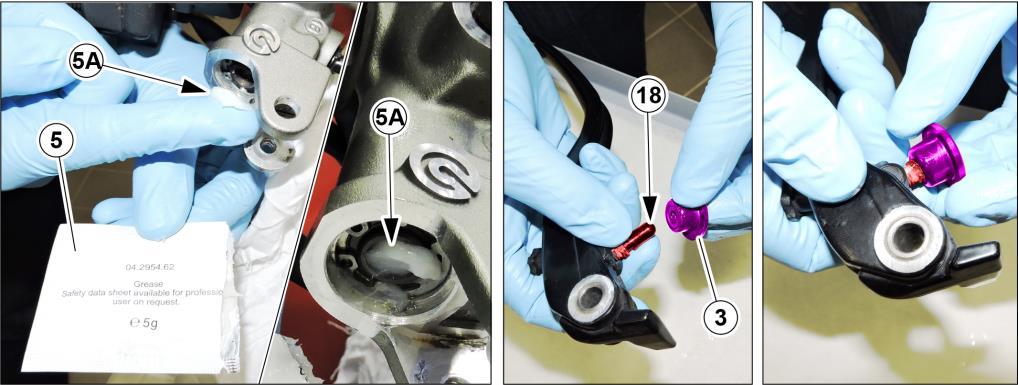
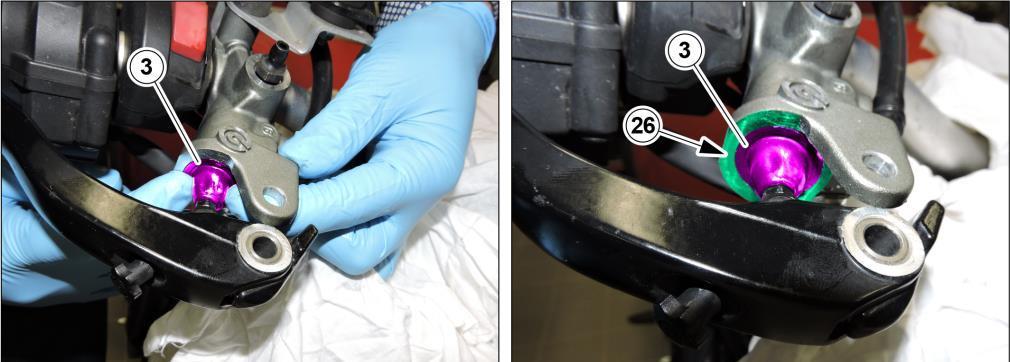
26) Install the new dust cap (3) on the brake master cylinder, bringing it fully home and evenly pressing all around. The dust cap (3) is properly installed if it is flush with the machined surface (26) of the brake master cylinder.
| NOTE | 1299 SUPERLEGGERA ONLY | |
|
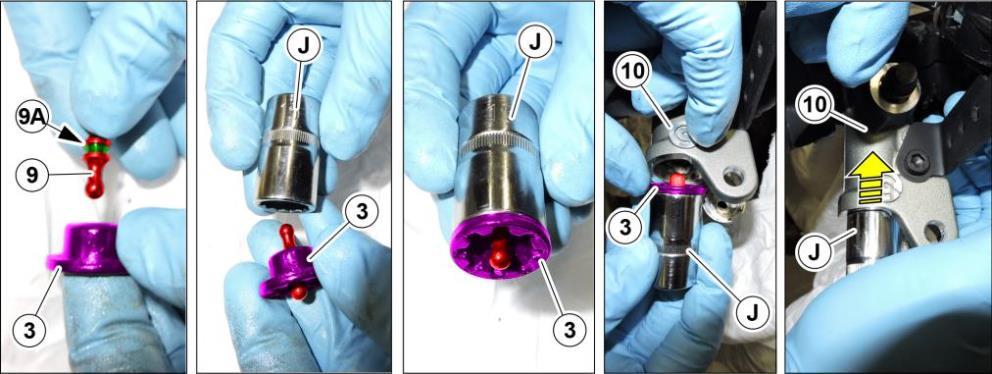
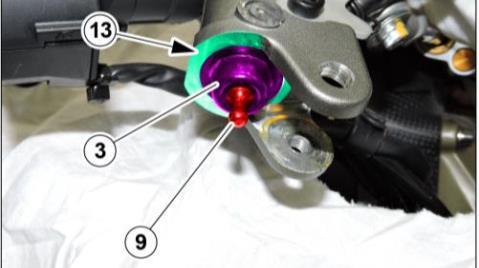
a) Fit the new dust cap (3) on pin (9), aiming it as shown in the figure and bring it in its seat (9A). b) Fit the new dust cap (3) on a 15 mm socket (J). c) Fit the new dust cap (3) bringing it fully home on brake master cylinder (10), pressing the 15 mm socket (J) on the master cylinder.
d) The new dust cap (3) is properly installed if it is flush with the machined surface (13) of the brake master cylinder.
|
||
| NOTE | SCRAMBLER CAFE RACER ONLY |  |
|
a) Fit the new dust cap (3) on pin (9), aiming it as shown in the figure and inserting it from the most worn side (9A), bring it in its seat (9B). b) Fit the new dust cap (3) on the 15 mm socket (J). c) Fit the new dust cap (3) bringing it fully home on brake master cylinder (10), pressing the 15mm socket (J) on the master cylinder. d) The new dust cap (3) is properly installed if it is flush with the machined surface (12) of the brake master cylinder (10).
|
||
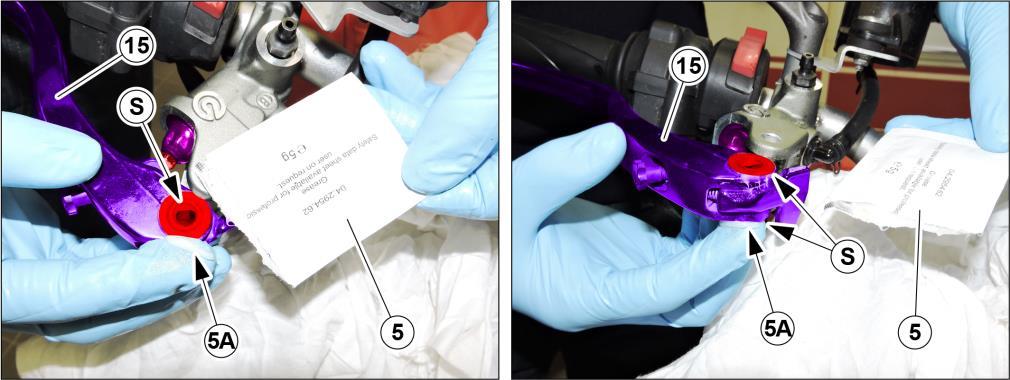
27) Smear white grease (5A) on the upper and lower side (S) of brake lever (15).
28) Fit the brake lever (15) to the brake master cylinder.
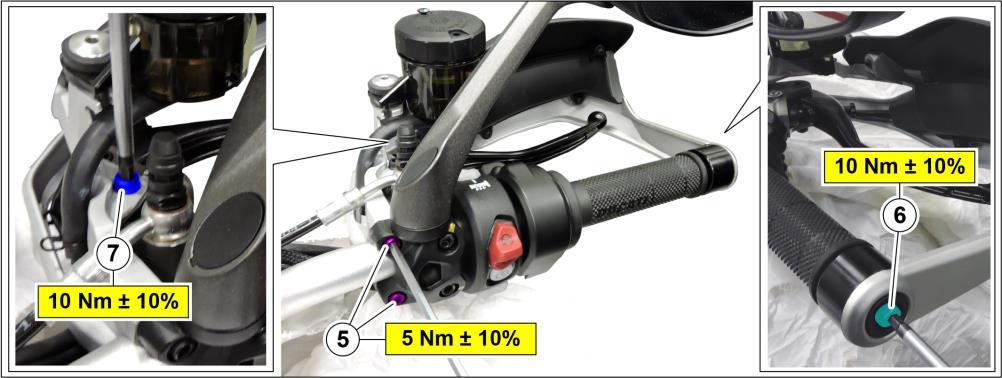
29) Snug and tighten pin (17) to 6 Nm ± 10%, using a torque wrench (G).
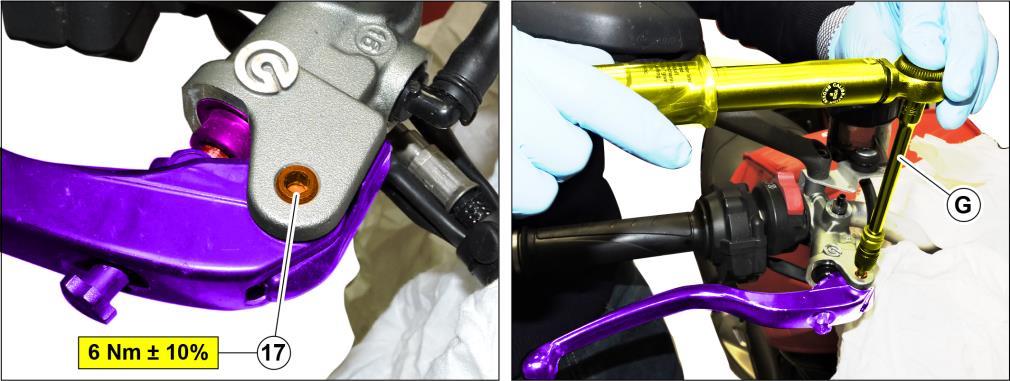
30) Snug and tighten nut (16) to 6 Nm ± 10%, using a torque wrench (H) while holding the pin (17) on the opposite side.
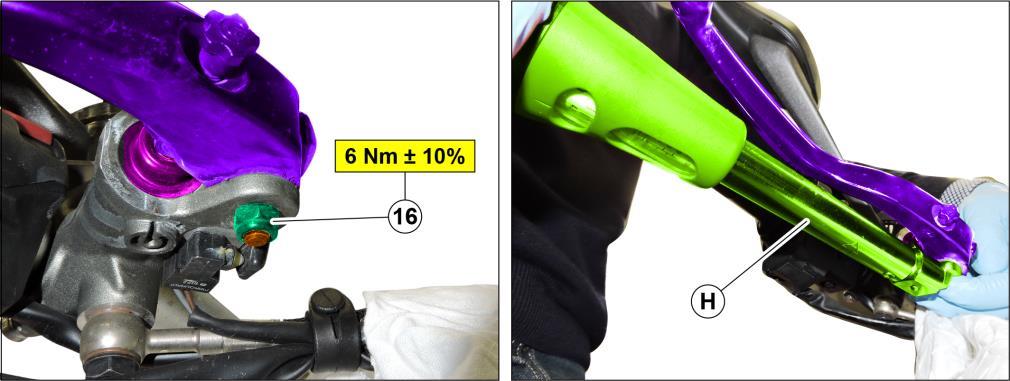
| NOTE | MULTISTRADA ONLY | |
|
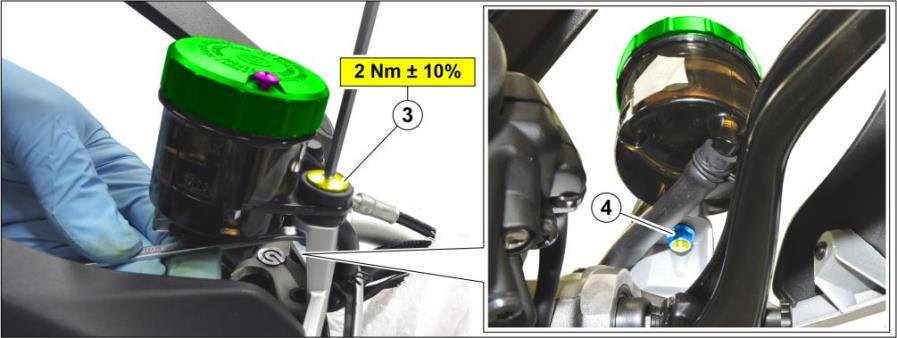
a) Refit the RH hand guard and start the 2 screws M5x18 (5), screw M6x55 (6), screw M6x18 (7). Tighten screws to the torque specified in the figure.
b) Refit the reservoir and start the special screw M5 (3). c) On the opposite side, tighten nut M5 (4) on special screw M5 (3) thread. d) Tighten the special screw (3) to a torque of 2 Nm ± 10%, while holding the nut (4), on the opposite side.
|
||
31) Fill the reservoir until maximum level using new DOT 4 brake fluid.
32) Fit wrench (B) in the flat on bleeder union.
33) Fit cap (N1) of bleeder vessel (N) on bleeder union.
34) Loosen bleeder union and pump with the lever (15), while progressively filling the reservoir so that the fluid level never goes below the half of the reservoir. Pump using lever (15) until you no longer see air bubbles coming out of the bleeder tube.
35) Tighten the bleeder union to a torque of 14 Nm ± 10% and remove the cap (N1) and wrench (B).
D) Front brake system fluid change
1) Fill the reservoir until maximum level using new DOT 4 brake fluid.
2) Remove the bleeder cap (1) from bleeder union (2) on main front brake caliper (3) (the main front brake caliper is the one featuring 2 unions).
| NOTE | SCRAMBLER CAFE RACER ONLY |  |
| The model Scrambler Cafè Racer is equipped with just one front brake caliper M4.32, so this step should be carried out just once, on the front brake caliper installed on the LH side. | ||
3) Fit wrench (B) in the flat on bleeder union (2).
4) Fit cap (4) of bleeder vessel on bleeder union.
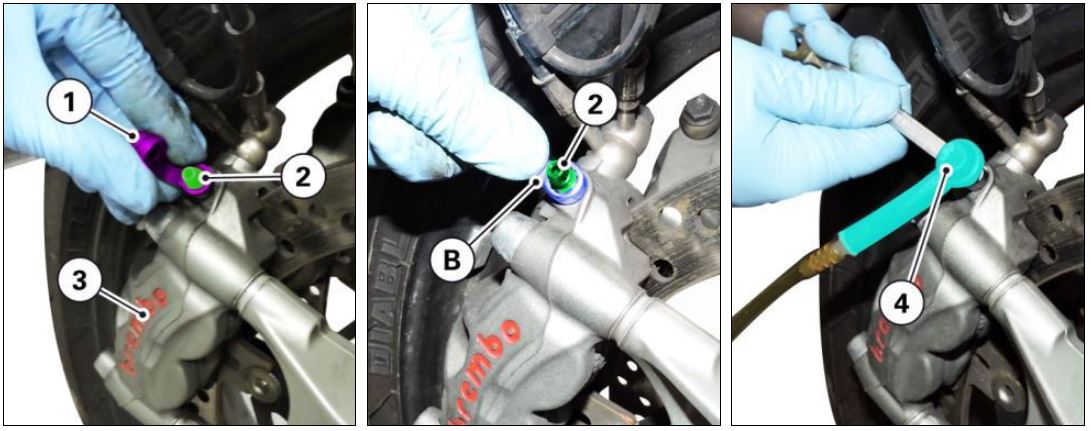
5) Loosen bleeder union (2) and pump with the front brake lever, while progressively filling the reservoir so that the fluid level never goes below the half of the reservoir.
6) Pump using the front brake lever (15) until you see the new DOT 4 brake fluid coming out of the bleeder tube, or until draining a quantity of fluid equivalent to the reservoir content.
7) Tighten the bleeder union (2) on main front brake caliper to a torque of 10 Nm and remove the cap (4) and wrench (B).
8) Remove the bleeder cap (6) from bleeder union (7) on secondary front brake caliper (8) (the secondary front brake caliper is the one featuring 1 union).
9) Fit wrench (B) in the flat on bleeder union (7).
10) Fit cap (4) of bleeder vessel on bleeder union (7).
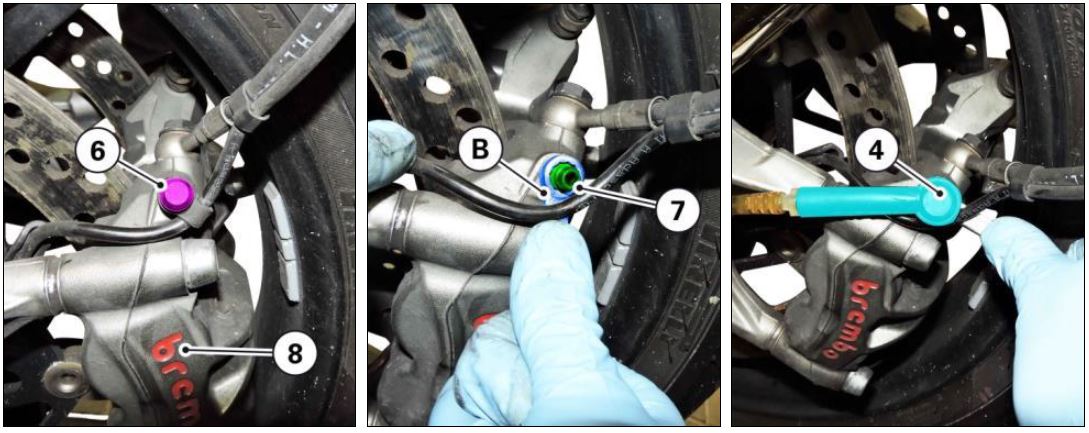
11) Loosen bleeder union (7) and pump with the front brake lever (15), while progressively filling the reservoir so that the fluid level never goes below the half of the reservoir.
12) Pump using the front brake lever (15) until you see the new DOT 4 brake fluid coming out of the bleeder tube, or until draining a quantity of fluid equivalent to the reservoir content.

13) Tighten the bleeder union (7) on secondary front brake caliper to a torque of 10 Nm and remove the cap (4) and wrench (B).
14) Install both bleeder caps to the bleeder unions.
E) Restoring the proper brake fluid level in the reservoir
| ATTENTION |
| In case of worn pads, excessively filling the brake fluid reservoir could result in amalfunction of the brake system. |
1) Top up the reservoir using new DOT 4 brake fluid until reaching the reference arrow (I).
2) Flush diaphragm (27) and cover (10) with abundant WATER and dry with compressed air.
3) Install diaphragm (27) inside cover (10).
4) Install cover (10) on brake fluid reservoir, start the no. 2 screws M4x45 (9) and tighten them to the indicated torque.
5) Install bleed cap (13) to bleeder union (14).
| NOTE | XDIAVEL S ONLY |  |
|
a) Top up the reservoir using new DOT 4 brake fluid until reaching the level previously measured with gauge (V).
b) Flush diaphragm (4) and cover (2) with abundant WATER and dry with compressed air. c) Install diaphragm (4) inside cover (2). d) Install cover (2) on brake fluid reservoir and start the no. 2 screws M4x15 (1). e) Tighten the 2 screws M4x15 (1) to the torque specified in the figure.
|
||
F) Final test with the elastic band
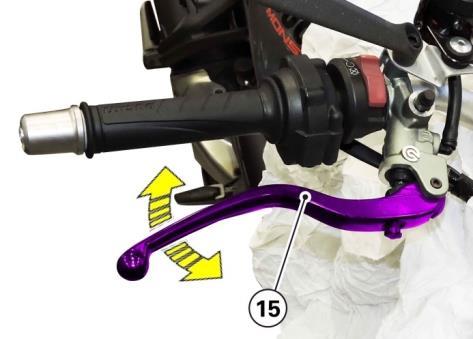
1) Install elastic band (7) to the throttle twistgrip so as to keep the brake lever (15) pulled.
2) Apply some adhesive tape (I) at the point where brake lever (15) bends. Mark the centre of the adhesive tape (I) with a reference mark (I1) as shown in the figure.
3) Use a gauge (V) to measure the distance from the throttle twist grip to the reference mark (I1) as shown in the figure.
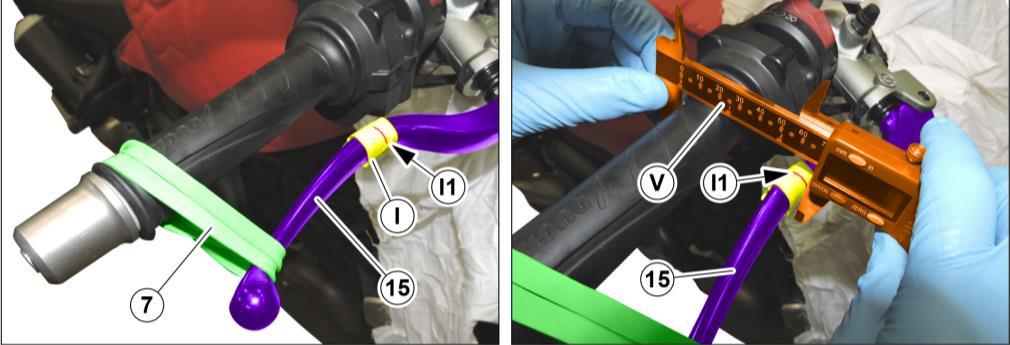
4) Wait 10 minutes and take a new measurement.
5) If the measured value is the same as the one previously measured the procedure for replacing the floating piston was performed correctly;
| NOTE |
| After the 10 minutes of this test, a decrease of 3 mm of the measured value is allowed. |
| NOTE |
| It might occur that the elastic band slightly loses its preload: it is acceptable to read a higher value than initially measured! |
6) If the measured value is 3 mm lower than the previously measured value, maybe the procedure for replacing the floating piston was not performed correctly and it will be necessary to repeat it.
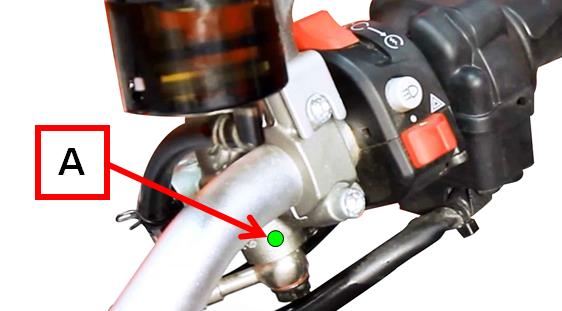
G) Certification of update successfully implemented
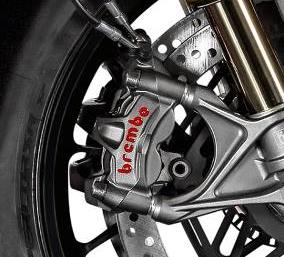
After this service, use a green permanent marker to mark successful completion of the service, draw a clearly visible dot (A) in the area indicated in the picture below:
Spare Parts:
The part numbers of the components required for this update depending on the specific model are listed below:
| Part no. | Description | Image | Note |
|---|---|---|---|
| 61041881A | KIT containing the aluminum floating piston, diameter 16 mm | 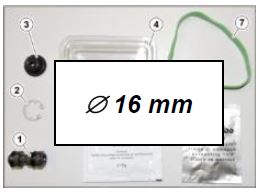 |
Models with 2 calipers M50 of the front brake |
| 61041891A | KIT containing the aluminum floating piston, diameter 15 mm | 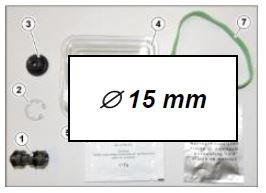 |
Models with 1 caliper M4.32 of the front brakeONLY for Scrambler Cafè Racer |
Warranty time allowance and reimbursement procedure:
Reimbursement for work associated with this Safety Recall Campaign will be done through the regular warranty claim procedure using the Campaigns section of the DCS; this campaign is identified as CR144.
You will be reimbursed:
-
- for 54 minutes of labour time (9 labour units) that includes the time necessary for:
- changing the PPS floating piston of the Brembo front brake radial master cylinder and its final test with the elastic band – 36 minutes;
- changing the brake fluid in the front brake system (with no ABS activation) – 6 minutes;
- bike reception, filling out the warranty claim and compensation of the cost for the brake fluid necessary to carry out the operation – 12 minutes.
- the required spare part depending on the specific model (61041881A or 61041891A).
- for 54 minutes of labour time (9 labour units) that includes the time necessary for:
The Warranty Claim is pre-filled and 2 types of repair are available, described in the table:
- REPAIR TYPE 1 – Changing the PPS floating piston of the Brembo front brake radial master cylinder, diameter 16 mm:
| Spare Parts | Labour | |
|---|---|---|
| Repair TYPE 1 | part no. 61041881AKIT containing the aluminum floating piston, diameter 16 mm | 54 minutes (9 labour unit) |
2) REPAIR TYPE 2 – Changing the PPS floating piston of the Brembo front brake radial master cylinder, diameter 15 mm:
| Spare Parts | Labour | |
|---|---|---|
| Repair TYPE 2 | part no. 61041891A
KIT containing the aluminum floating piston, diameter 15 mm (For Scrambler Cafè Racer ONLY) |
54 minutes (9 labour unit) |
Warranty Claims that do not conform to the 2 types of repair described in the table may result in charge- back to the dealer during periodic Warranty Audits.
Customer Notification:
Ducati North America, Inc. will notify all known owners of affected vehicles directly by First Class mail. Customers will then contact you to make an appointment for the update. A sample copy of the owner notification letter is enclosed for your information.
Please be reminded that all motorcycles in your inventory, and to be delivered to Customers, must be updated during pre-delivery operations, and ALWAYS before delivery to the final Customer. For retailed units, the update must be performed upon the motorcycles’ arrival for service or repairs.
Campaign authorization:
Ducati North America, Inc. will mail a notification letter to all known owners. If a customer does not present this notification letter, it is important that you confirm the eligibility for recall status on the DCS before you commence work. Reimbursement requests for duplicate recall campaign repairs will not be accepted.
Dealer obligation:
This program is designed to complete the necessary repairs and to achieve owner satisfaction. Therefore, we ask you to take prompt and courteous action in accordance with these directives. Please provide a copy of this communication to every person in your dealership who has recall-related responsibilities.
Thank you for your cooperation.
Service Department
Ducati North America, Inc.
Brembo Front Brake Master Cylinder
Recall Bulletin SRV-RCL-18-001
Sample of Customer Letter
IMPORTANT SAFETY RECALL
This notice applies to your vehicle: VIN
Date
Name
Address
City, St, Zip
| Subject: | Ducati Motorcycle: |
| Model Year 2017-2018 Scrambler Café Racer | |
| Model Year 2015-2017 Multistrada 1200 S/Pikes Peak | |
| Model Year 2018 Multistrada 1260 S/Pikes Peak | |
| Model Year 2015-2018 Monster 1200 S/R | |
| Model Year 2016-2018 XDiavel S | |
| Model Year 2015 – 2017 Panigale R | |
| Model Year 2015-2017 1299 Panigale STD/S/ S Anniversario | |
| Model Year 2017 1299 Superleggera | |
| Model Year 2018 1299 Panigale R Final Edition |
NHTSA Campaign I.D. Number: 17V-812
Transport Canada Safety Recall I.D. Number: 2017-637
Dealer Bulletin: SRV-RCL-18-001
Dear Ducati Owner,
This notice is sent to you in accordance with the U.S. National Traffic and Motor Vehicle Safety Act & Canada Motor Vehicle Safety Act.
Ducati Motor Holding S.P.A. has determined that a defect which relates to motor vehicle safety exists in the above listed model year 2015-2018 motorcycles. Our records indicate that you are the owner of a Ducati motorcycle affected by this safety recall campaign. Please take the time to read this letter and help us take the appropriate steps to ensure that your vehicle is operating properly.
What is wrong?
Ongoing quality testing on the motorcycles as manufactured, as well as analysis of field reports, has identified a potential safety issue affecting certain Model Year 2015-2018 motorcycles. Ducati has determined that on certain motorcycles, a crack within the polyphenilene sulphide (PPS) piston of the front brake master cylinder could occur. This could prevent the master cylinder from generating sufficient hydraulic pressure, which could lead to a loss of front braking capability and effective braking/stopping distances may be jeopardized. These conditions could increase the risk of a crash causing injury and/or damage to property. Please note, demanding conditions such as race track use, frequent ABS interventions, or vehicle tip-over may compound and further induce failure. The rear brake is not affected by the problem.
What will Ducati do?
To correct this condition, your authorized Ducati dealer will replace the PPS piston with one made from aluminum. The Dealer will perform this intervention at no cost to you for parts and labor. We request that you contact your authorized Ducati dealer and schedule an appointment, so that the required service can be performed without delay. You can ride your motorcycle to your Ducati Service Dealership, but we recommend you ride at moderate speed and maintain the proper safety distance from vehicles. Please note that it is always possible to use the rear brake to stop the motorcycle. To locate your nearest authorized Ducati dealer, please visit www.ducati.com, or www.canada.ducati.com , and select the “dealer locator” or you may call toll free from the U.S. 1-800-231-6696. Your dealer can complete the required service in less than two hours, if you have an appointment. Additional time may be required.
Federal regulations require that any lessor receiving this recall notice must forward a copy of this notice to the lessee within ten days.
Service Problem Help:
If you believe that your dealer has failed or is unable to perform the service within a reasonable period of time, please write to:
Ducati North America,
Inc. Attn: Customer Service
448 E. Middlefield Road
Mountain View, CA 94043 USA
If you still cannot obtain satisfaction, you may file a complaint with:
For USA Customers:
National Highway Traffic Safety Administration
1200 New Jersey Avenue, SE
Washington, D.C. 20590
Or call toll-free hotline at 1-888-327-4236 (TTY 1- 800-424-9153), or go to HTTP://WWW.SAFERCAR.GOV.
For Canadian customers:
Please contact Ducati customer service at 1-888-391-5446 or for additional information about the recall you can contact Transport Canada at 1-800-333-0510.
Service Problem Help:
If you believe that your dealer has failed or is unable to perform the service within a reasonable period of time, please write to:
Ducati Canada
777 Bayly Street West
Ajax, ON, Canada
L1S 7G7
TREADACT CUSTOMER REIMBURSEMENT PLAN
If you have paid for the repair described in the attached letter, and you would like to be considered for reimbursement, please contact your authorized Ducati dealer. Expenses from repair facilities outside of the authorized Ducati dealer network will be considered; however, the procedure must meet Ducati North America’s standards.
Your authorized Ducati retailer will request a copy of your owner notification letter, as well as, a copy of your previously paid invoice. They’ll inspect the vehicle, if still in your possession, prior to submitting a claim on your behalf to Ducati North America, Inc. for reimbursement.
Please note the following:
Only a repair involving this safety recall campaign is reimbursable. Ducati North America, Inc will not reimburse consequential expenses such as towing, rental, accommodations, and damage repairs.
We recommend that your authorized Ducati dealer be your primary contact on this issue. We anticipate that your authorized Ducati dealer will be able to answer any questions that you may have regarding your qualifications for reimbursement of a previous repair; additionally, our Customer Relations Dept. may be contacted at 408-253-0499 for any special assistance required.
We regret any inconvenience to you from this action; however, your safety and satisfaction are important to us. We request that you bring your Ducati motorcycle to your nearest authorized Ducati dealer at your earliest convenience. Thank you for riding Ducati.
Sincerely,
Ducati North America Service Department
https://static.nhtsa.gov/odi/rcl/2017/RCSB-17V812-2711.pdf
 Loading...
https://static.nhtsa.gov/odi/rcl/2017/RCAK-17V812-5438.pdf
Loading...
- High quality blend of polyethylene glycol ethers and additives
- Compatible with all brake system rubber components and other brake fluids
- Prevents seal hardening or softening
- Protects against rust and corrosion
- Provides excellent lubricity
- High compatibility. Use with or direct replacement for DOT 3, DOT 4, and DOT 5. 1
- Extended Service Interval (ESI): Lasts 100 percent longer than DOT 3, 50 percent longer than DOT 4, and 10 percent longer than DOT 5. 1
- Exceeds all DOT 3, DOT 4, and DOT 5. 1 standards
- Wet boiling point ~ 365 DegreeF/Viscosity at -40 DegreeC ~ 685mm2/s
- Standard brake fluid has a recommended change interval of 2 years. The recommended change interval for Bosch ESI6 is 3 years.

- Provides an extra margin of safety in extreme braking conditions
- Mix of polyglycol ethers ensures hot brake-system operation will not create dangerous vapor
- Excellent for ABS, disc and drum brake systems
- Delivers braking power when needed by avoiding a spongy pedal
- Both wet and dry boiling points exceed the minimum government standards

- The 336⁰F wet boil point and 521⁰F dry boil point exceeds common characteristics for DOT 4 brake fluids
- Provides corrosion protection in brake components
- Matches needs of all DOT 4 manufacturer recommendations
- Compatible with all DOT 3 and DOT 4 applications

- Synthetic quality brake fluid
- Contains special ingredients to guard against vapor lock and moisture absorption
- Exceeds requirements for both DOT 3 and DOT 4 brake fluids
- Specially formulated for DOT 4 brake fluid applications
- Designed for use in disc, drum and ABS brake systems

- Premium brake and hydraulic clutch fluid that protects internal components from corrosion under normal use
- High boiling point to minimize brake fluid boiling and vapor lock
- Excellent low temperature capability and stability when used where lower cold viscosities are required
- Excellent low temperature capability and stability when used where lower cold viscosities are required

- Premium DOT 3 Brake Fluid has a minimum boiling point of 450°F
- Meets and exceeds DOT 3 and all other Federal and SAE specifications and standards for motor vehicle brake fluids
- Mixes with all DOT 3 approved brake fluids
- Designed for use in disc, drum and ABS brake systems
- Helps provide protection against brake failure from vapor lock
- Helps prevent corrosion in brake system
- Works with all brake system requiring DOT 3 fluids
- Exceeds federal motor vehicle safety standard No. 116
- Meets SAE spec. J1703.
- Minimal decrease of boiling point due to excellent water locking properties
- Non-foaming when filling and bleeding the brake system
- Excellent corrosion protection due to selected additives
- High safety tolerance against steam bubbles
- Makes brake fluid changing intervals of up to 3 years possible
Last update on 2024-06-11 / Affiliate links / Images from Amazon Product Advertising API
This product presentation was made with AAWP plugin.