
| “This site contains affiliate links for which OEMDTC may be compensated” |
NHTSA Campaign Number: 18E088
Manufacturer AXN Heavy Duty LLC
Components SUSPENSION
Potential Number of Units Affected 1,569
Wheel End Separation from Axle
If the wheel end separates from the axle, it can increase the risk of a crash.
Summary
AXN Heavy Duty LLC (AXN) is recalling certain Trailer Axles. The wheel end nut locking device on these trailers may not be properly installed, allowing the wheel end to separate from the axle.
Remedy
AXN has notified the trailer manufacturers that purchased the axles, and dealers for those manufacturers will inspect the locking clip to ensure its proper installation, correcting it as necessary, free of charge. The recall began on August 29, 2018. Owners may contact AXN customer service at 1-502-882-9122.
Notes
Owners may also contact the National Highway Traffic Safety Administration Vehicle Safety Hotline at 1-888-327-4236 (TTY 1-800-424-9153), or go to www.safercar.gov.
Pro-Torq Inspection Procedure
ACTION PLAN: Pro-Torq Retaining Clip (Keeper) Inspection
August 29, 2018 RevC
SAFETY STATEMENT
Always consult with your Certified Safety Administrator prior to any Inspections or Procedures.
AXN Heavy Duty, LLC shall not be held liable for any actions or damage incurred during Inspections or Procedures.
REQUIRED INSPECTION PROCEDURE:
- Remove Hub Cap and discard gasket.
- Visually verify presence of Pro-Torq Retaining Clip (Keeper) (see Figure 1).
- Verify the mating teeth are engaged and the keeper tab and keeper arms are fully seated into the undercut groove in the Pro-Torq Wheel Nut (Figure 1). If all of these conditions are NOT met, see CORRECTIVE ACTIONS
#1 – CORRECTIVE ACTION – if Pro-Torq Keeper is present and mating teeth are engaged properly, but a keeper arm does NOT seem to be engaged in groove:
|
#2 – CORRECTIVE ACTION – if Pro-Torq Keeper is missing or mating teeth are NOT engaged:
|
Figure 1: Pro-Torq Wheel-end Nut and Retaining clip Proper Installation
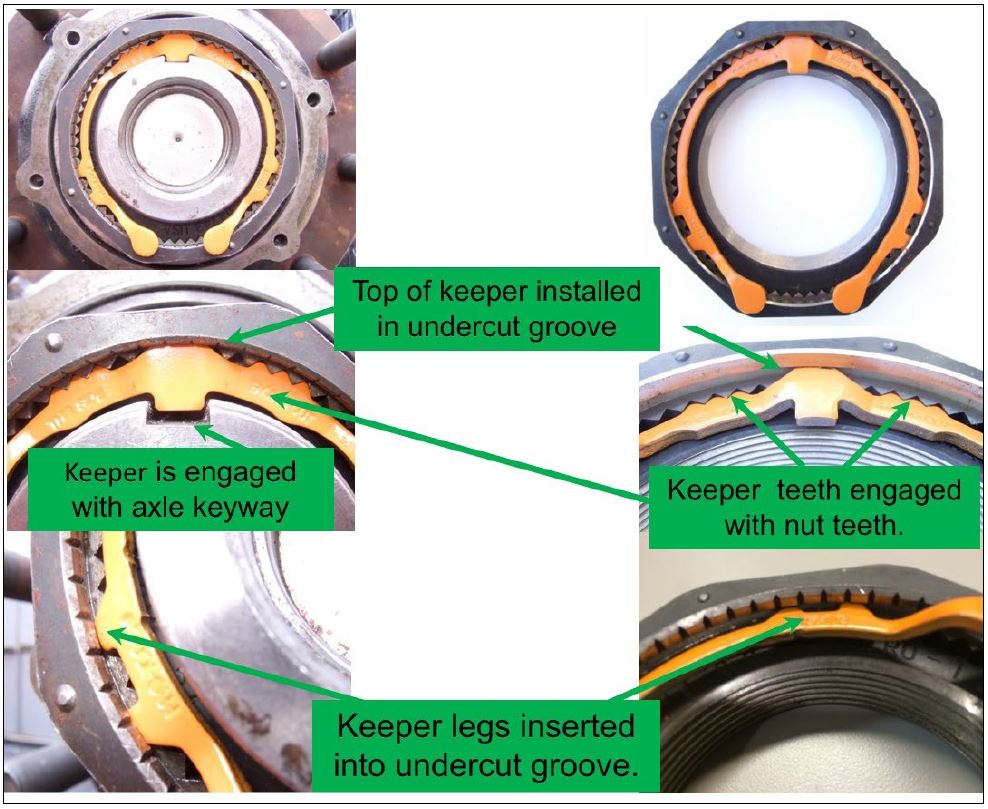
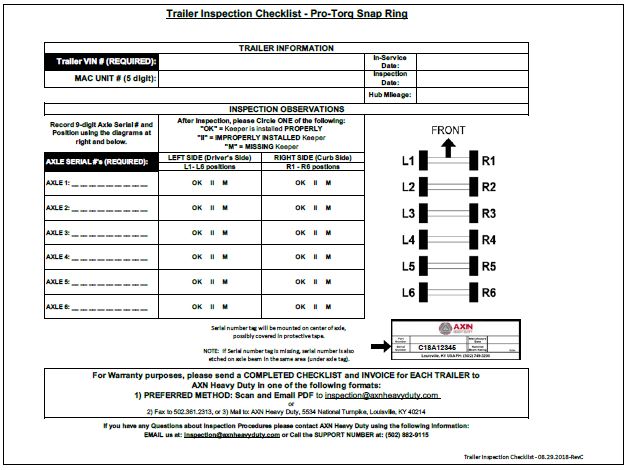
Figure 2: Trailer Inspection Checklist
STEMCO PRO-Torq Instructions
Step 1: Remove the Keeper from the nut
Use a small screwdriver to carefully pry the keeper arm from the undercut groove on each side until the keeper is released.
Step 2:
Thread the nut onto the axle until hand tight against the bearing
Step 3: Seat the Bearing
With hub/drum only:
Using a torque wrench:
A.
(1) Tighten the Nut to 200 ft-lbs. Spin the wheel at least one full rotation.
(2) Tighten the Nut to 200 ft-lbs. Spin the wheel at least one full rotation.
(3) Tighten the nut to 200 ft-lbs. B. Back the nut off until it is loose.
B. Back the nut off until it is loose.
With hub/drum/wheels:
A. Tighten the nut to 200 ft-lbs while the wheel is rotating.
B. Back the nut off until it is loose.
Step 4: Adjust the Bearing
With hub/drum only:
Using a torque wrench:
A.
(1) Tighten the Nut to 100 ft-lbs. Spin the wheel at least one full rotation.
(2) Tighten the Nut to 100 ft-lbs. Spin the wheel at least one full rotation.
(3) Tighten the nut to 100 ft-lbs.
B. Back the nut off one raised face mark.
With hub/drum/wheels:
Using a torque wrench:
A. Tighten the nut to 100 ft-lbs while the wheel is rotating.
B. Back the nut off one raised face mark.
WARNING! Failure to follow this instruction could cause the wheel to come off and cause bodily injury. Failure to back off the nut will cause the bearing to run hot and be damaged.
Step 5: Install the Keeper
ORANGE SIDE FACING OUT
A. Insert the keeper tab into the undercut groove of the nut and engage the keyway tang in the axle keyway. Insert keeper tab with the orange side facing out.
B. Engage the mating teeth.
C. Compress and insert the keeper arms, one at a time, into the undercut groove with a small screwdriver.
NOTE: Recommended practice is to replace the keeper each time the Pro-Torq nut assembly is removed for maintenance purposes.
Step 6:
If the inner tang does not line up with the keyway, back the nut off slightly until it does. Using a small screwdriver, compress and insert the keeper arms, one at a time, into the undercut groove. The orange painted side of the keeper must be facing out
Step 7:
Failure to follow this instruction could cause the wheel to come off and cause bodily injury. Make sure that the keeper tab and keeper arms are fully seated into the undercut groove.
Step 8:
Inspect keyway tang to ensure it does not contact the bottom of the keyway. If contact exists, immediately notify your PRO-TORQ® representative.
Step 9: Acceptable End Play
The dial indicator should be attached to the hub or brake drum with its magnetic base. Adjust the dial indicator so that its plunger is against the end of the spindle with its line of action approximately parallel to the axis of the spindle.
Grasp the wheel or hub assembly at the 3 o’clock and 9 o’clock positions. Push and pull the wheel-end assembly in and out while oscillating the wheel approximately 45 degrees. Stop oscillating the hub so that the dial indicator tip is in the same position as it was before oscillation began. Read the bearing end-play as the total indicator movement.
*Acceptable end-play is .001” – .005”
Please refer to TMC RP 618A “Wheel Bearing Adjustment Procedures”
Agreement for Allowable Standard Repair Times (SRT) for Pro-Torq Inspection Program
The following Terms of Service are effective August 29, 2018:
| BETWEEN: | Owner, Operator, Dealer, Repair Facility (Service Provider) performing the Inspection Procedures |
| AND: | AXN Heavy Duty (Company) 5534 National Turnpike Louisville, KY 40214 |
BILLING AGREEMENT for SRT:
Service Provider is prepared to provide the following professional services to Company.
- A qualified Service Provider will have to precisely follow the INSPECTION PROCEDURE – Pro-Torq Retaining Clips-RevC.pdf.
- For the Inspection Procedure, the Service Provider will charge the allowable rate of:
- Service Provider will fill in all fields on the Trailer Inspection Checklist.pdf and then submit to AXN per the instructions on the checklist, along with the final Service Provider Repair Invoice.
- Bills are payable by Company to Service Provider within 30 days of the receipt date of Invoice.
- Any Questions, or Repairs or Fees OUTSIDE of the scope of Inspection Procedures will need to be discussed with AXN Heavy Duty by emailing inspection@axnheavyduty.com or calling the Support Number at (502) 882-9115.
AXN Heavy Duty
inspection@axnheavyduty.com
502.882.9122
ACTION PLAN: Pro-Torq Retaining Clip (Keeper) Inspection
August 29, 2018 RevC
https://static.nhtsa.gov/odi/rcl/2018/RCRIT-18E088-2590.pdf
 Loading...
Trailer Inspection Checklist – Pro-Torq Snap Ring
08.29.2018-RevC
https://static.nhtsa.gov/odi/rcl/2018/RCRIT-18E088-9275.pdf
Loading...
Agreement for Allowable Standard Repair Times (SRT) for Pro-Torq Inspection Program
https://static.nhtsa.gov/odi/rcl/2018/RMRP-18E088-5687.pdf
Loading...
Manufacturer Notice
https://static.nhtsa.gov/odi/rcl/2018/RCMN-18E088-5788.pdf
Loading...
Recall Acknowledgement
September 25, 2018
https://static.nhtsa.gov/odi/rcl/2018/RCAK-18E088-5544.pdf
Loading...
| “This site contains affiliate links for which OEMDTC may be compensated” |

- Specs: 3,500 lbs Idler Trailer Axle (Capacity 3.5K), 5 Lug, Tube: 2 3/8"
- High Strength Straight Steel Axle Tube
- Axle comes fully assembled, so all you'll have to do is attach the springs, the U-bolt kits, and the tire and wheel assemblies.
- Underslung - Spring seats are welded to the bottom of the axle, which allows for a lower ride height.
- Trailer Axle Design for use on Light Duty Trailers

- EZ Lube Design Removable rubber plug on the hub cap with easy access to a grease-able zerk fitting Grease your axle without pulling off your whole entire hub
- Internal Wiring System To ensure seamless design Protect brake wires from wear and tear
- High Strength Straight Steel Axle Tube Construction to ensure Even Tire Wear A better highway experience
- Underslung - Axle is welded with spring seats on the bottom Allows for lower ride height For optimal usage, use with double eye springs
- 72" from Hubface to Hubface and 58" Spring Center to Spring Center.
- Springs are 25 1/4" long and 1 3/4" wide
- 4 Leaf Springs
- 2-3/8" Main Tube
- 5 Lug with a 4 1/2" bolt pattern. 1/2 lug studs.
- Capacity: 2000 lbs, Tube:1-3/4 | 5x4.5 Bolt Pattern
- EZ Lube Design: Removable rubber plug on the hub cap with easy access to a grease-able zerk fitting. Grease your axle without pulling off your whole entire hub.
- Internal Wiring System: To ensure seamless design and protect brake wires from wear and tear.
- High Strength Straight Steel Axle Tube Construction: To ensure even tire wear and a better highway experience.
- Underslung - Axle is welded with spring seats on the bottom: Allows for lower ride height. For optimal usage, use with double eye springs.

- All-in-One Bundle: This 3.5K LD Single Axle trailer kit includes everything you need for a quick and easy installation, such as a 3.5k Idler Axle, double eye hanger kit, 4-Leaf Double Eye Springs, and 2 1.75k U-Bolt Kits
- High Strength Construction - The high strength steel axle tube construction ensures a durable and long-lasting performance for small utility trailers, cargo trailers, ATV trailers, and more
- High-Quality Parts - Made with OEM grade trailer axles and suspension, this kit is packed with high-temp axle grease for reliable performance
- Low Ride Height - With an underslung design, the axle is welded with spring seats on the bottom, allowing for a lower ride height and improved stability
- EZ Lube Design - Removable rubber plug allows for easy access to a grease-able zerk fitting, allowing you to grease your axle without having to remove the entire hub

- Underslung Design - Our trailer axle is underslung and Welded with Spring Seats on the Bottom - Provides a lower ride height for easier loading and unloading of your trailer
- EZ Lube Design - These single trailer axle features a removable rubber plug on the hub cap - allows for easy grease access without the need to remove the entire hub, saving you time and hassle
- Light Duty Trailer Axle - Designed for use on light duty trailers, utility, boat, car haulers, ATV, lawn & landscape, motorcycle, BBQ pit, cargo, enclosed, RV trailers and more
- Internal Wiring System - The trailer axle comes with an internal wiring system that protects brake wires from wear and tear, ensuring a seamless design that is perfect for any trailer type
- 5x4.5 Bolt Pattern - The 5 x 4.5 bolt pattern offers compatibility with a wide range of trailer wheels, providing flexibility and convenience for your trailer setup

- 2,000 lbs capacity
- Stub axles can be bolted (hardware not included) or welded to trailer frame
- 45 degree downward starting angle
- Perfect item to easily build your own custom motorcycle trailer
- Read product description below for more detailed information.

- Complete Rockwell American 3,500 lb Idler Axle - Made in the USA
- 3,500 lb Idler Axle Hubs, Bearings, Lugs & Nuts (2 Year MFG Warranty) & (1) 32 oz Johnson Trailer Parts Insulated Mug
- This Axle Comes with a Superior Powder Coated Finish and Posi-Lube Spindles that Provide Continuous Bearing Protection
- 5 Lug on 4.5 Bolt Pattern (other bolt patterns available - Contact Johnson Trailer Parts)
- Replaces Dexter, Al-ko & TK Trailer Axles. This Axle Kit is Available in the Sizes Shown in the 3rd Picture - Search "Johnson Trailer Parts or Rockwell American" in Amazon Search Bar for more Trailer Parts

- Specs: 3,500 lbs Idler Trailer Axle (Capacity 3.5K), 5 Lug, Tube: 2 3/8"
- High Strength Straight Steel Axle Tube
- Axle comes fully assembled, so all you'll have to do is attach the springs, the U-bolt kits, and the tire and wheel assemblies.
- Underslung - Spring seats are welded to the bottom of the axle, which allows for a lower ride height.
- Trailer Axle Design for use on Light Duty Trailers
Last update on 2024-06-11 / Affiliate links / Images from Amazon Product Advertising API
This product presentation was made with AAWP plugin.